Metal Roof Seaming: Best Practices for Ensuring Weathertight Seams

It would seem logical that the most important field installation process for a standing-seam metal roof is the actual process of creating the weathertight seams that connect the metal panels together and ensures the structural integrity of the roof. Perhaps for many different reasons, however, this critical seaming process is not always given the proper attention it deserves, nor are installers given the proper training required to ensure installation runs smoothly. This approach can cause some serious issues, not the least of which is the voiding of a manufacturers warranty or the discovery of roof leaks and the resulting damage.

To help, here are some best practices for readily and successfully carrying out the metal roofing seaming process:
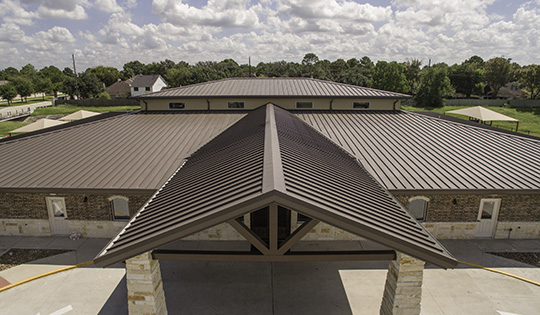
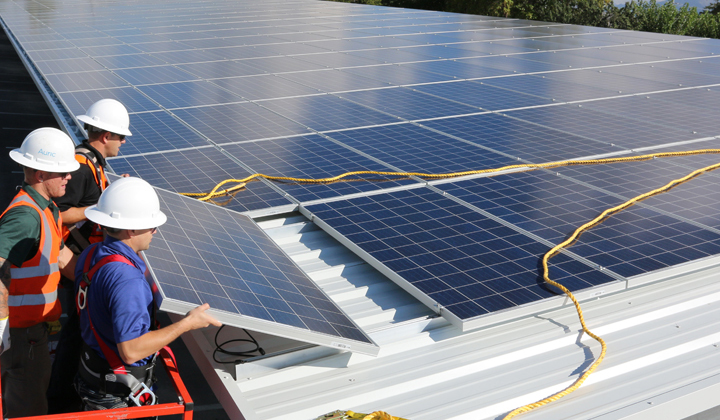
MBCI Blog Image_Seaming_062019_00_in post_reduced

Personnel

Because of the critical nature of seaming metal roofs, the crew members doing this work should be properly trained. Team members who will be performing this work should not perform the seaming without having participated in the appropriate installation training required to ensure the seaming process is appropriately managed. Most roofing manufacturers offer installation training that many installers take advantage of—and this training opportunity should be taken advantage of by the staff who will be doing the seaming.

Seaming Equipment

It is very important that the seaming equipment being used is matched to the specific roof panel system being installed. Manufacturers routinely rent out this equipment in order to be sure that the metal panel profiles are installed properly and are not compromised through the use of generic equipment or that of another manufacturer. Using the wrong equipment can end up being costly for everyone if panels and seams are ruined in the process.

 Hand Crimper

As metal panels are set in place, they are often secured with metal clips, spaced according to engineering and construction needs. Hand crimpers are used to form the seams around the clips as well as any end laps. This process must not be overlooked as improper hand tooling is the number one cause of faulty seaming. To ensure costly mistakes aren’t made, follow the process described in the “Field Seaming Tool Manual”. This manual should be provided with the equipment and reviewed in training.

Electrical Sources

The next step will involve the use of an electric seamer which obviously needs a source of electricity to operate. However, not just any electrical power source will do. Almost all professional seamers have an AC/DC motor that will require 10 or 15 amps and 120 volts. A dedicated electrical circuit—preferably from a temporary electrical pole or an existing building electrical panel—is the best and most reliable way to go. A generator with 15 amp capacity dedicated to be used only for the seamer (in order to avoid power surging) may be acceptable as well. In either case, the power line to the seamer needs to be 10-gauge (minimum) cord. It should also be no more than 200 feet long (to avoid power drop).

Electrical power sources that are NOT acceptable include outlets from a powered man lift or a generator that is not dedicated to only the seamer. (This includes a generator that is part of a welding machine.) Check the manufacturer’s requirements for any other restrictions that can damage the seamer. Skipping this step can place the responsibility for repair or replacement onto the installer.

Electric Seamer

Once all panels are in place, the hand crimping is done and the power source is set. Then, electric seaming takes care of finishing the roofing system. Again, consult the seamer manual for proper procedures, including which direction the seaming should be done. (Seaming can either be done up or down the roof depending on direction of roof installation.) The electric seamer includes a switch for the operator to control the starting and stopping of the process.

On low-slope roofs, the operator should walk alongside the seamer to be sure nothing is in its path and that the seam is done properly. While stopping and re-starting is fine, the seamer should never be removed in the middle of a seam. Doing this makes it very difficult to set it back in exactly the same spot again. If something appears to be wrong with the seamer or the seams being produced, then don’t keep using it. There is no point in damaging multiple roof panels if any one panel indicates that things aren’t going right. In this case, contact the manufacturer right away for assistance or replacement of the seamer.

Safety

Electrical seamers are heavy and—if not used and secured properly—can cause harm or injury. Therefore, they should always be tied off with a safety line—the same type used for workers—not a common rope and definitely not the electrical cord. The safety line should be properly secured to the seamer and then attached to something rigid on the building. Never attach this to a person who could be pulled off of a roof by it.

Cleaning

Before use each day, check the electric seamer and remove any oils, debris or dirt. Make sure the seamer is unplugged from the electrical power source before you begin cleaning. Also, check the grease level in the machine daily and only add a little bit  (2-3 pumps from a grease gun) as needed. Too much will cause the grease to leak out onto the roofing.

Following these pointers should help assure the safe and efficient use of the right seaming equipment when installing roofing panels. To find out more about proper seaming or to schedule training, contact your local MBCI representative.
Installation Techniques for Varying Metal Roofing Fastening Systems

Installation techniques vary greatly depending on the metal roof’s fastening system. For single skin roofing, there are three fastening system options: concealed, exposed and standing seam. Proper execution of the correct installation techniques helps preserve roof structure and longevity.

Exposed Fastened Metal Roof Panel Installation

Exposed-fastened panels are installed over solid substrates or open framing using many screws that are visible from the outside of the structure. Field-applied systems ensure proper fastener alignment and engagement. The spacing of these screws is dictated by:

  • Substrate type
  • Project design loads (up to 12” on center with patterns)
  • Location on the roof (i.e. eaves, rake or ridge)

Roof slopes can vary from ½:12 minimum to 1:12 depending on product profile and building design requirements. Sidelap sealants are field-applied for all panel profiles, and using washers for weathertightness is ideal for this panel application system.

These roofing systems are low cost, easy to install and offer a wide variety of profiles for light applications, including:

  • Commercial
  • Industrial
  • Agricultural
  • Residential

Concealed Fastened Metal Roof Panel Installation

Concealed fastened metal roofing systems feature fixed fasteners hidden by either a snap-over sidelap or—in some cases—a  snap-on batten cap. Installed directly over solid substrates with a waterproof membrane, they require a minimal number of fasteners per panel sidelap or clip. Special tooling is not necessary to snap laps or engage the panel battens.

These panels are typically 16” or less in width and ideal for roofs that have a 3:12 or greater slope. In addition, installation of these panels over conventional or wood-framed structures is possible, making them suitable for the following industries:

  • commercial
  • architectural
  • residential

Standing Seam Metal Roof Panel Installation

Standing seam metal roof panels require application to solid substrates or open framing with concealed mechanical clips available in a variety of stand-off heights. These clips allow space for various insulation thicknesses, depending on the clip height. The design of most clips allows the roof panel to expand or contract independently of the substrate. This feature contributes to the panel durability and longevity as they can adapt to the thermal movement of large roof surfaces.

These panels are ideal for use in the following industries:

  • heavy commercial
  • industrial
  • architectural
  • residential

During installation, it’s important to pay close attention to proper panel alignment and engagement as well as substrate squareness and modularity of the install.  As a result, proper panel seaming is possible via Snap Lok or Mechanical Seaming. Either seaming method, depending on the panel profile, will encompass the panel clip into the panel seam, contributing to the roof system’s ability to expand and contract.

All sidelap sealants for this type of roofing system are factory-installed. In addition, most roof slope applications are ¼:12 and ½:12, but some require 3:12 or greater depending on profile and seam type.

Learn More About Metal Roof Installation Techniques

For more information about these installation techniques, view our in-depth installation materials. Also, feel free to contact our knowledgeable team with any additional metal roof installation questions.

Long-Life Fasteners: A Key Component of a Properly Installed Metal Roof

As the saying goes: “It’s the little things.” While metal roof fasteners may seem like just a minor aspect of a big system—in both cost and size—they are quite literally what holds it all together. In that respect, the fasteners used to attach a metal roof system are a significant part of the roof performance and, in turn, of the whole building. A leak-free roof will save time, money and avoid headaches for contractors, installers, owners and occupants over the long term. After all, if this small, inexpensive part fails, it can result in costly issues down the road. That said, make sure that all exposed fasteners are long-life, which is an important factor for a properly installed metal roof; it will make all the difference.

Why Choose Long-Life Fasteners?

According to a recent study conducted by the Metal Construction Association, a properly installed Galvalume roof can be expected to last upwards of 60 years.

The key phrase in that last sentence is “properly installed.” While the meaning of proper installation will vary based on a number of different factors, such as the roof type, roof geometry and geographic location, there is one common element to any proper roof installation, and that is the use of long-life fasteners at exposed locations.

Fastener life, in fact, is key and should match (or exceed) the life expectancy of the panel where it is being used. Not only that, but with the fasteners being such a critical component to the metal roof’s overall performance, the contractor must be well versed in selecting the right fastener.

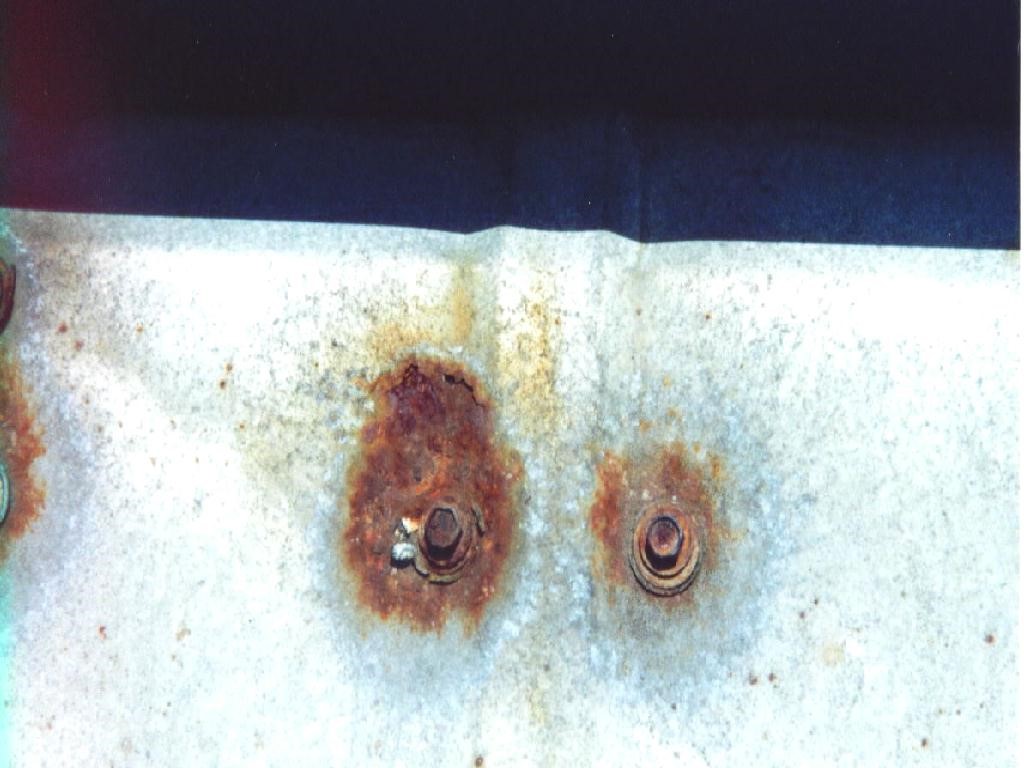
Whether your roof is a through-fastened roof, such as R panel, or a standing seam roof panel, it will have some exposed fasteners. It is imperative that these fasteners be long-life to prevent perforation of the roof panels at the exposed fastener locations. A non-long-life fastener will eventually begin to rust, even if it is painted. This rust “virus” will transfer down to the roof panel and rust a hole in the roof panel.

These fasteners have transferred the rust to the panel and perforated it.

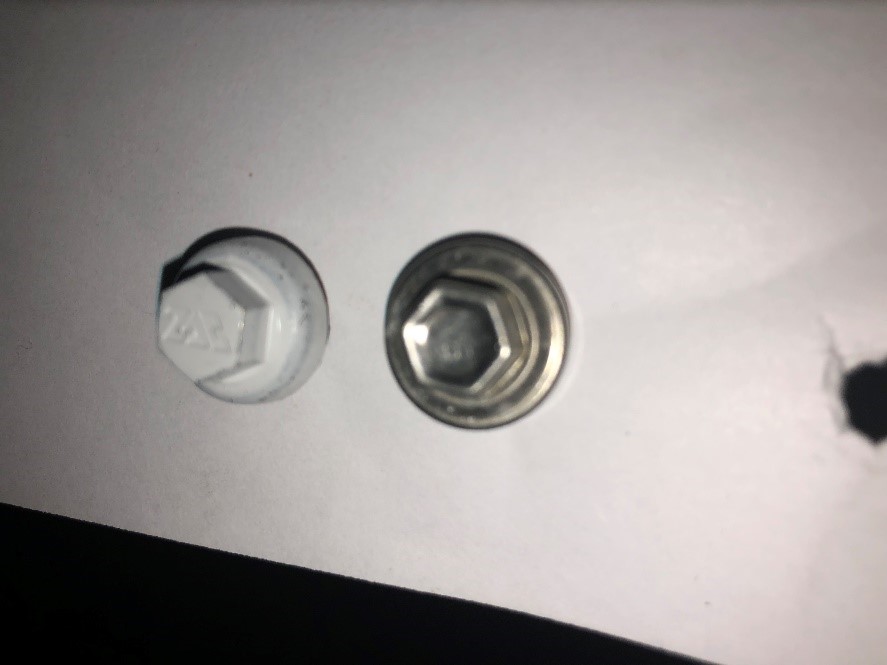
To prevent this from happening to your roof, always specify that long-life fasteners be used in all exposed fastener locations. To ensure that you have long-life fasteners in your roof, perform an inspection. Long-life fasteners for Galvalume coated steel will either be stainless steel, stainless steel capped or have a zinc/aluminum cap.

Long-life fasteners zinc/aluminum capped head (left) and stainless steel capped head (right).

Oftentimes, installers will use long-life fasteners during the roofing process but inadvertently use the wrong fastener at some other locations, perhaps due to fasteners being mixed up in their tool bag.  Other times, the misuse may be due to the need for a different fastener at a specific location.

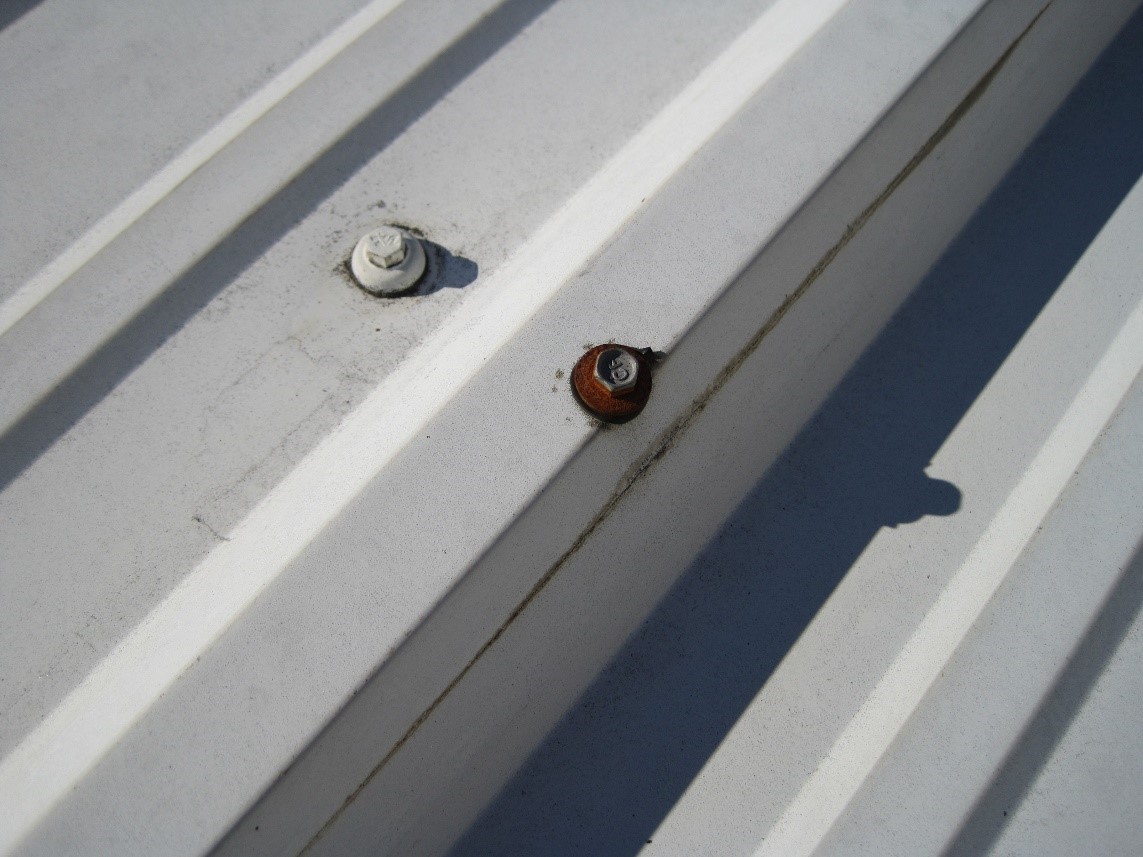
The fastener attaching the panel to the substructure is a long-life fastener. However, the lap fastener, which has a different drill point, is not a long-life fastener.

If non-long-life fasteners are found, they can be replaced with long-life fasteners of the same type. Long-life “oversized” fasteners are available to use in any locations where a fastener may be stripped out. Regardless of the installer’s intent or the fastener’s location, all exposed fasteners should be long-life. Failure to adhere to this could reduce the service life of your roof by 40 or more years.

To help maximize metal roof performance, MBCI’s long-life metal building fasteners are manufactured to work seamlessly with our metal panels and improve the installation process. For more information, refer to MBCI’s fastener catalog at www.mbci.com.

How Metal Panels Support Eco-Friendly Building Practices

The eternal struggle for contractors: to go green or not green? Profit or purpose? The good news is that with metal panels, eco-friendly building is not only possible but profitable, making the choice a no-brainer. Today’s metal panel systems look great and prove to be incredibly sustainable, enabling homeowners and contractors to reap the benefits of going green.

In fact, in today’s building and design market, increasing energy efficiency while reducing energy and maintenance costs are key drivers for a building design’s overall success. The metal panel market offers a number of products to support sustainability efforts, including recyclable metal roof and wall panels and energy-efficient insulated metal panels. Here we’ll take a look at a few of the key ways in which metal buildings and metal building components support enviro-friendly building.

Longer Lifespans

The documented longer lifespans of metal roofing systems (they can last 40 to 50 years) mean lower instances of re-roofing and repair jobs, thereby reducing energy required from such actions as manufacturing of parts, shipping or even energy expended by crews traveling to and from a jobsite.

Recyclability

Every piece of metal scrap can be recycled. That statement speaks for itself but from an economic standpoint, that equates to reduced jobsite costs since there’s no need to cart away or dispose of unused wood or masonry materials.

Energy Efficiency

According to data from ENERGY STAR, heating and cooling can account for up to 50% or more of a home’s total utility consumption. The use of metal roofing can help with energy efficiency through solar radiation reflection such as with unpainted metal and by increased re-emittance of solar radiation with pre-painted or granular coating metal roofing systems.

Salt Lake Stadium

As one example, cool metal roofs use coatings with known radiative properties that are specified in order to keep the roof surface temperature lower than it would have been with uncoated or traditional roofing materials during peak sun times.

Sustainability Certification

Metal building materials can be used to help contribute to earning USGBC LEED credits through a number of ways based on the latest LEED v4 categories and criteria, including sustainable sites, energy and atmosphere, materials and resources, and indoor environmental quality.

For these reasons and more, metal panels and components lend themselves to the best that sustainable building has to offer, protecting the earth and protecting the bottom line. Visit us at mbci.com to find more resources on how metal building construction can be the smart choice in your next sustainable building project.

Project Services for Metal Buildings and Roofing: Part 2

In our last blog posting, we identified the project services that are available from MBCI and the typical process that contractors for metal buildings and roofing might experience in using them. In this posting, we will take a closer look at why so many contractors are taking advantage of these very helpful services and reaping multiple benefits.

We start by pointing out that, while it hasn’t historically been well-known that these project manager led services are available, things are changing. MBCI in particular has seen a 40 percent increase in service requests in just the past 2 years! The biggest growth has occurred in the areas of custom designs, high-end architectural buildings, and projects that use insulated metal panels (IMPs). Nonetheless, it has been recognized that virtually all types of projects benefit from these services. Therefore, it should come as no surprise that the combined MBCI project management teams are servicing 100 to 150 projects at any one time.Project Services Part 2 March 2019 Blog

While it is hard to pinpoint why this impressive growth is happening in the use of project services, there are some commonly reported advantages such as the following:

Single Point of Contact: By having a designated project manager at the manufacturing company, communication is direct and streamlined. Further, the project manager takes care of everything from start to finish in regards to the metal building or roofing package. That means the contractor is freed up to focus on the site-specific aspects of the installation without needing to worry about managing the process on the manufacturer’s end.

Applicability: The range of building types that have benefitted from these services is all-encompassing, indicating that these services are applicable to virtually any metal building or roofing project. Project service teams are experienced in virtually all types of non-residential construction including commercial, retail, hospitality, institutional, schools, higher education, hospitals, government buildings, and many more.

Regional Expertise: The MBCI project service teams are organized so that they can focus on one of four specific regions of the United States. That means contractors receive attention from people who understand localized concerns.

Assistance During Design: When architects and engineers need some information on using metal building or roofing systems, the project manager can, as a courtesy, assist the contractor in providing design assistance. This includes helping designers become more familiar with metal product offerings and generally to become more informed and up to date on options. There is never an intent to lead the design or move the project in any particular direction.

Price Quotes: This is often the biggest and most noted benefit of working with the project service team. By having a relationship with a manufacturer, accurate quotes can be obtained quickly to allow bid deadlines to be met with a clear understanding of scope and confidence in the numbers.

Engineered Drawings: The ability to provide complete, engineered drawings is a big advantage instead of needing to find a local engineer take on that task.

Detailed Bill of Materials: All of the take-offs and ordering are done right from the information prepared by the project services team. There is no need for the contractor to spend the time on a separate take-off.

Scheduling Flexibility: The project manager can work with the contractor and work out a production, fabrication, and delivery schedule that meets the needs of the project. For large projects, this might mean phasing delivery of different parts of the package to suit the overall project schedule. Overall, projects have been done with coordinated schedules that are as short as 2 months, or phased up to 2-1/2 years.

Full Erection Drawings: Along with the full package of building materials, a full set of erection drawings are provided that serve as a virtual “installation manual” to help streamline the work in the field.

There are certainly other reasons for using these project services, but considering that most contractors don’t have the capabilities to do all of these things in-house, it can be a real time and money saver to take advantage of them from the manufacturer. Once contractors become aware of the availability of these services and the streamlined results, they often sign up for them repeatedly.

To find out more about how to successfully take advantage of these services and work with a project manager, contact your local MBCI representative.
Project Services for Metal Buildings and Roofing: Part 1

When a metal building or metal roofing project is being developed, it all starts with a design by an architect or engineer that may be rather standard, very custom, or somewhere in between. At some point a price for the metal portion of that design is requested from the contractor (i.e. an erector or sub-contractor to a general contractor) and of course that means turning to the metal building or roofing manufacturer for help.  Toward that end, MBCI offers a complete range of project services designed to streamline everything that needs to happen next in order to genuinely make life much easier for the contractor.

Project Services Part

What are these services? Essentially, there are four:

  • Estimating and price quoting services for public or private bids
  • Engineering services for the metal building systems involved
  • Drafting services for creation of shop drawings and erection drawings
  • Overall project management of all of the above plus coordination of production, shipping, and delivery.

The key to the success of these services is the assignment of a project manager who acts as the single point of contact between the contractor and the manufacturer throughout the entire project. Having a relationship with a metal building manufacturer who can assign such a project manager right up front is a huge benefit to the contractor. Here’s how the process might work in a standard project:

Cost Quote: The project manager will use the architectural drawings (submitted by the contractor) to have the project services team generate a lump sum price. That price is limited specifically to the metal building or roofing package with a clear description of what is included and what is not. That allows the contractor to develop the remaining costs for labor and equipment to erect the metal building along with any separate project costs as appropriate.

Detailed Drawings: Assuming the contractor is selected to proceed with the work, then an agreement on full project services can be made. Based on the architectural and/or engineering drawings, the project manager will then arrange for the detailed shop drawings to be prepared (including engineering stamp or seal if needed) so they can be submitted to the architect for review and approval. Note, that this will be a requirement of the manufacturer as well since they will not do take-offs from other people’s drawings for their manufactured systems. The shop drawings will notate all of the required components necessary to install and MBCI will order plus deliver all items required upon request/approval.

Scheduling and Production: Once all of the drawings are approved, then a full production schedule can be prepared with delivery dates identified. The project manager will oversee and coordinate the various people involved to see that things are progressing as planned and intervene as needed if any changes come up from the architect, owner, contractor, or manufacturer.

Delivery and Installation: When ready, the metal building package can be prepared and delivered according to the contractor’s schedule. Full erection drawings will be included which have enough detail that they are a virtual “instruction manual” for putting the building together.

That’s the typical process. In our next blog post, we will discuss the many reasons that contractors are taking advantage of these project services to save them time, money, and hassle. In the meantime, to find out more about how to successfully work together with MBCI, contact your local MBCI representative.
Preventing Roof Damage from Rusted Fasteners

These days, the majority of metal roofs are made from Galvalume coated steel, which typically carry a warranty against perforation due to rusting for a period of 20 years. A study on Galvalume standing seam roofs (SSR) conducted at the behest of the Metal Construction Association (MCA) showed that a properly installed Galvalume SSR can be expected to last 60 years or more.  However, the caveat is “properly installed”. One of the major issues that will drastically reduce the service life of a Galvalume-coated roof is the use of non-long-life fasteners in exposed locations.

Anytime you have an exposed fastener on a metal roof, you risk rust—the term commonly used for the corrosion and oxidation of iron and its alloys. While a little rust might not seem like a big deal, its presence can actually be a harbinger of severe damage to your metal roof panels if not caught early, or ideally, stopped before it ever has a chance to start.

The issue is most prevalent on R-panel roofs due to the use of exposed fasteners. And even with standing seam roofs, which use clips and are typically referred to as a concealed fastener roofs, there are exposed fasteners as well, most often at the eave, the end laps and at trim, such as ridge flash, rake trim, and high-eave trim.

Prevention

The best recommendation for any exposed fasteners (meaning they are exposed to the weather and other harmful elements), is that they should be long-life fasteners. When you don’t use long-life fasteners, they start rusting with exposure to moisture and, over time, the rust virus stretches down to the roof, causing severe and often irreparable damage.

Suppose you have a metal roof that is 10 to 15 years old. Depending on the environment, the roof could be in excellent shape—except for where those screws are; you can have holes right through the roof at the fastener locations. More people than ever are starting to realize they’re supposed to use a long-life fastener, in a case like this. We see a lot of roofs when we inspect them for weathertightness warranties. What often happens is a worker on the roof may have just grabbed some screws that were handy without thinking about the kind of screw or the inevitable chemistry that could potentially cause rusting. Or, you may have a situation where there is some type of accessory put on the roof by another trade, perhaps a plumber or an HVAC installer—and maybe they didn’t use long-life fasteners.

The best recommendation to mitigate this potential problem is two-fold. First, make sure roofing installers know to use a long-life fastener at every exposed location. Secondly, make sure that every other contractor working on the roof that you’re responsible for knows to use long-life fasteners with whatever they’re doing.


Fasteners
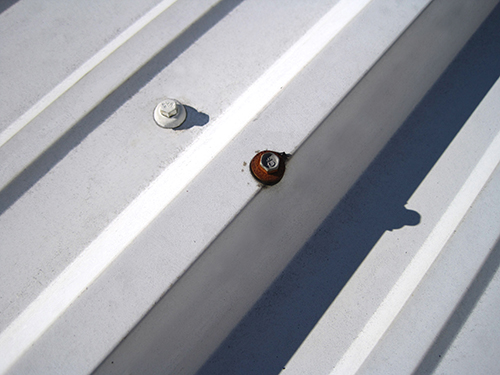
A long-life fastener (left) can withstand the elements and prevent rust buildup longer than other fasteners. A regular fastener (right) will begin to rust upon exposure to moisture.

What if rust does occur?

One question frequently asked is: if the fasteners do become rusty, do you have to replace all the panels? If you catch the problem before the rust virus makes its way down to the roof itself, you can just change out the screws. However, if the rust has compromised the roof, you very likely would have to change out all the panels, at the least everything that has been affected—just because of one little spot. Truthfully, if the rust is in one spot, it’s probably all over.

Another thing worth mentioning is if aluminum panels are used along with typical long-life fasteners, it could still rust, especially if the roof is exposed to salt spray (think close to the coast).  The answer in this case is to use a stainless steel screw, which are long-life fasteners (but not all long-life fasteners are stainless steel).

Be aware from the start.

It’s crucial for installers and contractors to take notice and order the right fasteners from the start so that problems can be avoided.

Also, after some wear and tear, if subsequent work is done on the roof, everyone involved should take note. For instance, you buy a building and somewhere down the road you decide to frame out a small office and add a bathroom. You’d need a water heater, so a plumber goes on the roof, puts in pipe penetration and doesn’t use long-life fasteners. The onus would be on the owner to ensure that everyone performing work on that roof—no matter when—is using long-life fasteners.

Conclusion

The best-case scenario with a metal roof is to get the right fasteners to begin with. However, if the roof is already installed, the next step is to be on the lookout for rust and if you notice it, consider that it might be because of the fastener.

If that’s the case and you catch it early—when it’s just the screws that are rusting but the rust virus hasn’t yet transferred down onto the roof, you can just change out the screws with the proper long-life fasteners. We recommend doing a roof inspection at least once a year. If you see any loose or rusty screws, replace as needed.

For more information on MBCI’s broad selection of metal roof and wall panels, contact your local MBCI representative.

Standard Testing For Metal Roofing – Part 2: Air and Water Resistance

In a prior post, we discussed the importance of independent (i.e. third party) standardized testing as a means of verifying the performance of metal roofing, and specifically looked at structural and wind uplift performance. In this post, we will similarly look at testing standards but focus on metal roofing tested for air leakage and water penetration.

Air Leakage and ASTM E1680

Keeping air from passing through a building system from the exterior to the interior (i.e. drafts) is a fundamental role of any building envelope system, including roofing. It is also important in controlling the flow of harmful airborne moisture into a roof assembly. Hence, testing a roofing panel for its ability to control air leakage is critical to the long-term success of the roofing system, and ultimately, the building.

ASTM E1680 “Standard Test Method for Rate of Air Leakage Through Exterior Metal Roof Panel Systems” is used to determine “the resistance of exterior metal roof panel systems to air infiltration resulting from either positive or negative air pressure differences”. It is a standard procedure for “determining air leakage characteristics under specified air pressure differences”. The test is applicable to the field portion of any roof area including panel side laps and structural connections but not at openings, the roof perimeter, or any other details. The test is also based on constant temperature and humidity conditions across the roofing specimen being tested to eliminate any variation due to those influences.

The standard test procedure consists of “sealing and fixing a test specimen into or against one face of an air chamber, supplying air to or exhausting air from the chamber at the rate required to maintain the specified test pressure difference across the specimen, and measuring the resultant air flow through the specimen”. Basically, the test is meant to reveal the ability of the selected roofing panel to resist the difference in air pressure between the two sides and thus demonstrate its air tightness.

The beauty of this standardized test is that different metal roofing products can be tested under the same conditions and compared. The standard calls for a pressure differential between the two sides of positive and negative 1.57 foot pounds of pressure per square foot of panel (75 paschals of pressure) and can be tested in the negative pressure mode alone if the roof slope is less than 30 degrees from horizontal.

MBCI's metal roofing products are tested to confirm airtightness and water permeability.
MBCI’s metal roofing products are tested to confirm an air tight and water-resistant roof.

Water Penetration and ASTM E1646

In addition to air leakage, water leakage in roofing systems is obviously not desired. To test the performance of metal roofing products in this regard, ASTM E1646 titled “Standard Test Method for Water Penetration of Exterior Metal Roof Panel Systems by Uniform Static Air Pressure Difference” is the norm. This standard laboratory test is not based solely on free running water, but on water “applied to the outdoor face simultaneously with a static air pressure at the outdoor face higher than the pressure at the indoor face, that is, positive pressure”. This pressurized testing is intended to simulate wind-driven rain and flowing water that can build a head as it drains. The test measures the water-resisting properties of the roofing in the field of the roof panels including panel side laps and structural connections. Just like air testing, it does not include leakage at openings, perimeters, or other roofing detail areas.

The test method itself consists of “sealing and fixing the test specimen into or against one face of a test chamber, supplying air to or exhausting air from the chamber at the rate required to maintain the test pressure difference across the specimen, while spraying water onto the outdoor face of the specimen at the required rate and observing any water leakage”. Hence, it requires the air and water to be supplied simultaneously and for the testers to observe and document the rate of water leakage under the test conditions.

The test parameters typically require at least 20 gallons of water per hour (gal/hr) overall with between 4 – 10 gal/hr in any quarter section of the tested specimen, all at specified air pressure differentials. Given that this is a fairly stringent test, it is fair to say that metal roofing that holds up under these test conditions will likely perform well under most weather conditions when installed on a building. Typically, manufacturers have developed metal roofing products with seaming and connection methods that allow them to pass this test with virtually no observable water penetration.

To find out more about the tested results of metal roofing products you may be considering, contact your local MBCI representative or see the MBCI website and select the “testing” tab under a selected product.

Standard Testing for Metal Roofing – Part 1: Structural Performance and Uplift Resistance

When selecting a metal roofing product, there is an expectation that it will perform as intended over the life of the building. But what assures building owners, code officials, or design professionals that a product will in fact perform as promised? This question often comes up in building product discussions and the accepted way to answer it is to subject the products to physical testing. The type of testing is usually very specific to the product based on protocols and procedures developed by independent agencies such as Underwriters Laboratories (UL), ASTM International, or others. Manufacturers typically submit their products to independent testing labs who follow these standard test procedures. Once testing has concluded, they report the results back to the manufacturer. These results then show whether the product meets stated performance criteria or not. If not, the manufacturer can re-design and re-test until it does and then make the final results available to the public.

For metal roofing, a series of relevant and important tests are typically performed. In this blog, we will look at two of them related to structural performance and wind uplift.

ASTM E1592

The structural integrity of metal roofing is crucial given the various natural forces that can be imposed on the materials. Effects from wind, snow, or other conditions can compromise its integrity. Accordingly, the ASTM Committee E06 on Performance of Buildings (including sub-committee E06.57 on Performance of Metal Roof Systems) has developed ASTM E1592 “Standard Test Method for Structural Performance of Sheet Metal Roof and Siding Systems by Uniform Static Air Pressure Difference”. While the standard acknowledges the use of computation (i.e. calculations) to determine the basic structural capacity of most metal products, it also points out that some conditions are outside of the scope of computational analysis and hence need to be tested.

The standard describes a test method with “optional apparatus and procedures for use in evaluating the structural performance of a given (metal) system for a range of support spacings or for confirming the structural performance of a specific installation”. As such, it is very specific both to metal roofing and its installation. This test method uses imposed air pressure not to look at air leakage but simply to determine structural reactions. It consists of three steps:

1. Sealing the test specimen into or against one face of a test chamber

2. Supplying air to, or exhausting air from, the chamber at the rate required to maintain the test pressure difference across the specimen

3. Observing, measuring, and recording the deflection, deformations, and nature of any failures of principal or critical elements of the panel profile or members of the anchor system

The test needs to be performed with enough variation to produce a load deformation curve of the metal and account for typical edge restraint (fastening) representative of field conditions.

Manufacturers need to submit different products that are tested at least once at two different span lengths between supports. Standing seam roof panels are typically tested at a 5’-0” and 1’-0” span. Spans between the two tested spans can be interpolated. The result is a table of tested loading results that can be compared to code required or engineered design loading to then determine if the selected material and spacing are adequate for the project needs or if another product or spacing is needed.

MBCI's metal roofing products undergo a series of tests to ensure maximum resistance and performance.
MBCI’s metal roofing products undergo a series of tests to ensure maximum resistance and performance.

UL 580

The ASTM E1592 test is focused on the structural integrity of metal panels. It also uses positive and negative air pressure in a static (i.e. non-moving) condition to determine performance. There is also a separate concern about how metal roofing will perform in a dynamic condition as would be expected in a windy condition where wind gusts can ebb and flow erratically. In that regard, a separate test developed jointly between Underwriters Laboratories (UL) and the American National Standards Institute (ANSI) looks at the ability of roofing to resist being blown off a building due to wind. Known as ANSI/UL 580 “Standard for Tests for Uplift Resistance of Roof Assemblies”, it has become the recognized means to identify and classify the suitability of roofing for different wind conditions – low to high.

This test is also specific in its scope and intent stating that it “evaluates the roof deck, its attachment to supports, and roof covering materials”. It also points out that it is not intended to test special roof conditions, main or secondary structural supports, or deterioration of roofing. The standard prescribes in considerable detail the type of test chamber that needs to be constructed and used for the testing which includes three sections: “a top section to create a uniform vacuum, a center section in which the roof assembly (i.e. deck, attachment, and roofing) is constructed, and a bottom section to create uniform positive pressure”. The test procedure is then based on placing the roof assembly into the test chamber and subjecting it to a prescribed sequence of 5 phases of oscillating positive and negative pressure cycles (simulating dynamic wind conditions) over 80 minutes of total testing.

There are four wind uplift classifications obtainable for a tested assembly based on the test assembly retaining its attachment, integrity and without any permanent damage. These include Class 15, Class 30, Class 60, and Class 90. Each class has its own requirements for test pressures with increasing pressure as the class number increases. Higher class numbers indicate increasing levels of wind uplift resistance. Note, that to obtain a Class 60 rating, the tested assembly must pass the Class 30 test then be immediately subjected to the Class 60 test sequence. Similarly, to obtain a Class 90 rating, the tested assembly must first pass both the Class 30 and 60 tests. Metal roofing manufacturers who want their roofing products tested and classified under UL 580 must pair them with standard roof deck and fastening materials. Hence most have many different tests performed and results reported accordingly.

When reviewing metal roofing options, it is comforting to know that most manufacturers have tested their products and designed them to meet or exceed minimum requirements. To find out more about tested results of products you may be considering, contact your local MBCI representative or see the MBCI website and select the “testing” tab under a selected product.

Sealing the Deal: The Importance of Properly Sealing the Building Envelope Using IMPs and Single-Skin Panels

The primary purpose of a building’s envelope (roof and walls) is to protect the building’s interior spaces from the exterior environment and provide the desired exterior aesthetics. Whether choosing insulated metal panels (IMPs) for their superior performance or, instead, looking to the wide range of aesthetic choices available with single-skin panels—or some combination of the two—the common goal must always be to protect the building from the potential ravages of water, air, vapor, and thermal/heat. By ensuring proper installation of metal panels and, thereby, properly sealing the building envelope, problems can be mitigated, efficiencies maximized, and the integrity of the building protected.

Here, we’ll briefly consider the benefits of each panel, and some key considerations relative to their sealant needs and capabilities.

Insulated Metal Panels (IMPs)

IMPs are lightweight, composite exterior wall and roof panels that have metal skins and an insulating foam core. They have superior insulating properties, excellent spanning capabilities, and shorter installation time and cost savings due to the all-in-one insulation and cladding. In effect, IMPs serve as an all-in-one air and water barrier, and are an excellent option for retrofits and new construction. With their continuous insulation, roof and wall IMPs provide performance and durability, as well as many aesthetic benefits.

IMPs offer excellent R-value and improve energy efficiency to the building envelope.

Generally speaking, because of the nature of the joinery, it is easier to get a good seal in place with IMPs given their relative simplicity (i.e., putting the two pieces together with the sealant). They require great attention, though, in terms of air and vapor sealing—aspects largely controlled by the installers on a given project. As an example, vapor sealing in cold climates or applications is critical to the overall soundness of a building. Consider the damage a building could incur if moisture seeps into a panel and becomes trapped; it if freezes, it could push panels out of alignment. This would result in not just an unattractive aesthetic, but a performance failure as well. In order to be effective, all sealant and caulking must be fully continuous.

Single-Skin Panels

Single-skin panels, alternatively, offer the advantage of an expansive array of colors, textures and profiles. They are also thought to have more “sophisticated” aesthetics than IMPs. Single-skin panels are available in both concealed fastener and exposed fastener varieties, and are part of an assembly. They can be used alone or in combination with IMPs, and as long as the needed insulation is incorporated, single-skin panels can meet technical and code requirements, depending on the application. Single-skin products offer a wide range of metal roof systems and wall systems as well.

Getting the proper seal on single-skin panels may require extra sealants or closures, and have more parts and pieces that have to come together to create the seal. However, when properly installed and sealed, they can provide excellent performance in their own right. Some key caveats include ensuring panel laps are properly sealed with either tape or gun butyl sealants, and carefully inspecting air and water barriers for proper installation as well as penetrations through the wall for sealing/fire caulking prior to panel.

In most cases, following the details for the most common conditions will give you a successful and high-performing outcome.

Regardless of the type of metal panel used, taking the time and effort to ensure the sealing and caulking details are properly handled, metal buildings can protect the built environment and provide long-lasting quality and performance.

Find a sales representative