Commercial Metal Roof Flue & Pipe Penetration

Pipe penetrations are one of the most common types of roof penetration in commercial metal roofs. Regarded for their proven record of longevity and value in providing weathertight solutions, a metal roof’s performance can be compromised by improper pipe or flue penetrations to accommodate other building systems. Done poorly, metal roof penetrations can cause leaks, building damage, and unnecessary expenses. When expertly designed and installed, however, pipe and flue penetrations may be successfully integrated into metal roofing systemswithout compromising performance. Here are five proven and practical guidelines to help avoid problems. 

Metal Roof Flue & Pipe Penetration Tips

1. Use Qualified Installers

A qualified roofing installer is the best person to cut and install appropriately flashed and booted pipe penetration. If that isn’t possible or practical, then any penetration installed by another contractor should be fully coordinated with the architect/owner’s representative and the roofing contractor. This is the only way to be sure that the integrity of the roofing system is maintained. 

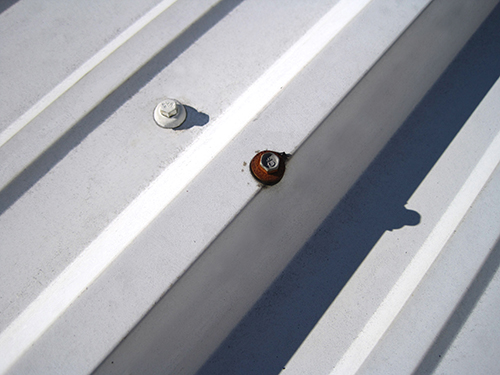
2. Use Only Commercial Materials for Pipe Penetration

Use Only Commercial Materials for Pipe PenetrationTo properly seal around the pipe penetration, use only a rubber roof jack made specifically for use with metal roofs. Do not use residential-type roof jacks or those designed for other roof types – they will not last over time. Further, do not use materials that are dissimilar to the standing seam metal roof, such as copper, lead, or galvanized metal roof jacks, which can corrode the metal roof system, or are of inferior quality with a short service life (less than 20 years). Proper commercial roofing products combine an EPDM rubber boot (or silicone for high-heat applications) with a bonded aluminum band to allow a compression seal to be formed at the roof panel. 

Penetrations
Pipe and flue penetrations allow for a long-term performance of the roof.
  • Standard EPDM roof jacks can withstand temperatures up to 212º and are suitable for most applications.
  • High-heat, silicone-based roof jacks can withstand temperatures up to 437º and are suitable for flues.
  • Retrofit roof jacks are available in both temperature ranges for applications in which the roof jack cannot be slipped over the top of the pipe.
  • Use only tape and caulk sealants approved by the roof manufacturer.
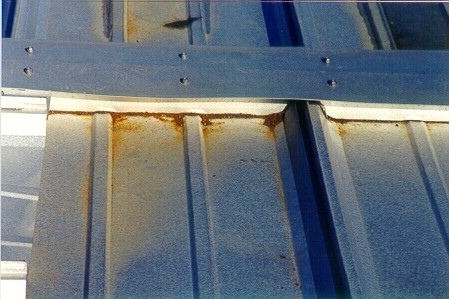
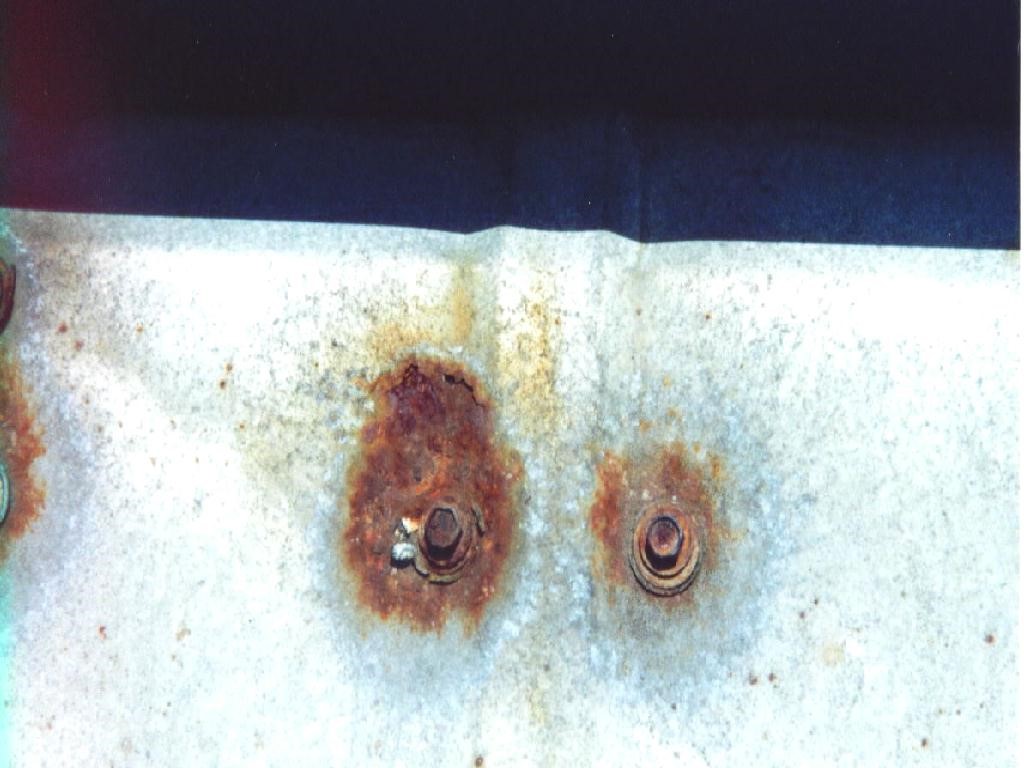
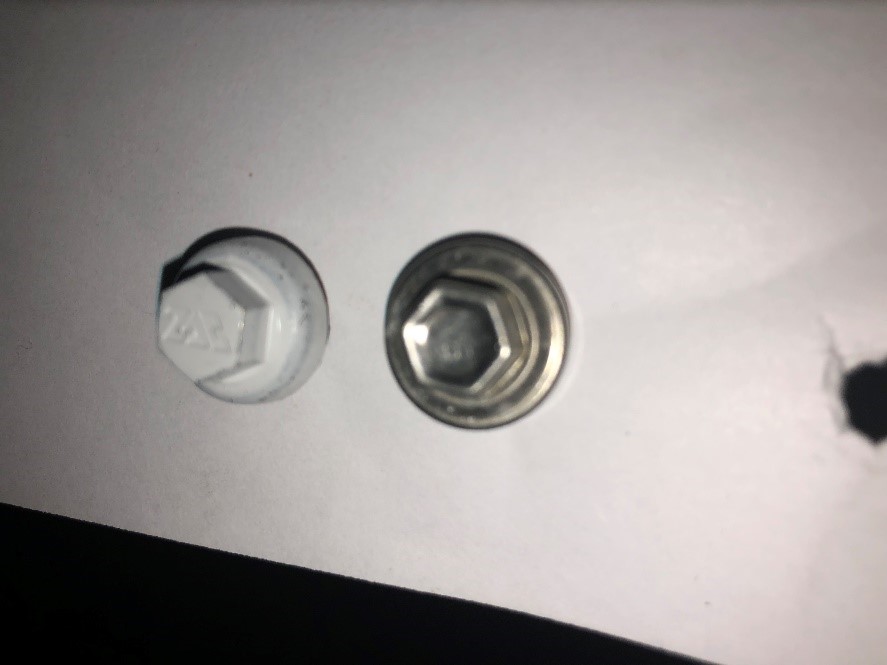
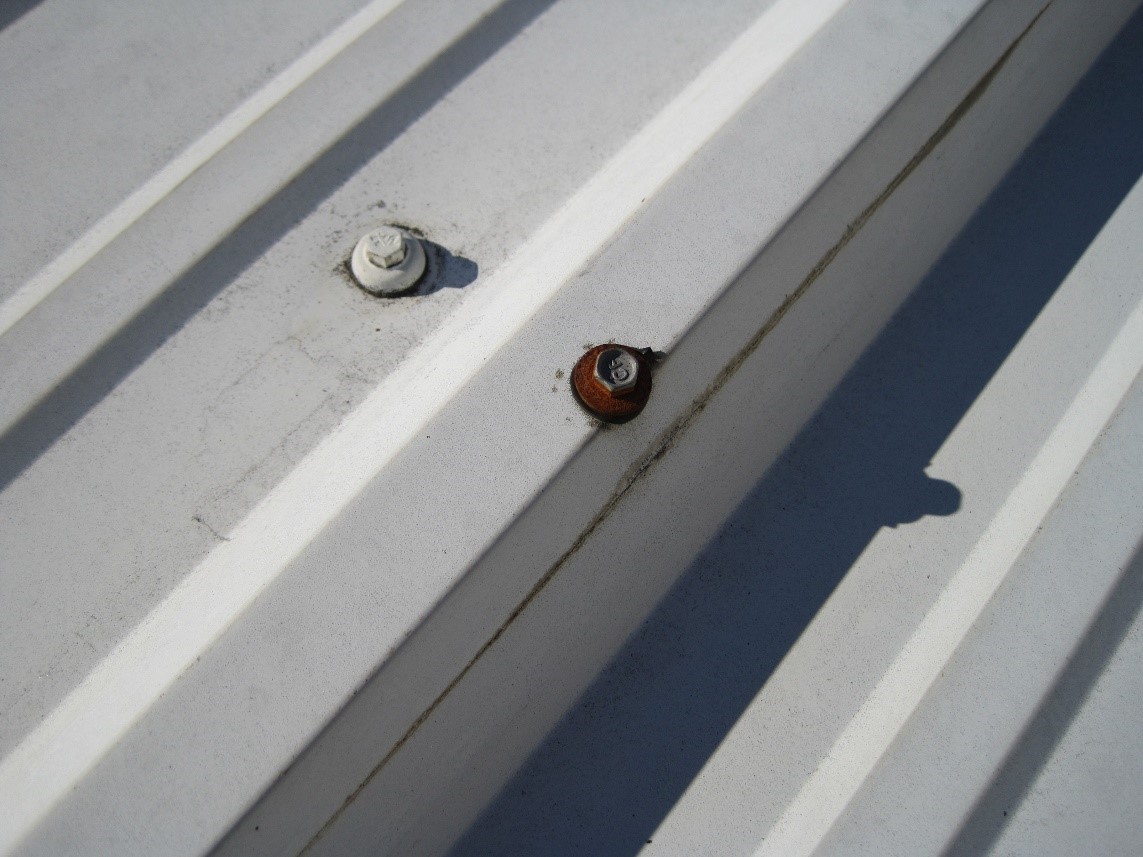
  • Use only long-life fasteners at all exposed fastener applications. Note that zinc-plated fasteners will not last for 20 years and will typically void roof warranties for finish and weather tightness.

3. Metal Roof Flue & Pipe Penetration Locations

All planned commercial pipe and flue penetrations should be assessed first to be sure they are not inadvertently creating a potential leak or other problem. Rather, they should be located so they can be properly sealed with no immediate obstructions that would make the seal to the roof unnecessarily difficult or compromise the long-term performance of your pipe or flue penetration. 

  • Never allow a pipe to penetrate through a standing seam. It is almost impossible to seal around the roof jack and the panel seam in a manner that will be leak free for the life of the roof. Therefore, always locate the roof penetration onto a smooth or flat area of the roof surface.
  • Place the penetration in a location that has the least amount of water draining into the immediate area around it.
  • Similarly, never allow a pipe to block the water flow down a roof panel and create a buildup of water. When a pipe is encountered that is too large to fit in the flat of the panel without blocking the water flow, use an aluminum pipe curb to allow the water to flow around the pipe and to provide a large, flat area in which to seal the roof jack to the roof surface.
  • In Northern areas, vent pipes should be located as high as possible or otherwise protected against sliding ice and snow from above. On roofs with slopes as low as 2:12, sliding snow, impacting an unprotected pipe, can tear the metal roof or shear the pipe off flush with the roof.

4. Allow for Thermal Movement

The metal roof flue and pipe penetration must allow for thermal movement of the roof. Pipes or other penetrations that are rigidly attached to the structure below may not be able to move as the roof expands and contracts. In these cases, the hole in the standing seam roof should be large enough to allow for this movement without the roof panels impinging on the penetration. 

5. Check Warranties

If the penetrations are to be included in a manufacturer’s weather tightness warranty, the manufacturer must approve in writing beforehand the materials and methods to be used to install the penetrations. Failure to follow this guideline may result in the penetrations being excluded from the weather-tightness warranty. If everyone involved with the roofing penetrations is aware of and follows these five guidelines, then in the end everyone should be quite happy with the long-term performance of the roof. If not, the potential for roof leaks and other related problems only increases. 


Why Choose Retro-R® Panels?

Upgrade your building with NuWall and Retro-R Panels

Metal-Over-Metal Retrofit Roof Hugger System

Planning for Metal Roof Retrofitting

Tips for Selecting and Field Applying Touch-Up Paint

Metal roofing and wall panels routinely come from the factory pre-finished a durable, baked-on paint finish that covers the Galvalume®-coated steel surface. This production occurs in a controlled environment, which helps create a consistent product, and allows metal panels to last decades with minimal maintenance. It turns out, however, that the biggest threat to a metal panel’s paint coating can happen during panel installation. Tools, fasteners and other installation-related items and activities can scratch or damage the finish, requiring touch-ups to the paint. If you experience this, here are some touch-up paint tips to keep in mind.

Assess the Damage

First, determine how noticeable the scratch is. Do you have to be close to see it, or can you see it easily from several feet away? Generally, if the scratch isn’t noticeable and has not penetrated the Galvalume coating, its best to refrain from doing a paint touch-up. This is because touch-up paint can’t match the fade resistance of the original baked-on pre-finish, and if the Galvalume is still intact, it will still protect the steel beneath the scratch.

On dark or bright colors in particular, the touch-up paint will fade much more quickly than the original paint. Often, the end result is that touch-up paint is more noticeable than if the scratch is left alone. On the other hand, if the scratch is noticeable and needs a touch-up, there are some best practices to follow. It’s important to note though, that if a large area of the panel is damaged (more than 10–15%), then it’s best to just replace the panel.

Getting the right touch-up paint

MBCI Metal Panel Touch-Up Paint

Metal panel manufacturers recognize that there may be a need for minor paint touch-ups in the field. So, most offer small containers of paint conducive to field work. These paints are specifically formulated to match standard color offerings, and have properties that make them compatible with the factory finish. Therefore, it’s important to always buy touch-up paint from the manufacturer that produced the original panels. Never ask a paint store to match colors based on a piece of panel or trim. Doing so may get a color match, but it won’t contain the other protective properties of the paint coating you receive from a manufacturer.

Choice of touch-up paint application

Touch-up paint for field application is often available in three types of containers: paint pens, small bottles and spray cans. Usually, the best choice for a scratch is a paint pen. Touch-up paint pens have small, precise tips that can fit into scratches, allowing it to only apply paint where needed. For larger scratches or scuffs, manufacturers offer bottles of paint (with a small brush) similar to those used for nail polish. Generally, these are best for dings on the panel.

Spray cans are also available, and are ideal for painting small accessories like plumbing vent pipes. Don’t use spray cans to conceal a scratch because they apply much more paint than necessary. This can cause unsatisfactory results as the paint weathers and fades differently than the original paint.

Using touch-up paint

When performing a paint touch-up, it’s important to make sure the area in and around the scratch is clean and dry. Wipe down the area as needed, then dry it completely before applying any paint. Afterward, paint the surface using the least amount of paint necessary. This eliminates excess paint on the pre-finished panel. Paint pens are ideal for this since they apply less paint than a nail polish-type bottle or spray can. Once the touch-up paint is on the panel, it will need time to dry. During drying, make sure that dust or other contaminants do not embed into the wet paint.

Consult the metal panel manufacturer

To ensure you or your maintenance professional properly select and apply touch-up paint, be sure to check all warranty and installation requirements and resources with the metal panel manufacturer. They can help ensure you get touch-up paint that matches the paint originally used on your panels and that you take the right steps to ensure warranties remain intact. MBCI offers metal panel touch-up paint for industries and applications including:

For more on metal roof and wall panel finishes, colors and touch-up paint techniques, contact your local MBCI representative.

Cutting Metal Panels Properly On Site

Cutting metal panels on site is an often-necessary part of installing metal roofing and wall panels. However, using the right tools and methods to ensure the panels remain damage-free is vital. Using the wrong tools can result in rust, rust stains, the voiding of warranties and diminished building service life. In this blog post, we’ll share several common field-cutting techniques and best practices that help ensure good results.


Maintaining Longevity When Cutting Metal Panels On Site

When metal panels are made in a manufacturing facility, the tools and methods used to cut the coated metal coil help protect the cut edge from deterioration like corrosion. When cutting metal panels on a jobsite or in the field, protecting any cut edges is just as important. To understand how to field-cut metal panels without sacrificing the quality and protection delivered from the manufacturing facility, you must first understand the what protects the panels. Most often, metal roof and wall panels are fabricated from Galvalume®-coated steel coil because of its proven longevity. Not only does the Galvalume coating protect the surface area of the metal panels, it has also been shown to be effective along the thin edges of the metal too, as long as those edges are cut properly.

During fabrication, the Galvalume metal panels are cut to length either by shearing while flat before entering the roll former, or by means of a profile shear as the panels exit the roll former. Either method tends to “wipe” the Galvalume coating across the cut edge of the metal panels. This provides superior cut-edge protection from corrosion.

Likewise, when panels arrive on site, any needed field cutting should address the same concerns of protecting the edge of the steel from corrosion. Of course, there are ways of doing the field cutting correctly. However, there are also poor strategies that can lead to real problems. The following are examples of common field cutting tools and the best practices for good results.


Common Tools and Methods for Cutting Metal Panels On Site:

Aviation Snips

Red and green aviation snips are a good choice for small cuts on metal panels, such as around pipe penetrations. These snips will wipe the Galvalume® coating in the same way as factory shears, making them a good choice.

Electric Shears

Electric shears are optimal when making lengthier cuts along the steel, such as cutting a wall panel at a corner or at a door opening. These shears take a ¼” strip of metal out of the panel during the cutting process, which tends to leave both sides of the panel smooth and flat along the cut. Like the aviation snips and factory shears, electric shears will wipe the Galvalume coating and protect the edges.

Mechanical Shears

Mechanical shears are an add-on tool that fit onto a battery-operated impact or screw gun. These shears do not take any metal out of the panel and will leave a slightly wavy edge. Mechanical shears are an excellent choice for bevel cutting standing-seam panels at hips and valleys, since they too wipe the Galvalume coating over the cut edges to offer protection.

Nibblers

A nibbler is a great tool for cutting across corrugations in wall panels to create openings for windows, doors and similar structural additions. A good nibbler typically costs $500-$700 (currently), but is well worth it if you often cut corrugated metal panels. The punch and die in the nibbler tends to wipe the Galvalume across the cut edge as it punches out small, half-moon shaped pieces of panel. However, because these little metal pieces will fall away from the cut, it’s important to contain them so no one walks on them. Otherwise, they can embed in the soles of installer’s shoes and create scratches in roof panels when they walk on the roof.

Skill Saw

Skill saws are an ideal tool for cutting metal panels because of their versatility. This tool can cut either across or parallel to corrugations, whether straight or at an angle. When using a skill saw, it is critical to use a saw blade that cuts cool. Otherwise, the Galvalume coating can melt along the cut edge and become ineffective. In particular, do not use an abrasive blade, which will generate heat and damage the coating.

MBCI Blog: Field Cutting Metal Panels On Site
Panels cut with abrasive blades corrode. A cool-cutting blade leaves a smooth edge.


Additionally, its vital to avoid cutting panels on the roof or above other panels. A skill saw blade will throw considerable amounts of steel debris into the air and down onto any panels below. This debris, called swarf, will quickly rust and ultimately cause rust spots in the panels. If enough swarf gathers in one spot, it can rust through the panel.

MBCI Blog: Field-Cutting Metal Panels On Site

Steel swarf, like this collected at the ridge will rust through the panel.


Which Tools Should To Avoid When Cutting Metal Panels On Site:

Tools that should never be used include:

  • Torches
  • Cut-off saws
  • Reciprocating saws
  • Hacksaws
  • Grinders

All of these tools will melt the Galvalume® coating, causing edge rust just like an abrasive blade would. These tools also throw a lot of steel debris (swarf) onto the panels they cut. This debris will be hot and will embed into the panel coating. This can cause rust spots and bigger problems down the road.

In conclusion, using the right tools and following metal panel manufacturer recommendations when cutting metal on site will help ensure that the panels remain damage-free and the final installation will be a fairly seamless process. Using the wrong tools can result in rust, rust stains, and the voiding of warranties. For more on best practices and recommendations for on-site cutting and installation of metal panels contact your local MBCI representative.

Installation Techniques for Varying Metal Roofing Fastening Systems

Installation techniques vary greatly depending on the metal roof’s fastening system. For single skin roofing, there are three fastening system options: concealed, exposed and standing seam. Proper execution of the correct installation techniques helps preserve roof structure and longevity.

Exposed Fastened Metal Roof Panel Installation

Exposed-fastened panels are installed over solid substrates or open framing using many screws that are visible from the outside of the structure. Field-applied systems ensure proper fastener alignment and engagement. The spacing of these screws is dictated by:

  • Substrate type
  • Project design loads (up to 12” on center with patterns)
  • Location on the roof (i.e. eaves, rake or ridge)

Roof slopes can vary from ½:12 minimum to 1:12 depending on product profile and building design requirements. Sidelap sealants are field-applied for all panel profiles, and using washers for weathertightness is ideal for this panel application system.

These roofing systems are low cost, easy to install and offer a wide variety of profiles for light applications, including:

  • Commercial
  • Industrial
  • Agricultural
  • Residential

Concealed Fastened Metal Roof Panel Installation

Concealed fastened metal roofing systems feature fixed fasteners hidden by either a snap-over sidelap or—in some cases—a  snap-on batten cap. Installed directly over solid substrates with a waterproof membrane, they require a minimal number of fasteners per panel sidelap or clip. Special tooling is not necessary to snap laps or engage the panel battens.

These panels are typically 16” or less in width and ideal for roofs that have a 3:12 or greater slope. In addition, installation of these panels over conventional or wood-framed structures is possible, making them suitable for the following industries:

  • commercial
  • architectural
  • residential

Standing Seam Metal Roof Panel Installation

Standing seam metal roof panels require application to solid substrates or open framing with concealed mechanical clips available in a variety of stand-off heights. These clips allow space for various insulation thicknesses, depending on the clip height. The design of most clips allows the roof panel to expand or contract independently of the substrate. This feature contributes to the panel durability and longevity as they can adapt to the thermal movement of large roof surfaces.

These panels are ideal for use in the following industries:

  • heavy commercial
  • industrial
  • architectural
  • residential

During installation, it’s important to pay close attention to proper panel alignment and engagement as well as substrate squareness and modularity of the install.  As a result, proper panel seaming is possible via Snap Lok or Mechanical Seaming. Either seaming method, depending on the panel profile, will encompass the panel clip into the panel seam, contributing to the roof system’s ability to expand and contract.

All sidelap sealants for this type of roofing system are factory-installed. In addition, most roof slope applications are ¼:12 and ½:12, but some require 3:12 or greater depending on profile and seam type.

Learn More About Metal Roof Installation Techniques

For more information about these installation techniques, view our in-depth installation materials. Also, feel free to contact our knowledgeable team with any additional metal roof installation questions.

Long-Life Fasteners: A Key Component of a Properly Installed Metal Roof

As the saying goes: “It’s the little things.” While metal roof fasteners may seem like just a minor aspect of a big system—in both cost and size—they are quite literally what holds it all together. In that respect, the fasteners used to attach a metal roof system are a significant part of the roof performance and, in turn, of the whole building. A leak-free roof will save time, money and avoid headaches for contractors, installers, owners and occupants over the long term. After all, if this small, inexpensive part fails, it can result in costly issues down the road. That said, make sure that all exposed fasteners are long-life, which is an important factor for a properly installed metal roof; it will make all the difference.

Why Choose Long-Life Fasteners?

According to a recent study conducted by the Metal Construction Association, a properly installed Galvalume roof can be expected to last upwards of 60 years.

The key phrase in that last sentence is “properly installed.” While the meaning of proper installation will vary based on a number of different factors, such as the roof type, roof geometry and geographic location, there is one common element to any proper roof installation, and that is the use of long-life fasteners at exposed locations.

Fastener life, in fact, is key and should match (or exceed) the life expectancy of the panel where it is being used. Not only that, but with the fasteners being such a critical component to the metal roof’s overall performance, the contractor must be well versed in selecting the right fastener.

Whether your roof is a through-fastened roof, such as R panel, or a standing seam roof panel, it will have some exposed fasteners. It is imperative that these fasteners be long-life to prevent perforation of the roof panels at the exposed fastener locations. A non-long-life fastener will eventually begin to rust, even if it is painted. This rust “virus” will transfer down to the roof panel and rust a hole in the roof panel.

These fasteners have transferred the rust to the panel and perforated it.

To prevent this from happening to your roof, always specify that long-life fasteners be used in all exposed fastener locations. To ensure that you have long-life fasteners in your roof, perform an inspection. Long-life fasteners for Galvalume coated steel will either be stainless steel, stainless steel capped or have a zinc/aluminum cap.

Long-life fasteners zinc/aluminum capped head (left) and stainless steel capped head (right).

Oftentimes, installers will use long-life fasteners during the roofing process but inadvertently use the wrong fastener at some other locations, perhaps due to fasteners being mixed up in their tool bag.  Other times, the misuse may be due to the need for a different fastener at a specific location.

The fastener attaching the panel to the substructure is a long-life fastener. However, the lap fastener, which has a different drill point, is not a long-life fastener.

If non-long-life fasteners are found, they can be replaced with long-life fasteners of the same type. Long-life “oversized” fasteners are available to use in any locations where a fastener may be stripped out. Regardless of the installer’s intent or the fastener’s location, all exposed fasteners should be long-life. Failure to adhere to this could reduce the service life of your roof by 40 or more years.

To help maximize metal roof performance, MBCI’s long-life metal building fasteners are manufactured to work seamlessly with our metal panels and improve the installation process. For more information, refer to MBCI’s fastener catalog at www.mbci.com.

Preventing Roof Damage from Rusted Fasteners

These days, the majority of metal roofs are made from Galvalume coated steel, which typically carry a warranty against perforation due to rusting for a period of 20 years. A study on Galvalume standing seam roofs (SSR) conducted at the behest of the Metal Construction Association (MCA) showed that a properly installed Galvalume SSR can be expected to last 60 years or more.  However, the caveat is “properly installed”. One of the major issues that will drastically reduce the service life of a Galvalume-coated roof is the use of non-long-life fasteners in exposed locations.

Anytime you have an exposed fastener on a metal roof, you risk rust—the term commonly used for the corrosion and oxidation of iron and its alloys. While a little rust might not seem like a big deal, its presence can actually be a harbinger of severe damage to your metal roof panels if not caught early, or ideally, stopped before it ever has a chance to start.

The issue is most prevalent on R-panel roofs due to the use of exposed fasteners. And even with standing seam roofs, which use clips and are typically referred to as a concealed fastener roofs, there are exposed fasteners as well, most often at the eave, the end laps and at trim, such as ridge flash, rake trim, and high-eave trim.

Prevention

The best recommendation for any exposed fasteners (meaning they are exposed to the weather and other harmful elements), is that they should be long-life fasteners. When you don’t use long-life fasteners, they start rusting with exposure to moisture and, over time, the rust virus stretches down to the roof, causing severe and often irreparable damage.

Suppose you have a metal roof that is 10 to 15 years old. Depending on the environment, the roof could be in excellent shape—except for where those screws are; you can have holes right through the roof at the fastener locations. More people than ever are starting to realize they’re supposed to use a long-life fastener, in a case like this. We see a lot of roofs when we inspect them for weathertightness warranties. What often happens is a worker on the roof may have just grabbed some screws that were handy without thinking about the kind of screw or the inevitable chemistry that could potentially cause rusting. Or, you may have a situation where there is some type of accessory put on the roof by another trade, perhaps a plumber or an HVAC installer—and maybe they didn’t use long-life fasteners.

The best recommendation to mitigate this potential problem is two-fold. First, make sure roofing installers know to use a long-life fastener at every exposed location. Secondly, make sure that every other contractor working on the roof that you’re responsible for knows to use long-life fasteners with whatever they’re doing.


Fasteners
A long-life fastener (left) can withstand the elements and prevent rust buildup longer than other fasteners. A regular fastener (right) will begin to rust upon exposure to moisture.

What if rust does occur?

One question frequently asked is: if the fasteners do become rusty, do you have to replace all the panels? If you catch the problem before the rust virus makes its way down to the roof itself, you can just change out the screws. However, if the rust has compromised the roof, you very likely would have to change out all the panels, at the least everything that has been affected—just because of one little spot. Truthfully, if the rust is in one spot, it’s probably all over.

Another thing worth mentioning is if aluminum panels are used along with typical long-life fasteners, it could still rust, especially if the roof is exposed to salt spray (think close to the coast).  The answer in this case is to use a stainless steel screw, which are long-life fasteners (but not all long-life fasteners are stainless steel).

Be aware from the start.

It’s crucial for installers and contractors to take notice and order the right fasteners from the start so that problems can be avoided.

Also, after some wear and tear, if subsequent work is done on the roof, everyone involved should take note. For instance, you buy a building and somewhere down the road you decide to frame out a small office and add a bathroom. You’d need a water heater, so a plumber goes on the roof, puts in pipe penetration and doesn’t use long-life fasteners. The onus would be on the owner to ensure that everyone performing work on that roof—no matter when—is using long-life fasteners.

Conclusion

The best-case scenario with a metal roof is to get the right fasteners to begin with. However, if the roof is already installed, the next step is to be on the lookout for rust and if you notice it, consider that it might be because of the fastener.

If that’s the case and you catch it early—when it’s just the screws that are rusting but the rust virus hasn’t yet transferred down onto the roof, you can just change out the screws with the proper long-life fasteners. We recommend doing a roof inspection at least once a year. If you see any loose or rusty screws, replace as needed.

For more information on MBCI’s broad selection of metal roof and wall panels, contact your local MBCI representative.

Find a sales representative