
Tag: roofing components
Metal Panel Roof Restoration & Installation
Everything in Order: MBCI’s Online Ordering Assembly Feature
There’s no getting around it. Erecting any building involves thousands of parts. Different sizes, colors, lengths, types – you name it. Depending on the nature of the project, there could be numerous parts to be ordered and accounted for. Although MBCI simplifies the process, it can still be a lot to manage. Until now, everyone has come up with their own method – like the many long-timers who write it all out by hand. But for those newer to the process, it can be overwhelming. Now we’re taking the guesswork out of it and making the process considerably easier, with exciting new user-friendly features on our online ordering platform.
With the new addition of “Assemblies”, you can simply choose which area of a building you’re working on, fill in some details such as panel type, trim condition, attachment type, size, and color, and the system will do the rest of the work for you – making sure you have any necessary fasteners, accessories or other parts, adding everything to your order. No longer will you have to study construction drawings, note fastener types and add everything to your order by hand. No longer will you find yourself on-site without the needed materials. And, even if you do, the online ordering platform is available right from your phone to get whatever you need on the way ASAP.
As Director of Development Tyler Roose says, “We’ve heard testimonials from many, many customers and it’s the only way they like to order anymore. It’s a huge time saver.”
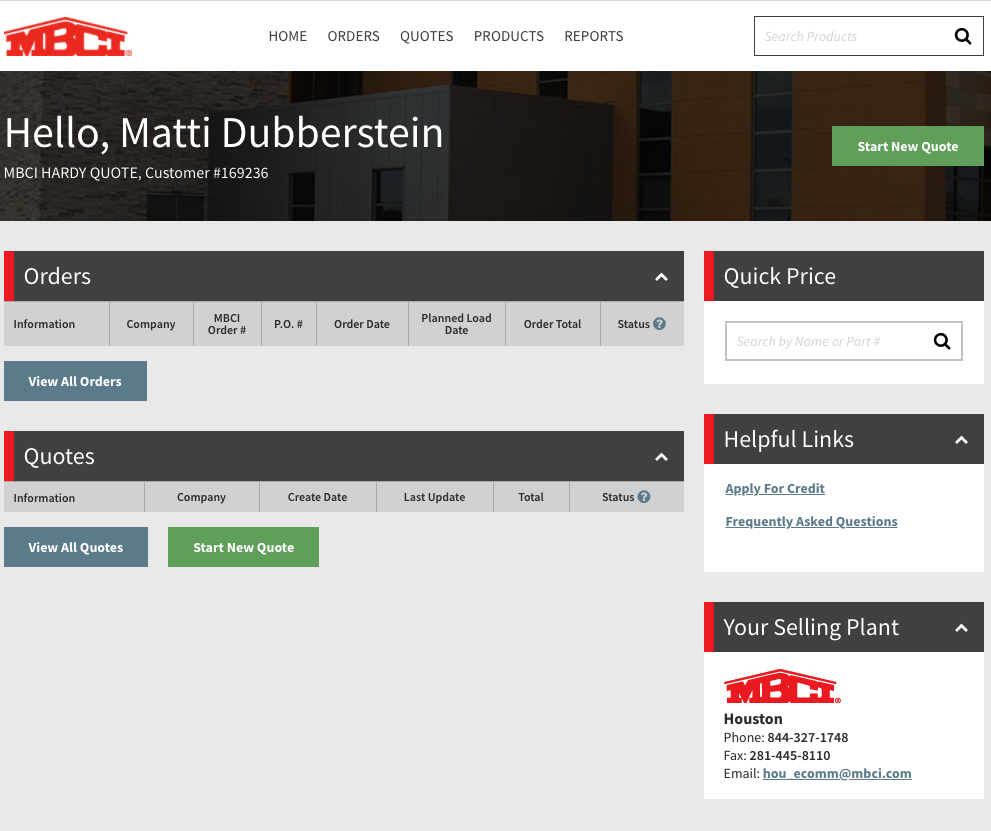
Ready to get started? Head to shop.mbci.com. If you are registered and an existing customer, you should have everything you need to log in. For new customers, simply fill in the requested information and provide your customer number to create an account. If you don’t have a customer number, reach out to your district sales manager or customer service rep.
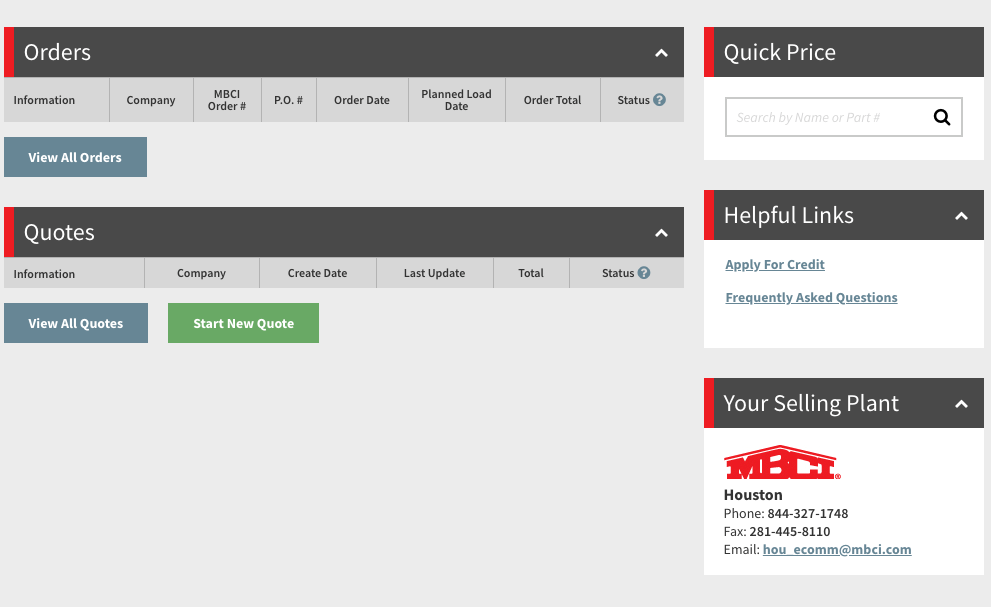
Once you’re logged in, you’ll see the dashboard, which has links to any existing orders, quotes or other information you may need.
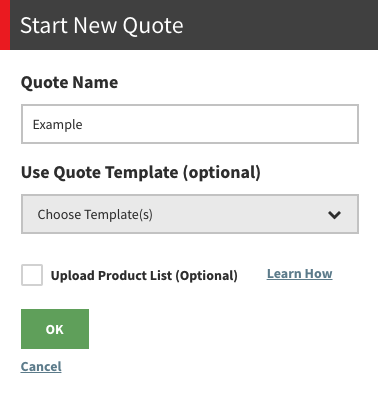
To get started on a new quote, simply click the “Start New Quote” button, which will give you an option to name your new quote and use a template if desired (more on that later).

Once you’ve begun a new quote, you will land on the Products page, where you have the option to shop by category, such as accessories, fasteners, panels, structural and trim. However, for this purpose, let’s focus on the newest option: Assemblies.

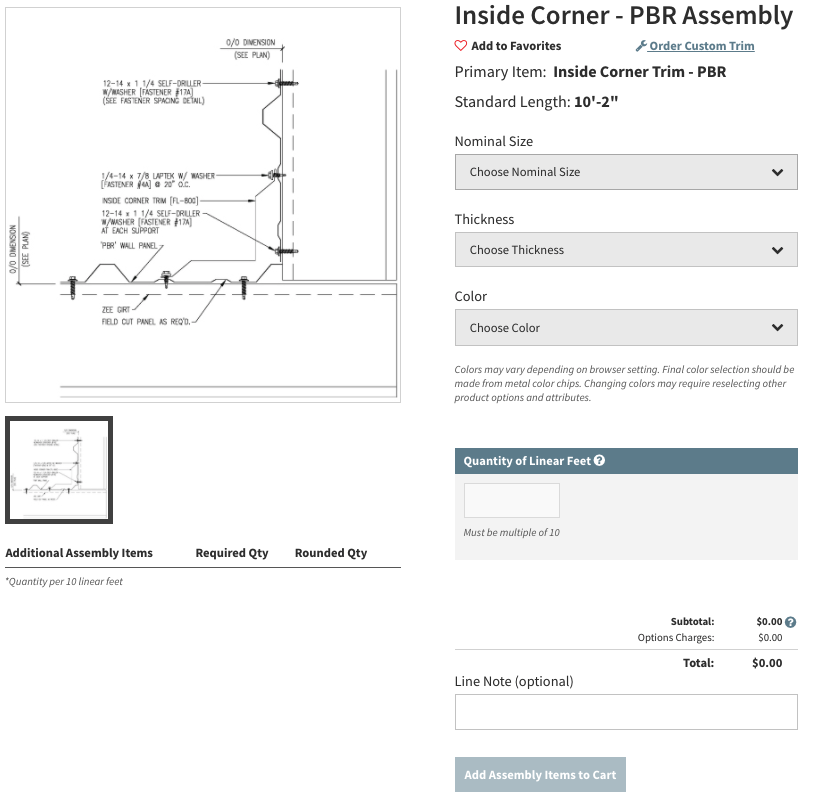
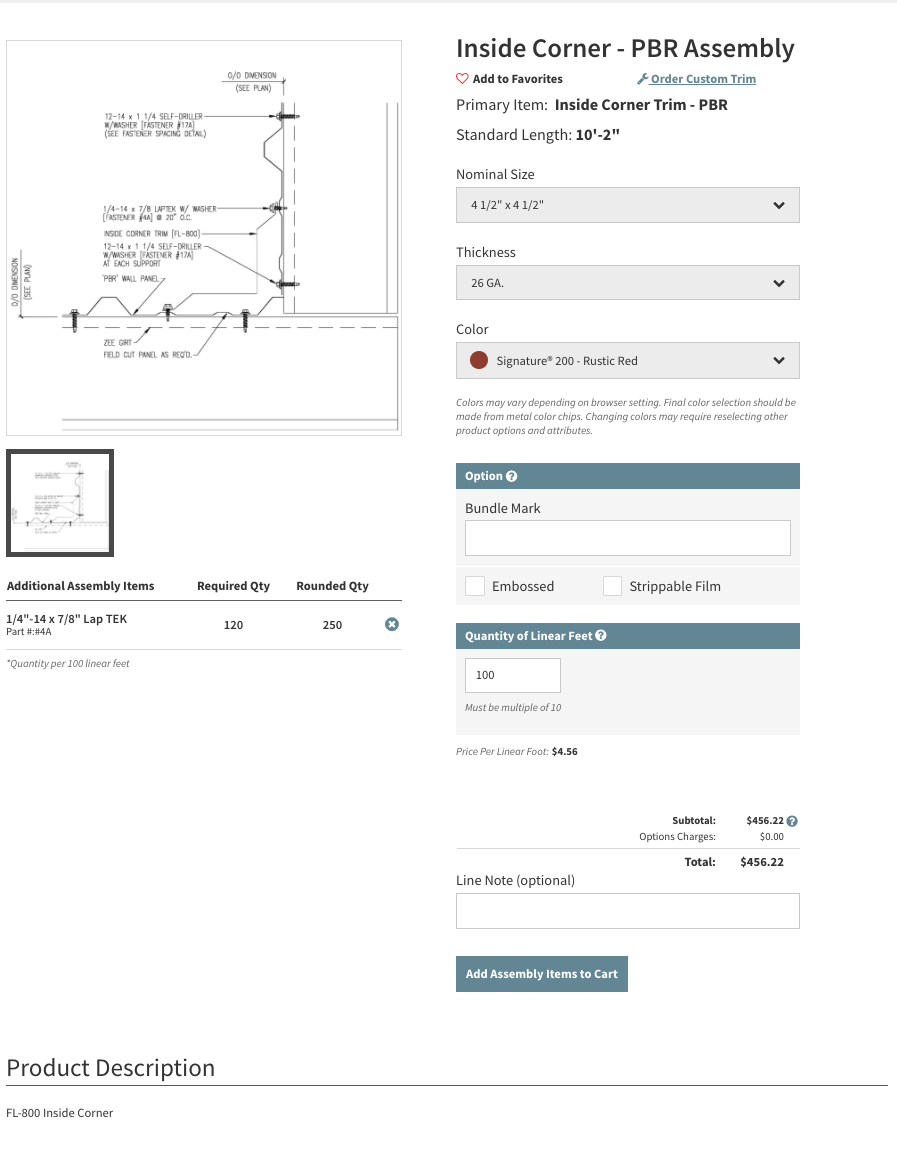
Choosing “Assemblies” will open a list of component types to choose from. For this example, we’re selecting PBR, but you’ll choose whichever is appropriate to your project. From the next list, select the area you’re working on, such as eaves, gutters, valleys, corners, bases, etc.

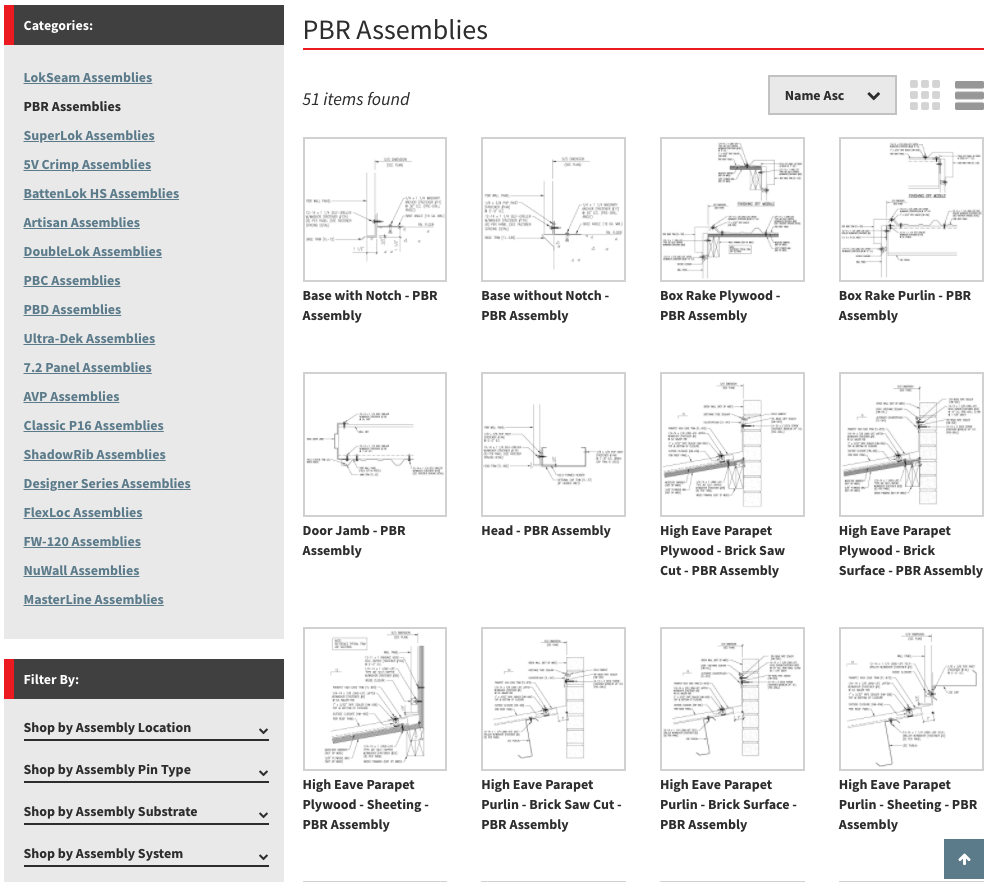
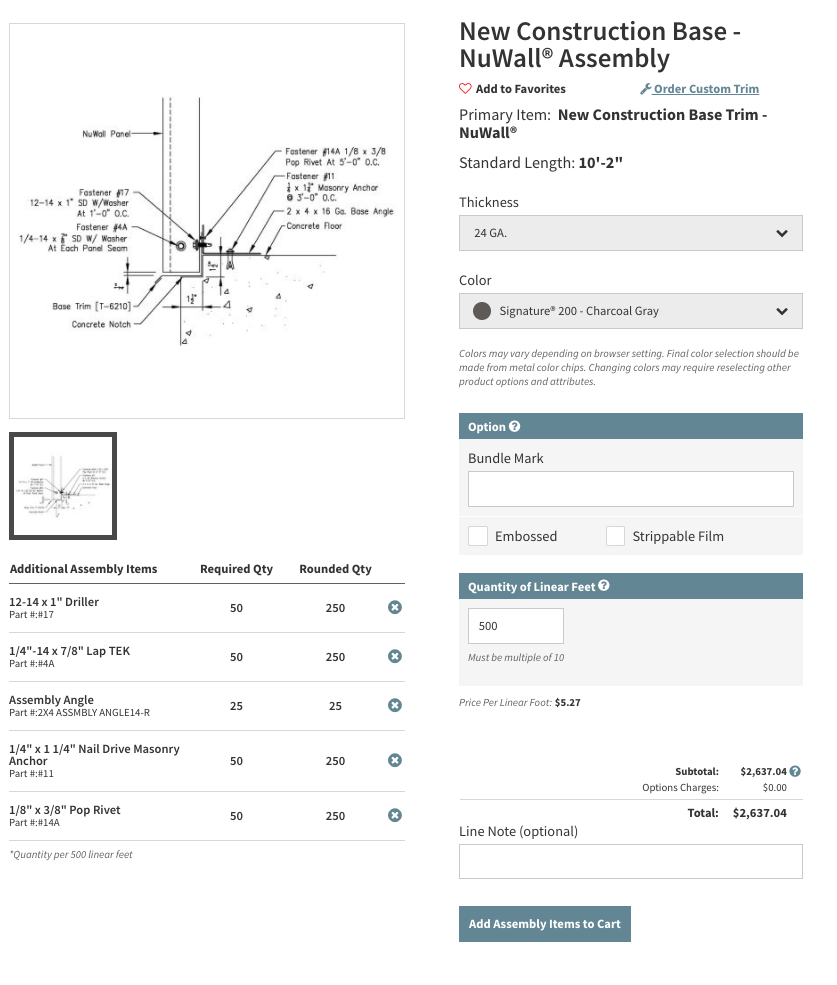
Once you’ve selected your assembly, the form will prompt you to choose details such as thickness, color, lineal footage of the assembly being used, and further options depending on the assembly and area you’re working on. Then, all the core trim items as well as necessary fasteners, sealants and accessories are automatically added to your material list for review. Notice the additional parts automatically added on the PBR form. If satisfied with your work, click “add to cart”, and a more formal review can now be completed once all parts from the project are accounted for.
Now you can simply repeat this process for whatever other areas you need. You can save and share this quote with others who may need to review and approve. If you anticipate needing similar orders in the future, choose the “Save as Quote Template” option in the dropdown box. The next time you have a similar project, choose this option when you start a new quote, then simply make whatever changes are necessary – colors, lengths, quantities, etc. – and you’ll be done with your order in much less time than with previous methods.
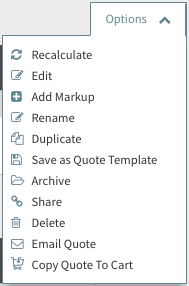
If for any reason you need to make changes to a quote, simply use the “Modify Quote” button at the bottom of the quote page.
![]()
Be sure to check out the other handy features on the online ordering site, such as related literature, documents and parts at the bottom of each product page and in catalogs. You can also search by keyword or use the navigation at the top for anything you might be looking for.
We hope you’ll take the time to learn the new system. It’s sure to save you innumerable hours in the long run. And if you get stuck or run into any problems, we’re here to help. Refer to the FAQ and don’t hesitate to get one of our sales individuals involved. We are all fully versed on online ordering and happy to help.
Types of Standing Seam Metal Roof Clips & Why They’re Essential
A successful standing seam metal roof project goes beyond the obvious panels, substrate and frame. In order for the roof to look great and perform properly, don’t neglect the importance of selecting the proper roof clips for your given project. What may seem like a minor detail is, quite literally, what’s holding it all together. Here we’ll take a look at the key factors that go into selecting the correct clip type and see why this is so essential for the well-being of any standing seam metal roof.
When you are looking at the installation manual or if you’re ordering your materials directly—or even if you’re submitting the order to MBCI to do the engineering for you—you’re going to need to know and identify certain details. The roof clip selection criteria will be based predominantly on two main factors: 1. What is your insulation system and 2. What are the expansion and contraction requirements for your roof? You’ll also need to know your project’s roof geometry and how the panel you’ve selected is able to meet the roof clip range on a particular plane, because the distance the panel spans impacts what type of clip you would use. Additionally, the type of substrate you are attaching the clip to will dictate what type of clip you should use. Is it going over wood, metal decking, open framing?
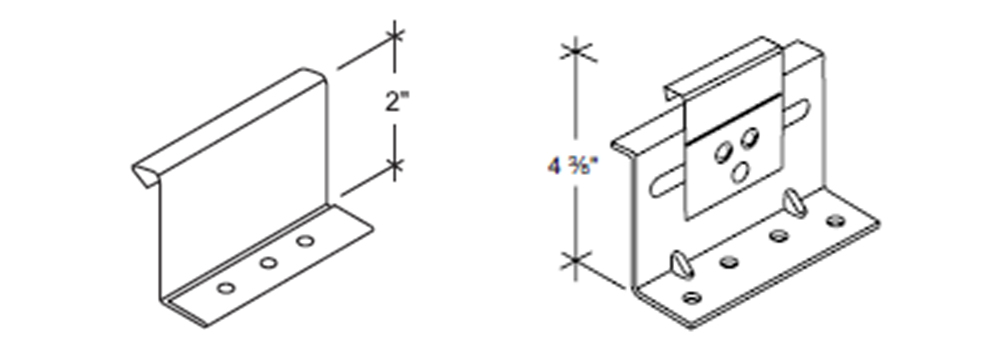
With that information in hand, you’re ready to do your due diligence. MBCI classifies clips in two ways: high or low; fixed or floating.
The high and low clips are predominantly determined by insulation systems. For a low clip, for instance, MBCI will typically will go up to a maximum of four inches of insulation; a high clip will go up to six inches of insulation.
Here’s a bit of a caveat. What we’re referring to is how much insulation you’re trying to compress between the roof panel and the substrate—and particularly the purlins or the steel frame you’re attaching it to. The clips are designed with a “stand-off” that elevates the roof panel above the substrate to permit insulation to pass between the roof panel and the substrate at the structural attachment points. A low clip is typically a 3/8-inch stand-off; a high clip, depending on panel type, can be 1-inch, 1-3/8-inch or even possibly 2-inch.
Knowing this helps determine whether you’re choosing the right clip because, let’s say, you go with too tall of a clip or not tall enough to accommodate your insulation system, then the system’s going to be difficult to install and will not perform correctly. And watch out for roof systems that have roof clips with no stand-off that do not permit fiberglass insulation to be installed or is discouraged from being installed at the clip lines due to impact on the panel appearance.
Another factor here is if you are putting the roof over a solid substrate, such as wood or metal decking. In this case, we will typically default customers to a low clip system because they don’t need to accommodate for any sort of fiberglass insulation systems. We’re assuming the insulation is occurring elsewhere below the decking or incorporated with the decking, such as rigid board insulation. In the case of rigid board insulation over decking, a low clip is still utilized but with an added bearing plate. The clip is attached through the rigid board insulation into the decking or structure below.
The more particulars you know of your intended insulation system to determine the clip height needed, the better prepared you will be in determining the right clips. Will there be fiberglass insulation or rigid board insulation or no insulation? What is the insulation thickness? What type of insulation system? Share these details with your MBCI sales rep to help you get started selecting the right clip height.
You can also find much of this information on the MBCI website by searching the roof type and then reviewing the corresponding installation manual and details to determine what clip height to use based on your insulation and substrate.
Which brings us to the other main factor in selecting the right clip. A fixed or floating clip is dependent on the substrate and how much anticipated movement is needed for the roof size.
With fixed clip systems, there are no moving parts in the clip. The ability for that clip to expand and contract as the roof expands and contracts is dependent on the substrate. In layman’s terms, if you were to screw that clip to a purlin, as the purlin heats up and cools down, it’s going to allow for some of the movement of that roof. Generally, when a fixed clip is installed over a metal building purlin, the manufacturer advises a limit of 100-foot maximum on a single roof surface. This is an average and can be impacted also by roof color and geographic location of the roof install that control temperature swing ranges, i.e., 100-foot maximum is a guide.
It is advised that the fixed clip always be installed over open framing in order to permit the greatest ability to accommodate roof panel expansion/contraction. It is not advised to use fixed clips attached to a solid substructure because those don’t accommodate roof panel movement.
If the roof needs to be installed over a solid substrate OR if the roof plane is over a slope more than 100 feet, then the manufacturer would prescribe a floating clip system. [Note: A floating clip can also be used even if the slope is less than 100 feet.] The floating clip system permits the roof panel to move (expand/contract) independent of the substrate to which the clip is installed. The system either contains a clip with a tab seamed into the roof panel rib that is able to float/slide where it attaches to the clip, or the clip is such that when it engages the panel seam is doesn’t restrict the panel movement. The only thing controlling for floating clips is the maximum range of the clips that allows it to float. In other words, how far can the clip tab or panel slide at the clip attachment. The panel manufacturer again will have information as to this amount. You will need to make sure they’re aware of what the maximum single panel run distance is from low side to high side.
One more thing to note is that not every roof system is available with fixed clips and not all systems have high and low clips (although the majority do). That said, educating yourself and researching the panel you’re looking at will give you the information you need to make the determination as to which clip will not only work best, but potentially will work at all. Every panel has its own roof clips, so the roof clips are not interchangeable across all systems. An essential part of selecting a roof panel is verifying that its clip attachment is suitable for your project.
It might not be immediately obvious that you have the wrong clip. For instance, let’s say you ordered an Ultra-Dek® roof and you ordered an Ultra-Dek® clip. That sounds straightforward, but did you order the RIGHT Ultra-Dek® clip for your particular project? The roof may even be able to be installed regardless, but, after installation you may discover it doesn’t perform properly or as intended due to the wrong combination of clips, insulation and substrate. That’s why it is so critical to check with the manufacturer that you have the right clip before you purchase or start putting down the roof.
For more information, reach out to your local sales rep or go to the MBCI Ask An Expert site to confirm the clip you need to make your project a success.
Tips for Selecting and Field Applying Touch-Up Paint
Metal roofing and wall panels routinely come from the factory pre-finished a durable, baked-on paint finish that covers the Galvalume®-coated steel surface. This production occurs in a controlled environment, which helps create a consistent product, and allows metal panels to last decades with minimal maintenance. It turns out, however, that the biggest threat to a metal panel’s paint coating can happen during panel installation. Tools, fasteners and other installation-related items and activities can scratch or damage the finish, requiring touch-ups to the paint. If you experience this, here are some touch-up paint tips to keep in mind.
Assess the Damage
First, determine how noticeable the scratch is. Do you have to be close to see it, or can you see it easily from several feet away? Generally, if the scratch isn’t noticeable and has not penetrated the Galvalume coating, its best to refrain from doing a paint touch-up. This is because touch-up paint can’t match the fade resistance of the original baked-on pre-finish, and if the Galvalume is still intact, it will still protect the steel beneath the scratch.
On dark or bright colors in particular, the touch-up paint will fade much more quickly than the original paint. Often, the end result is that touch-up paint is more noticeable than if the scratch is left alone. On the other hand, if the scratch is noticeable and needs a touch-up, there are some best practices to follow. It’s important to note though, that if a large area of the panel is damaged (more than 10–15%), then it’s best to just replace the panel.
Getting the right touch-up paint

Metal panel manufacturers recognize that there may be a need for minor paint touch-ups in the field. So, most offer small containers of paint conducive to field work. These paints are specifically formulated to match standard color offerings, and have properties that make them compatible with the factory finish. Therefore, it’s important to always buy touch-up paint from the manufacturer that produced the original panels. Never ask a paint store to match colors based on a piece of panel or trim. Doing so may get a color match, but it won’t contain the other protective properties of the paint coating you receive from a manufacturer.
Choice of touch-up paint application
Touch-up paint for field application is often available in three types of containers: paint pens, small bottles and spray cans. Usually, the best choice for a scratch is a paint pen. Touch-up paint pens have small, precise tips that can fit into scratches, allowing it to only apply paint where needed. For larger scratches or scuffs, manufacturers offer bottles of paint (with a small brush) similar to those used for nail polish. Generally, these are best for dings on the panel.
Spray cans are also available, and are ideal for painting small accessories like plumbing vent pipes. Don’t use spray cans to conceal a scratch because they apply much more paint than necessary. This can cause unsatisfactory results as the paint weathers and fades differently than the original paint.
Using touch-up paint
When performing a paint touch-up, it’s important to make sure the area in and around the scratch is clean and dry. Wipe down the area as needed, then dry it completely before applying any paint. Afterward, paint the surface using the least amount of paint necessary. This eliminates excess paint on the pre-finished panel. Paint pens are ideal for this since they apply less paint than a nail polish-type bottle or spray can. Once the touch-up paint is on the panel, it will need time to dry. During drying, make sure that dust or other contaminants do not embed into the wet paint.
Consult the metal panel manufacturer
To ensure you or your maintenance professional properly select and apply touch-up paint, be sure to check all warranty and installation requirements and resources with the metal panel manufacturer. They can help ensure you get touch-up paint that matches the paint originally used on your panels and that you take the right steps to ensure warranties remain intact. MBCI offers metal panel touch-up paint for industries and applications including:
- Agricultural
- Architectural
- Commercial and Industrial
- Insulated Metal Panels
- Residential
- Standing-Seam Metal Roofing
For more on metal roof and wall panel finishes, colors and touch-up paint techniques, contact your local MBCI representative.
Cutting Metal Panels Properly On Site
Cutting metal panels on site is an often-necessary part of installing metal roofing and wall panels. However, using the right tools and methods to ensure the panels remain damage-free is vital. Using the wrong tools can result in rust, rust stains, the voiding of warranties and diminished building service life. In this blog post, we’ll share several common field-cutting techniques and best practices that help ensure good results.
Maintaining Longevity When Cutting Metal Panels On Site
When metal panels are made in a manufacturing facility, the tools and methods used to cut the coated metal coil help protect the cut edge from deterioration like corrosion. When cutting metal panels on a jobsite or in the field, protecting any cut edges is just as important. To understand how to field-cut metal panels without sacrificing the quality and protection delivered from the manufacturing facility, you must first understand the what protects the panels. Most often, metal roof and wall panels are fabricated from Galvalume®-coated steel coil because of its proven longevity. Not only does the Galvalume coating protect the surface area of the metal panels, it has also been shown to be effective along the thin edges of the metal too, as long as those edges are cut properly.
During fabrication, the Galvalume metal panels are cut to length either by shearing while flat before entering the roll former, or by means of a profile shear as the panels exit the roll former. Either method tends to “wipe” the Galvalume coating across the cut edge of the metal panels. This provides superior cut-edge protection from corrosion.
Likewise, when panels arrive on site, any needed field cutting should address the same concerns of protecting the edge of the steel from corrosion. Of course, there are ways of doing the field cutting correctly. However, there are also poor strategies that can lead to real problems. The following are examples of common field cutting tools and the best practices for good results.
Common Tools and Methods for Cutting Metal Panels On Site:
Aviation Snips
Red and green aviation snips are a good choice for small cuts on metal panels, such as around pipe penetrations. These snips will wipe the Galvalume® coating in the same way as factory shears, making them a good choice.
Electric Shears
Electric shears are optimal when making lengthier cuts along the steel, such as cutting a wall panel at a corner or at a door opening. These shears take a ¼” strip of metal out of the panel during the cutting process, which tends to leave both sides of the panel smooth and flat along the cut. Like the aviation snips and factory shears, electric shears will wipe the Galvalume coating and protect the edges.
Mechanical Shears
Mechanical shears are an add-on tool that fit onto a battery-operated impact or screw gun. These shears do not take any metal out of the panel and will leave a slightly wavy edge. Mechanical shears are an excellent choice for bevel cutting standing-seam panels at hips and valleys, since they too wipe the Galvalume coating over the cut edges to offer protection.
Nibblers
A nibbler is a great tool for cutting across corrugations in wall panels to create openings for windows, doors and similar structural additions. A good nibbler typically costs $500-$700 (currently), but is well worth it if you often cut corrugated metal panels. The punch and die in the nibbler tends to wipe the Galvalume across the cut edge as it punches out small, half-moon shaped pieces of panel. However, because these little metal pieces will fall away from the cut, it’s important to contain them so no one walks on them. Otherwise, they can embed in the soles of installer’s shoes and create scratches in roof panels when they walk on the roof.
Skill Saw
Skill saws are an ideal tool for cutting metal panels because of their versatility. This tool can cut either across or parallel to corrugations, whether straight or at an angle. When using a skill saw, it is critical to use a saw blade that cuts cool. Otherwise, the Galvalume coating can melt along the cut edge and become ineffective. In particular, do not use an abrasive blade, which will generate heat and damage the coating.

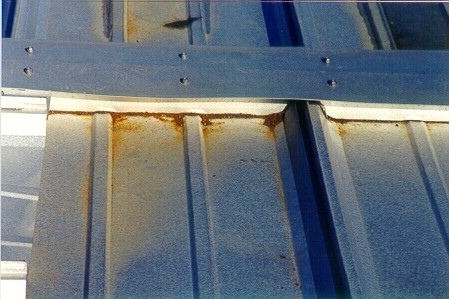
Additionally, its vital to avoid cutting panels on the roof or above other panels. A skill saw blade will throw considerable amounts of steel debris into the air and down onto any panels below. This debris, called swarf, will quickly rust and ultimately cause rust spots in the panels. If enough swarf gathers in one spot, it can rust through the panel.
Steel swarf, like this collected at the ridge will rust through the panel.
Which Tools Should To Avoid When Cutting Metal Panels On Site:
Tools that should never be used include:
- Torches
- Cut-off saws
- Reciprocating saws
- Hacksaws
- Grinders
All of these tools will melt the Galvalume® coating, causing edge rust just like an abrasive blade would. These tools also throw a lot of steel debris (swarf) onto the panels they cut. This debris will be hot and will embed into the panel coating. This can cause rust spots and bigger problems down the road.
In conclusion, using the right tools and following metal panel manufacturer recommendations when cutting metal on site will help ensure that the panels remain damage-free and the final installation will be a fairly seamless process. Using the wrong tools can result in rust, rust stains, and the voiding of warranties. For more on best practices and recommendations for on-site cutting and installation of metal panels contact your local MBCI representative.
Metal Roof Seaming: Best Practices for Ensuring Weathertight Seams
It would seem logical that the most important field installation process for a standing-seam metal roof is the actual process of creating the weathertight seams that connect the metal panels together and ensures the structural integrity of the roof. Perhaps for many different reasons, however, this critical seaming process is not always given the proper attention it deserves, nor are installers given the proper training required to ensure installation runs smoothly. This approach can cause some serious issues, not the least of which is the voiding of a manufacturers warranty or the discovery of roof leaks and the resulting damage.
To help, here are some best practices for readily and successfully carrying out the metal roofing seaming process:
Personnel
Because of the critical nature of seaming metal roofs, the crew members doing this work should be properly trained. Team members who will be performing this work should not perform the seaming without having participated in the appropriate installation training required to ensure the seaming process is appropriately managed. Most roofing manufacturers offer installation training that many installers take advantage of—and this training opportunity should be taken advantage of by the staff who will be doing the seaming.
Seaming Equipment
It is very important that the seaming equipment being used is matched to the specific roof panel system being installed. Manufacturers routinely rent out this equipment in order to be sure that the metal panel profiles are installed properly and are not compromised through the use of generic equipment or that of another manufacturer. Using the wrong equipment can end up being costly for everyone if panels and seams are ruined in the process.
Hand Crimper
As metal panels are set in place, they are often secured with metal clips, spaced according to engineering and construction needs. Hand crimpers are used to form the seams around the clips as well as any end laps. This process must not be overlooked as improper hand tooling is the number one cause of faulty seaming. To ensure costly mistakes aren’t made, follow the process described in the “Field Seaming Tool Manual”. This manual should be provided with the equipment and reviewed in training.
Electrical Sources
The next step will involve the use of an electric seamer which obviously needs a source of electricity to operate. However, not just any electrical power source will do. Almost all professional seamers have an AC/DC motor that will require 10 or 15 amps and 120 volts. A dedicated electrical circuit—preferably from a temporary electrical pole or an existing building electrical panel—is the best and most reliable way to go. A generator with 15 amp capacity dedicated to be used only for the seamer (in order to avoid power surging) may be acceptable as well. In either case, the power line to the seamer needs to be 10-gauge (minimum) cord. It should also be no more than 200 feet long (to avoid power drop).
Electrical power sources that are NOT acceptable include outlets from a powered man lift or a generator that is not dedicated to only the seamer. (This includes a generator that is part of a welding machine.) Check the manufacturer’s requirements for any other restrictions that can damage the seamer. Skipping this step can place the responsibility for repair or replacement onto the installer.
Electric Seamer
Once all panels are in place, the hand crimping is done and the power source is set. Then, electric seaming takes care of finishing the roofing system. Again, consult the seamer manual for proper procedures, including which direction the seaming should be done. (Seaming can either be done up or down the roof depending on direction of roof installation.) The electric seamer includes a switch for the operator to control the starting and stopping of the process.
On low-slope roofs, the operator should walk alongside the seamer to be sure nothing is in its path and that the seam is done properly. While stopping and re-starting is fine, the seamer should never be removed in the middle of a seam. Doing this makes it very difficult to set it back in exactly the same spot again. If something appears to be wrong with the seamer or the seams being produced, then don’t keep using it. There is no point in damaging multiple roof panels if any one panel indicates that things aren’t going right. In this case, contact the manufacturer right away for assistance or replacement of the seamer.
Safety
Electrical seamers are heavy and—if not used and secured properly—can cause harm or injury. Therefore, they should always be tied off with a safety line—the same type used for workers—not a common rope and definitely not the electrical cord. The safety line should be properly secured to the seamer and then attached to something rigid on the building. Never attach this to a person who could be pulled off of a roof by it.
Cleaning
Before use each day, check the electric seamer and remove any oils, debris or dirt. Make sure the seamer is unplugged from the electrical power source before you begin cleaning. Also, check the grease level in the machine daily and only add a little bit (2-3 pumps from a grease gun) as needed. Too much will cause the grease to leak out onto the roofing.
Following these pointers should help assure the safe and efficient use of the right seaming equipment when installing roofing panels. To find out more about proper seaming or to schedule training, contact your local MBCI representative.
Advances in Ordering Metal Building Products Online
You’ve heard it before: “Online is the way of the future!” but do online solutions really meet the demands of traditional building? In recent blog posts, we’ve outlined the general benefits of using an online ordering platform to order metal building products. These include the customized metal roof and wall panels and trim MBCI offers. Beyond basic ordering functionalities (which are must-haves for an effective tool), there are additional features that manufacturers can incorporate to save you time and help you effectively build your projects when ordering metal online.
![]()
Time-saving features that improve ordering metal online include:
- Copying and Merging Online Carts: Sophisticated online ordering tools now feature the ability to copy previously-created quotes, quote templates and/or orders. Once copied and/or merged, you can then modify item attributes like color and gauge to suit your preferences. These tools can also feature the ability to merge all items from several sources into a single, combined cart.
- Consolidated Carts: Some online ordering tools take care to consider not just the actual tool functionality, but the experience people have when using it. Part of this is ensuring users can quickly and easily view order details. Enhanced online ordering websites are attempting to achieve this by grouping like-products together—thus reducing the number of pages included for each quote or order. This not only cuts down on the amount of scroll time needed to view an entire quote or order, but enables you to quickly and easily see the most important details.
- Changing Multiple Items at Once: Large quotes and orders often require that the same specifications apply across a series of different items. For example, you may want the same panels but in a different color, texture or thickness. Likewise, you may even want to remove entire product types (like panels or trim). Instead of modifying cart items one at a time, you can now change to several products at once.
- Complete Building Assemblies: Ordering metal online helps make getting the products you need easier and faster. But what if you know what you want to build, but aren’t sure about all the products you’ll need to get the job done? Online ordering tools like MBCI’s now provide a selection of “Building Assemblies” that group all products needed to complete a project into single, pre-defined bundles.These complete product assemblies allow you to put all the metal building products you need for an entire building into your online ordering cart with just a few clicks of your mouse. In addition to saving time and effort, these assemblies can include warranty protection if all other conditions are met. Note that it’s also possible to remove specific products (like fasteners, sealant, etc.) if you already have them.
- Account Management Improvements: Controlling who can place orders has been a key benefit of many online ordering systems. However, based on customer feedback, MBCI has overhauled this part of our tool, making it much easier for your organization’s designated account administrator to add and modify users, as well as set access and spending limits and track user activity within the system. Overall, these seemingly basic improvements allow you to more effectively manage your business.
- View All Quotes and Orders: Common to many e-commerce sites, only the user who creates the quotes and/or orders generated through their account can see them. However, because most organizations rely on several people collaborating to best service their customers, more sophisticated capabilities are required. New features now allow your company’s online account administrator to grant multiple users access to view quotes and orders while controlling the level of detail shared. This allows your team access to the information they need to effectively do their jobs while also protecting sensitive details at your discretion.
Industry-first features like these further support building contractors, project managers and suppliers in meeting the needs of their customers and clients when ordering metal online. MBCI has recognized the value tools and features like these can provide. As more people shift toward ordering metal online, we aim to continue enacting improvements that positively impact the overall MBCI ordering process.
To find out more about ordering metal online, including how to price, quote and place orders, visit http://www.mbci.com/shop or contact your local MBCI representative today. To be the first to know when we launch new time-saving enhancements to our online ordering tool, stay tuned to our blog, email and social media posts.
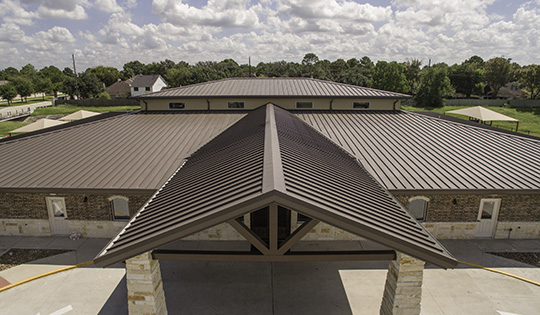
Built to Move: Building for Expansion and Contraction with Standing Seam Roofs
Standing seam roof (SSR) systems are built to move, designed to account for necessary—and often substantial—expansion and contraction due to thermal conditions. In fact, for many builders, this fact is one of the main reasons SSRs are such an attractive option.
Even with this expectation baked into the mix, many contractors and installers may still make a wrong turn when tying the SSR into adjacent structures and other building edge conditions. By not allowing for that same expansion and contraction on trims and transitions, problems can ensue.
Fixed and Floating Clips
One main consideration in planning for this movement is the clip type used. Standing seam metal panel clips are designed specifically to interact with their corresponding roof panels in order to allow movement (both interior and exterior) caused by thermal changes. The clips, which are part of the concealed fastening system used with SSRs, provide improved aesthetics in addition to durability and protection from the elements.
The two main options are fixed clips (one-piece) and floating/sliding clips (two-piece). Fixed clips are limited by and dependent on the substrate’s ability to expand and contract with the roof system, whereas floating/sliding clips permit the panels to expand and contract within the clip itself. These clips will allow for greater thermal movement of the panel, which is independent of the substrate while still ensuring the panel remains secured. Regardless of which clip is utilized, you are not going to stop the expansion and contraction. You can, however, have some control of the direction of movement, and, therefore, can address or compensate for the degree of this movement when tied into adjacent structures.

Standing seam roofs with floating/sliding clips require one end of the panel run to be “pinned” and the other end to be “moveable” in order to permit expansion and contraction. The “pinned” point of the system is typically the low eave, although it doesn’t have to be. There will be instances when it becomes beneficial to “pin” the roof at the complicated transition or tie-in point and design the roof system to expand/contract outward from this location. This can eliminate potentially “troublesome” areas from the equation on having to deal with the roof movement, and in turn can make them easier to install and have greater weathertightness success.
With all this in mind, it is important to always check with the manufacturer to determine the best clip and design layout to use with any given SSR system and be aware of how much and in what direction the expansion and contraction is going to occur.
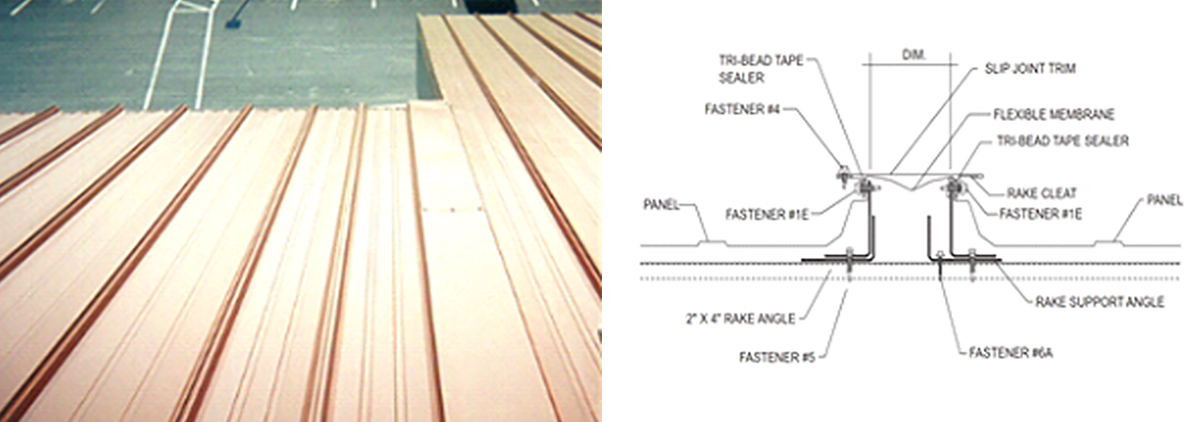
Tying In
Not only does the building move, but anything it ties into has to be able to permit that movement, e.g., the edges or perimeter of the buildings. Manufacturers can provide both longitudinal and transverse transitions that allow for thermal movement so that when they tie into an adjacent structure it doesn’t restrict the panel from moving. Not adequately compensating for or preventing that movement entirely can lead to potential pitfalls, such as oil canning. It could also lead to fasteners backing out and slotting of holes. Bottom line, any time that we try to confine or restrict the roof from doing what it was meant to do (move!), we inevitably run the risk of damaging the panel not just aesthetically but more importantly, from a weathertightness standpoint.
The Role of Expansion
Issues can arise not just when tying panels into adjacent structures. Because of the roof’s size and magnitude of potential movement, you may/will have to implement expansion/contraction capability of various degrees into the perimeter of the roofing system itself. In these cases, this is why manufacturers offer roof accessories as ridge expansions, edge trim expansions, panel expansions, gutter expansions and other details to account for not only the roof movement but the perimeter trims that are secured from the roof system to the wall system.
Know Your Details
The key takeaway here is to remember that if you’re considering a standing seam roof for a project, then you need to make sure that the designer looks at every detail from the manufacturer and accounts for movement of the roof panel, such as how it ties into adjacent structures or simply how the edge or perimeter of the building is terminating to make sure they permit that expansion and contraction. Know what you’re buying and understand that if the roof you’re purchasing is meant to expand and contract, everything that ties into it has to be able to expand and contract as well.
To find out more about how to correctly install your standing seam roof, contact your local MBCI representative.
A Guide to Selecting the Right Metal Roof Panel
With the great variety on the market, one of the main questions we, as metal roof panel manufacturers, get from customers is “How do I select the right panel for my project?” The answer can generally be found by examining a number of criteria, including the properties of the roof, the region and climate, geometry, slope, warranty type…among other key factors.
Here we will provide a brief overview of the various factors that should be considered when narrowing down the choices.
Determining Factors
1. Slope— Slope is the first consideration as just this one aspect will eliminate certain panels, making it easier to narrow down options right from the start. The two types of roof slopes are low slope and steep slope.
- A low-slope roof, commonly found in commercial applications, is one whose slope is less than 3:12. The benefits include a simpler geometry that is often much less expensive to construct, and the requirement of fewer materials than a steep slope, thereby reducing material costs.
- A steep slope roof, more common in residential construction, is one whose slope is greater than 3:12. Steeper slopes are ideal for areas that have higher snow loads and will also prevent the possibility of ponding water on the roof. Since the roof is a visible part of the structure, choosing a metal roof for residential construction often skews more toward aesthetic considerations.
2. Location/Climate— The location and climate of the project is a factor, specifically when looking at certifications/regulatory product approvals, which will limit the panels you can you use within specific regions. This is most relevant to Dade County, the state of Florida, and the Texas Coast, as well as certain snow regions.
3. Specified test standards—Often times, you may need to specify UL 580 or Factory Mutual Insurance Design.
4. Engineering Design—Due to the roof pressure acting on the buildings, engineering design factors eliminate some products because they’re simply not strong enough. This is an area that needs true technical expertise. For that reason, make sure to get a professional engineer to design the roof system in order to determine the correct panel for the project. Also, check with the manufacturer to determine if they have panels that have been tested to certain test standards. If they do not have the testing on a product, that in itself can exclude a particular panel.
5. Geometry—In its most basic terms, roof geometry is an overview of what the finished roof will look like, including special conditions, such as hips, valleys and ridges. The various conditions that go along with specific roof types will determine if a roof geometry is simple or complicated—which will affect the type of panel that can—and can’t—be used. For instance, a Double-Lok® roof panel can be used on a low slope roof—it can go down to 1/4:12. However, if a low roof slope condition has a valley, you may want to avoid a Double-Lok® panel since this product is more difficult to use in a valley situation.
6. Panel type— Panel types can be broken out into two main types: standing seam and through-fastened. The choice of specific product within these general categories depends on a number of considerations, including aesthetics and weathertightness warranties. If your project calls for either standing seam OR through-fastened, that will eliminate about half the types right off the bat.
- Standing Seam Roof Systems
In basic terms, there are four unique styles of metal standing seam panels: Double lock seam, symmetrical seam, one-piece snap-lock interlock and two-piece snap-lock interlock. These styles can be further delineated by seam shape or profile, i.e. trapezoidal rib, vertical rib, square rib and tee rib. - Through-Fastened Roof Systems
Exposed, or through-fastened panels, are available in a variety of widths, usually from two to three feet wide. They also come in various rib shapes, heights and spacings. Typical gauges are 29 and 26, but they also come in 24 and 22 gauge. There are also structural and non-structural through-fastened panels. Structural panels are capable of spanning across purlins or other secondary framing members such as joists or beams. Non-structural panels must be installed over a solid deck. Through-fastened roofs are best suited to small- and medium-sized metal buildings and residential applications. In both instances, the panel runs are limited to shorter lengths where thermal movement is typically not a problem.
7. Substrate— Examples of substrates are open framing, plywood, and metal deck. Some panels can’t be attached, for instance, to open framing but almost every type of panel can attach to plywood.
8. Required Weathertightness Warranties— If a weathertightness warranty is a requirement, your options are down to the only panels offered with that guarantee—eliminating all the through-fastened panels.
Looking to the Manufacturer for Help
While specifiers need to take that initial look at all the determining factors, the choices can still feel overwhelming. Once you’ve eliminated the panels that surely won’t work, you will still likely be left with many strong choices. The metal panel manufacturer can guide you to that decision. We encourage you to contact the MBCI team of experts to help further narrow down the choices in order to finalize what is the best metal roof panel for your project. For more guidance on finding the right roof panel for your project, stay tuned for our white paper coming soon.