Built to Move: Building for Expansion and Contraction with Standing Seam Roofs

Standing seam roof (SSR) systems are built to move, designed to account for necessary—and often substantial—expansion and contraction due to thermal conditions. In fact, for many builders, this fact is one of the main reasons SSRs are such an attractive option.

Even with this expectation baked into the mix, many contractors and installers may still make a wrong turn when tying the SSR into adjacent structures and other building edge conditions. By not allowing for that same expansion and contraction on trims and transitions, problems can ensue.

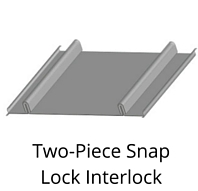
Fixed and Floating Clips

One main consideration in planning for this movement is the clip type used. Standing seam metal panel clips are designed specifically to interact with their corresponding roof panels in order to allow movement (both interior and exterior) caused by thermal changes. The clips, which are part of the concealed fastening system used with SSRs, provide improved aesthetics in addition to durability and protection from the elements.

Fixed Clip (left) Floating / Sliding Clip (right)

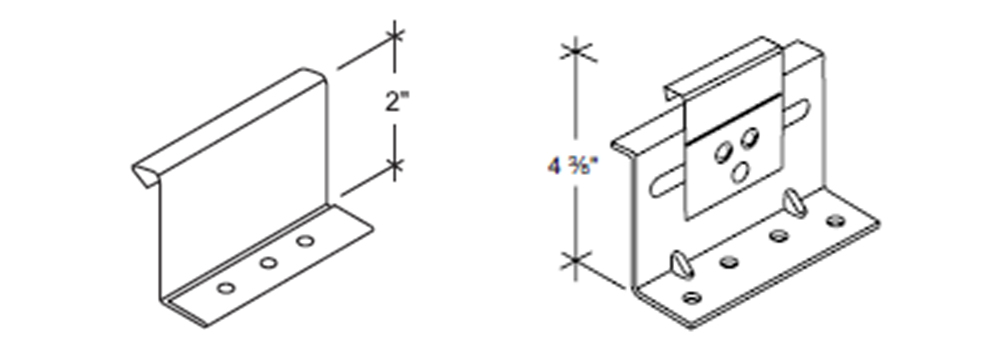
The two main options are fixed clips (one-piece) and floating/sliding clips (two-piece). Fixed clips are limited by and dependent on the substrate’s ability to expand and contract with the roof system, whereas floating/sliding clips permit the panels to expand and contract within the clip itself. These clips will allow for greater thermal movement of the panel, which is independent of the substrate while still ensuring the panel remains secured. Regardless of which clip is utilized, you are not going to stop the expansion and contraction. You can, however, have some control of the direction of movement, and, therefore, can address or compensate for the degree of this movement when tied into adjacent structures.

While standing seam roofs are designed for movement, correctly tying it to the rest of the structure is crucial.

Standing seam roofs with floating/sliding clips require one end of the panel run to be “pinned” and the other end to be “moveable” in order to permit expansion and contraction. The “pinned” point of the system is typically the low eave, although it doesn’t have to be. There will be instances when it becomes beneficial to “pin” the roof at the complicated transition or tie-in point and design the roof system to expand/contract outward from this location. This can eliminate potentially “troublesome” areas from the equation on having to deal with the roof movement, and in turn can make them easier to install and have greater weathertightness success.

With all this in mind, it is important to always check with the manufacturer to determine the best clip and design layout to use with any given SSR system and be aware of how much and in what direction the expansion and contraction is going to occur.
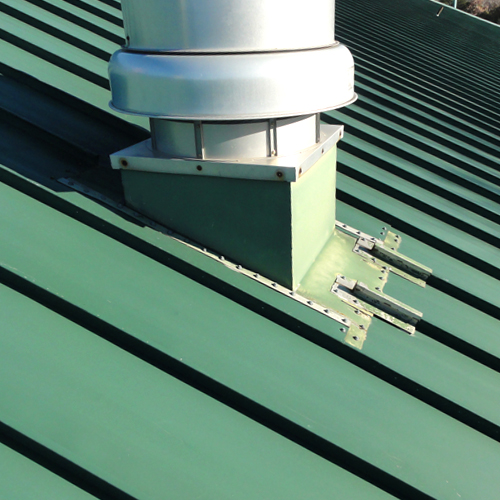
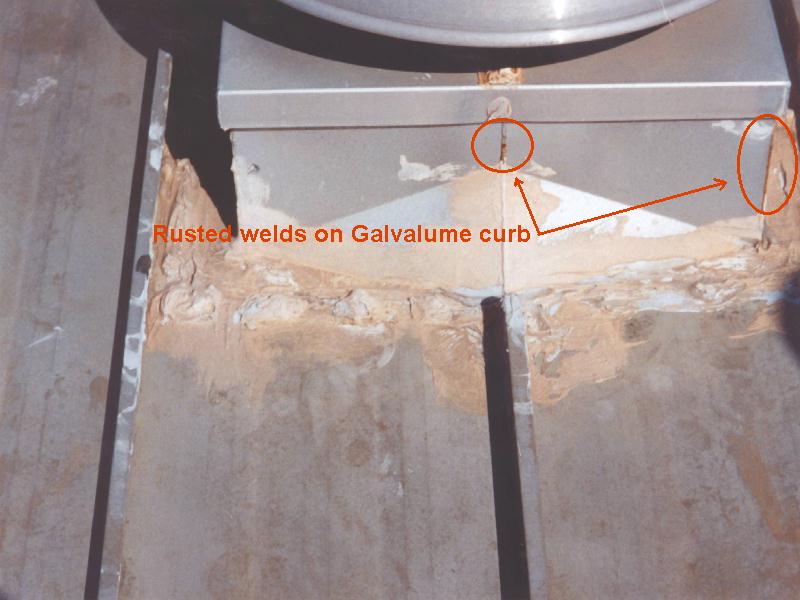
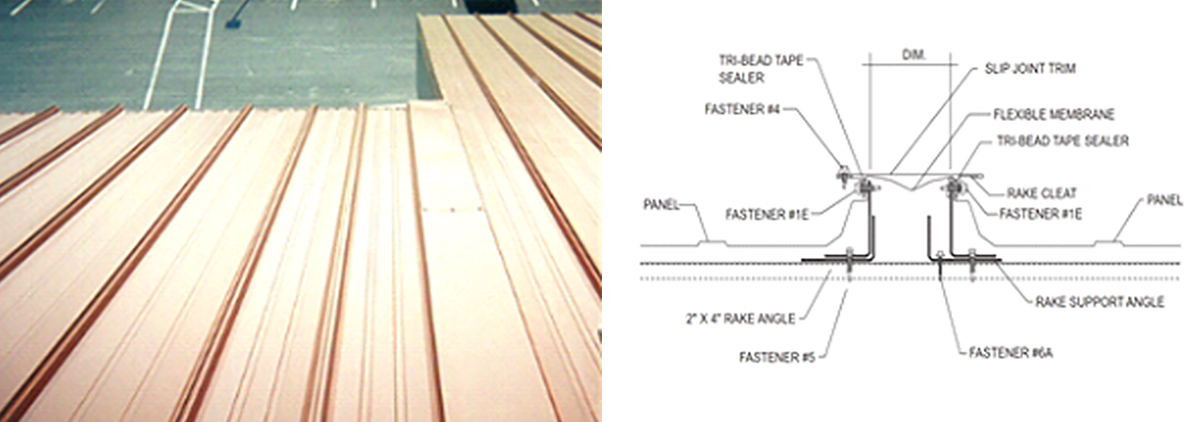
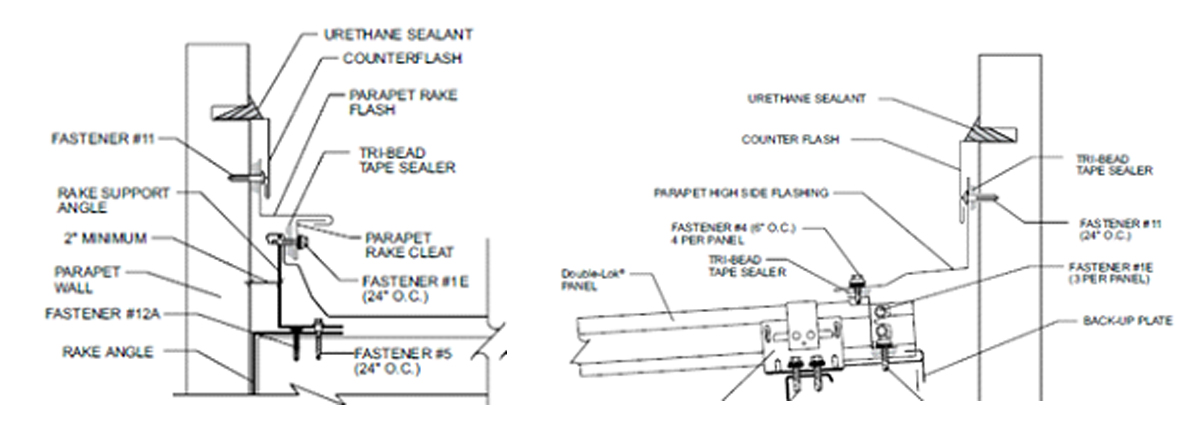
Tying In

Not only does the building move, but anything it ties into has to be able to permit that movement, e.g., the edges or perimeter of the buildings. Manufacturers can provide both longitudinal and transverse transitions that allow for thermal movement so that when they tie into an adjacent structure it doesn’t restrict the panel from moving. Not adequately compensating for or preventing that movement entirely can lead to potential pitfalls, such as oil canning. It could also lead to fasteners backing out and slotting of holes. Bottom line, any time that we try to confine or restrict the roof from doing what it was meant to do (move!), we inevitably run the risk of damaging the panel not just aesthetically but more importantly, from a weathertightness standpoint.

Slip joint being used for transverse tie-in between adjacent roof surfaces.

The Role of Expansion

Issues can arise not just when tying panels into adjacent structures. Because of the roof’s size and magnitude of potential movement,  you may/will have to implement expansion/contraction capability of various degrees into the perimeter of the roofing system itself. In these cases, this is why manufacturers offer roof accessories as ridge expansions, edge trim expansions, panel expansions, gutter expansions and other details to account for not only the roof movement but the perimeter trims that are secured from the roof system to the wall system.

Parallel Roof Transition (left) and Perpendicular Roof Transition (right)

Know Your Details

The key takeaway here is to remember that if you’re considering a standing seam roof for a project, then you need to make sure that the designer looks at every detail from the manufacturer and accounts for movement of the roof panel, such as how it ties into adjacent structures or simply how the edge or perimeter of the building is terminating to make sure they permit that expansion and contraction. Know what you’re buying and understand that if the roof you’re purchasing is meant to expand and contract, everything that ties into it has to be able to expand and contract as well.

To find out more about how to correctly install your standing seam roof, contact your local MBCI representative.

Tips for Installing Metal Roof Curbs

Metal roofs made from galvalume-coated steel provide great corrosion resistance and can readily satisfy a 20-year weather-tightness warranty. However, when a large penetration in the roof is needed, such as a large exhaust fan or other equipment, the integrity of the roof can be compromised if not addressed properly. The common method of dealing with large penetrations (i.e., spanning over one or more standing seams) is to install roof curbs that form the transition between the roof and the equipment being installed.

Of course, like most aspects of building construction, there are choices available in materials, methods, techniques, and styles of installing a roof curb. When the key objective is to provide a curb that will perform for the entire life of the standing seam roof, there are four key points to keep in mind.

Roof Curbs
Roof Curbs for Standing Seam Metal Roofs

Pick the Proper Material:

A galvalume-coated roof doesn’t mean that a galvanized steel roof curb is the best thing to use – in fact, galvanized roof curbs are known to rust, corrode, and leak, particularly along weld joints, as soon as a year after installation. Instead, a curb made from aluminum (preferred) or stainless steel should be used to prevent premature corrosion. To put any concerns about dissimilar materials and galvanic corrosion to rest, keep in mind that galvalume is approximately 80 percent aluminum by volume, so they are highly compatible.

Rusted Roof Curbs
Rusted Welds on a Galvalume Roof Curb

Use the Proper Roof Curb Type:

It is not uncommon for a roofer to choose a curb type referred to an an “over/over” curb, meaning that, after the opening is cut, the curb is installed over the roofing on both the upslope and the downslope sides. This might be the easiest to install during construction, but it will very likely create more work and callbacks when the upslope side starts to get water into or under the joint, and leaks. Instead, it is well worth taking a few extra minutes to install an “under/over” curb, which places the upslope side under the roofing in a true shingled lap between the curb and the roof. This way, the upslope edge is much more protected and less likely to leak using the same shingled condition occurring on the downslope side – all creating a properly water-shedding, weathertight condition.

Provide the Proper Water Flow Clearance:

We all know that water seeks the path of least resistance, so the key to keep water flowing down a roof is to avoid creating pockets of resistance. This is particularly true on the upslope end of a curb as well as on the two sides parallel to the slope of the roof. A curb with a minimum clearance of 12 inches between it and any other object on the upslope end will give water enough room to flow around the curb easily. Similarly, once the water reaches the two sides, at least 6 inches of free clearance is needed (i.e., without being encumbered by standing seams or other features) to allow the water to keep going and not back up to create a water head at the upslope end of the curb. Simply put, clearance means free-flowing drainage; lack of clearance can mean water buildup and leaks.

Install Roof Curbs Rib to Rib:

Installing curbs that rest in the flat, lower, panel area of metal roofing invites water tightness problems since the curb now has to be installed and sealed in the most vulnerable area – the surface where rainwater flows. Instead, coordinating the curb size with the rib spacing to provide a rib-to-rib curb eliminates fasteners down both sides of the curb in the pan of the roof panels. Placing the curb on and attaching it to the ribs also allows better transitioning from under the roofing on the upslope end to cover the roof on the downslope end. This type of curb has the added benefit of being able to be installed either during the roof installation of after the roof is finished.

Taking these four points into account in your next metal roofing project where roof curbs are required will help assure a well-installed, weathertight condition that should last just as long as the metal roofing system itself.

Choosing the Right Type of Standing Seam Roof (SSR)

When it comes to specifying standing seam roofs, one type doesn’t fit all. While a standing seam metal roof system can be one of the most durable and weather-tight roof systems available in the industry, its benefits can be negated if you fail to understand the details in application parameters of the specific system. Do your research, though, and for your next design that requires an aesthetically pleasing and structurally sound metal roofing system, you can choose with confidence the standing seam metal roof system that suits your project to a tee.

How to identify a good standing seam roof system

A good standing seam roof system is one that can satisfy both the project’s specific design criteria and adhere to building code standards. Standing seam profiles can include those that are utilitarian or architectural in nature, are of numerous widths and profiles and have varying seam joinery (e.g., snap or field seamed).

Why specify a standing seam metal roof system

When properly installed, standing seam metal roof systems are an extremely effective and long-lasting material choice. Key advantages include:

  • Weather-tight roofing system
  • Can be engineered to withstand high winds (150 mph and higher)
  • Class A Fire-resistance rating from UL
  • Class 4 Impact-resistance rating from UL
  • Long service life—up to 60 years
  • Lightweight
  • Special clips designed to accommodate thermal roof expansion and contraction and various thicknesses of fiberglass insulation

Matching the roof system to the project

In basic terms, there are four unique styles of metal standing seam panels: Double lock seam, symmetrical seam, one-piece snap-lock interlock and two-piece snap-lock interlock. These styles can be further delineated by seam shape or profile, i.e. trapezoidal rib, vertical rib, square rib and tee rib. The choice of the rib profile, as well as the rib spacing is generally an aesthetic preference of the designer. Knowing which style will best suit a given situation will help ensure a successful installation.

Popular Standing Seam Metal Panels

Double Lock Standing Seam
Shown: MBCI Double-Lok®

One-Piece Snap Lock Interlock Standing Seam
Shown: MBCI LokSeam®

Two-piece Snap Lock Interlock Standing Seam
Shown: MBCI Craftsman™

Some criteria to consider are roof slope, roof run (distance from eave to ridge), weather conditions (such as ice or snow) and architectural features, i.e. hips, valleys, dormers, parapet walls, etc.

For instance, if your project has a roof slope of 1/2:12 you will need to ensure the product being installed is approved for this low pitch. In this case, you would likely use a “double lock” or mechanically “field-seamed” panel. You also want to ensure that all details are able to provide for a weather-tight seal even if temporarily submerged during a heavy rain. Field-seamed panels are also the best choice in areas that experience heavy ice and snow.

Additionally, it is imperative to recognize complicated design details that should be carefully specified and reviewed regardless of the roof slope. Design conditions that require special attention include: roof transitions, dead valleys, dormers, eave offsets, ridge offsets and offsets in parapet walls.

It cannot be overstated that you should always consult a metal roofing manufacturer about the capabilities of the standing seam metal roof system, including what warranties are available, prior to specifying it.

Browse the standing seam product manual for more information.

Design and testing

Familiarize yourself with wind uplift testing as prescribed by Underwriters Laboratories (UL-90 – 580 Test) and ASTM E-1592.

Best Applications for Water Barrier Standing Seam Metal Roof Panels

We discussed water shedding standing seam metal roofs in my last post, and the fact that despite their water shedding properties, you still really must guard against water infiltration. Today I’ll discuss water barrier roof systems, which are structural standing seam roofing systems. These panels can withstand temporary water immersion over the panel seams and end laps. They normally have factory applied mastic in the seams to insure weather integrity. End laps, when needed, are installed using high quality tape and/or bead sealant supplied by the manufacturer. The trim designs used with these systems are much more water resistant as well.Water barrier SSR

The advantage these water barrier SSRS systems offer:

  • They require no deck. This is a tremendous savings on the in-place roof cost.
  • Many systems can be installed on roof slopes as low as ¼:12. This allows greater design flexibility and can also save on the in-place roof cost.
  • Because they are the only thing between the interior of a building and the weather, these are the most tested metal roof systems available. Manufacturers spend a lot of time and money testing these systems for air and water intrusion, dead load, wind uplift and fire.

Water barrier SSRSs can be further divided by seam type—trapezoidal or vertical rib.

Trapezoidal systems usually have a rib height of 3 inches. The most common panel width is 24 inches, although some manufacturers offer them in other widths as well. Trapezoidal systems are traditionally thought of as commercial or industrial standing seam systems. They are used on warehouses, factories and buildings where the roof is not meant to be seen from the ground. However, some designers have taken these systems and incorporated them into architectural applications with stunning results.

But be careful. Trapezoidal rib systems are much harder to seal at hips and valleys than vertical rib systems. The outside closures at the hip must be cut on a compound bevel with a trapezoidal system. At a valley, the panels are harder to seal because they require an inside closure; the vertical rib panels do not.

Vertical rib systems have traditionally been thought of as non-structural. However, there are now many vertical rib systems available that can span purlins or joists. These systems are available in a wide variety of panel widths, ranging from as little as 10 inches to as much as 18 inches wide. Rib heights vary from 1 foot to 3 feet.

Vertical rib systems are usually easier to install than the trapezoidals. There are fewer parts to the typical vertical seam system, which makes for a simpler, quicker installation. Because there are no inside closures, valleys are much easier to seal and quicker to install. Hips are easier to seal because the outside closures can be cut quickly and simply from a stock length of zee closure.

For these reasons, the vertical rib systems are often a better choice for applications on high-end architectural roofs. Ask just about any metal roof installer, and he will tell you that he prefers the vertical rib system over the trapezoidal system in this application.

Bottom line, when selecting a roof system, choose function first, then aesthetics.  When you use the wrong roof system for a given function, the installation process becomes complicated, and results less than ideal. With so many great metal roof options, don’t make life more complicated and uncertain than it need be.

And to make things simple, safe and sound, choose from MBCI’s array of metal roofing system products. Find out more.

Find a sales representative