Texas Department of Insurance Windstorm Inspection Program

Are you involved with a building project along the Gulf Coast of Texas in which metal roofing or siding is involved? If so, obtaining a building permit may be subject to compliance with the Texas Department of Insurance (TDI) Windstorm Inspection Program. Here is some information that can help.

What is the TDI Windstorm Inspection Program?

In 1987, the Texas Legislature enacted HB 2012 with a requirement to mitigate losses to structures due to hurricanes along the Texas Gulf Coast. On January 1, 1988, the Texas Department of Insurance (TDI) began administrating the Windstorm Inspection Program in support of this legislation. The program is centered in Austin, with four other field offices also located along the Gulf Coast.

Where does the TDI Windstorm Inspection Program apply?

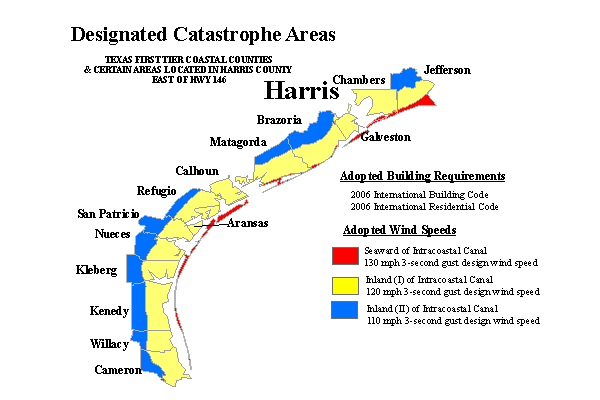
The Windstorm Inspection Program applies to all commercial and residential structures located primarily along the Gulf Coast of Texas. TDI has designated specific areas as catastrophe areas, also known as Texas’ First Tier Countries. The affected countries include Aransas, Brazoria, Calhoun, Cameron, Chambers, Galveston, Jefferson, Kenedy, Kleberg, Matagorda, Nueces, Refugio, San Patricio, Willacy and certain cities east of State Highway 146 in Harris County (La Porte, Morgan’s Point, Pasadena, Seabrook, Shoreacres).

Designated Catastrophe Areas

What is the Texas Windstorm Insurance Association?

The designated catastrophe areas often use Texas Windstorm Insurance Association (TWIA) as the insurer of last resort for the wind and hail portion of their building insurance. To qualify for wind and hail insurance through TWIA, all new structures plus any alterations, additions, or repairs to existing structures (including re-roofs or roof repairs) located in the designated catastrophe areas must be constructed and inspected according to the building specifications adopted by TDI.

How are Building Permits Affected?

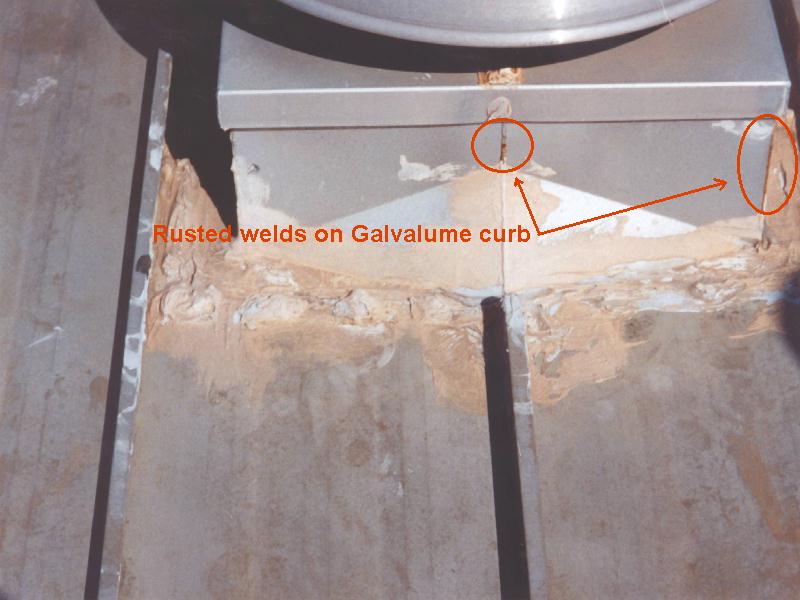
All building work needs to meet the requirements of the adopted building codes in Texas (currently the 2006 version of the International Building Code and the International Residential Code). However, in addition to the codes, the TDI requirements must also be complied with in the designated countries. This is similar to other parts of the country that experience severe weather events (e.g., Dade County, Florida) where additional requirements above the code have been instituted for safety reasons. At the time of building permit application, evidence will need to be shown of TDI compliance in design documents; therefore, many times the local TDI office is contracted first and an application is submitted (Form WPI-1). Then, during construction, a TDI certified inspector (usually an engineer) will inspect the work, as will the regular building inspectors. Compliance will need to be shown with the TDI requirements (Form WPI-8) in order to obtain final sign off and a Certificate of Occupancy.

What Building Products are Approved for Use?

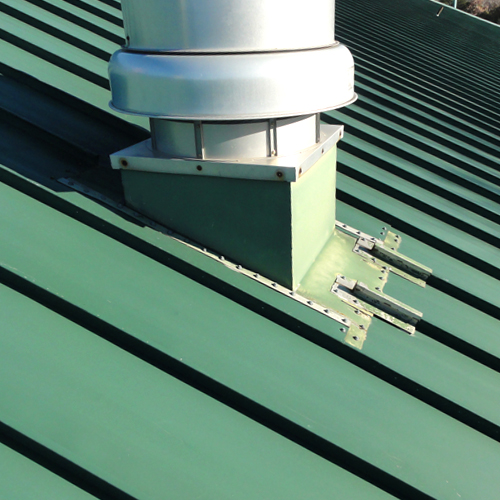
In order to be compliant with TDI standards, building products must be independently tested and shown to be able to withstand different levels of severe weather. For products like metal roofing and siding, the testing needs to include the method of attachment and the substrate type (metal, wood, etc.). Product evaluations are available by product type (such as “Exterior Coverings” for metal siding or “Roof Coverings” for metal roofing) and then by manufacturer all by either contacting a local TDI field office or on TDI’s website: www.texas.gov/wind/prod/index

For more information on this program visit http://www.tdi.texas.gov/wind/index.html or email [email protected]. To find out more about metal roofing and siding products that meet the severe weather requirements, contact your local MBCI representative.


Tips for Installing Metal Roof Curbs

Metal roofs made from galvalume-coated steel provide great corrosion resistance and can readily satisfy a 20-year weather-tightness warranty. However, when a large penetration in the roof is needed, such as a large exhaust fan or other equipment, the integrity of the roof can be compromised if not addressed properly. The common method of dealing with large penetrations (i.e., spanning over one or more standing seams) is to install roof curbs that form the transition between the roof and the equipment being installed.

Of course, like most aspects of building construction, there are choices available in materials, methods, techniques, and styles of installing a roof curb. When the key objective is to provide a curb that will perform for the entire life of the standing seam roof, there are four key points to keep in mind.

Roof Curbs
Roof Curbs for Standing Seam Metal Roofs

Pick the Proper Material:

A galvalume-coated roof doesn’t mean that a galvanized steel roof curb is the best thing to use – in fact, galvanized roof curbs are known to rust, corrode, and leak, particularly along weld joints, as soon as a year after installation. Instead, a curb made from aluminum (preferred) or stainless steel should be used to prevent premature corrosion. To put any concerns about dissimilar materials and galvanic corrosion to rest, keep in mind that galvalume is approximately 80 percent aluminum by volume, so they are highly compatible.

Rusted Roof Curbs
Rusted Welds on a Galvalume Roof Curb

Use the Proper Roof Curb Type:

It is not uncommon for a roofer to choose a curb type referred to an an “over/over” curb, meaning that, after the opening is cut, the curb is installed over the roofing on both the upslope and the downslope sides. This might be the easiest to install during construction, but it will very likely create more work and callbacks when the upslope side starts to get water into or under the joint, and leaks. Instead, it is well worth taking a few extra minutes to install an “under/over” curb, which places the upslope side under the roofing in a true shingled lap between the curb and the roof. This way, the upslope edge is much more protected and less likely to leak using the same shingled condition occurring on the downslope side – all creating a properly water-shedding, weathertight condition.

Provide the Proper Water Flow Clearance:

We all know that water seeks the path of least resistance, so the key to keep water flowing down a roof is to avoid creating pockets of resistance. This is particularly true on the upslope end of a curb as well as on the two sides parallel to the slope of the roof. A curb with a minimum clearance of 12 inches between it and any other object on the upslope end will give water enough room to flow around the curb easily. Similarly, once the water reaches the two sides, at least 6 inches of free clearance is needed (i.e., without being encumbered by standing seams or other features) to allow the water to keep going and not back up to create a water head at the upslope end of the curb. Simply put, clearance means free-flowing drainage; lack of clearance can mean water buildup and leaks.

Install Roof Curbs Rib to Rib:

Installing curbs that rest in the flat, lower, panel area of metal roofing invites water tightness problems since the curb now has to be installed and sealed in the most vulnerable area – the surface where rainwater flows. Instead, coordinating the curb size with the rib spacing to provide a rib-to-rib curb eliminates fasteners down both sides of the curb in the pan of the roof panels. Placing the curb on and attaching it to the ribs also allows better transitioning from under the roofing on the upslope end to cover the roof on the downslope end. This type of curb has the added benefit of being able to be installed either during the roof installation of after the roof is finished.

Taking these four points into account in your next metal roofing project where roof curbs are required will help assure a well-installed, weathertight condition that should last just as long as the metal roofing system itself.

Find a sales representative