Best Practices for Ensuring Metal Roof Accessories are Properly Installed

Best practices for roofing contractors, general contractors…and even architects—from spec’d work to pre-roofing conferences.

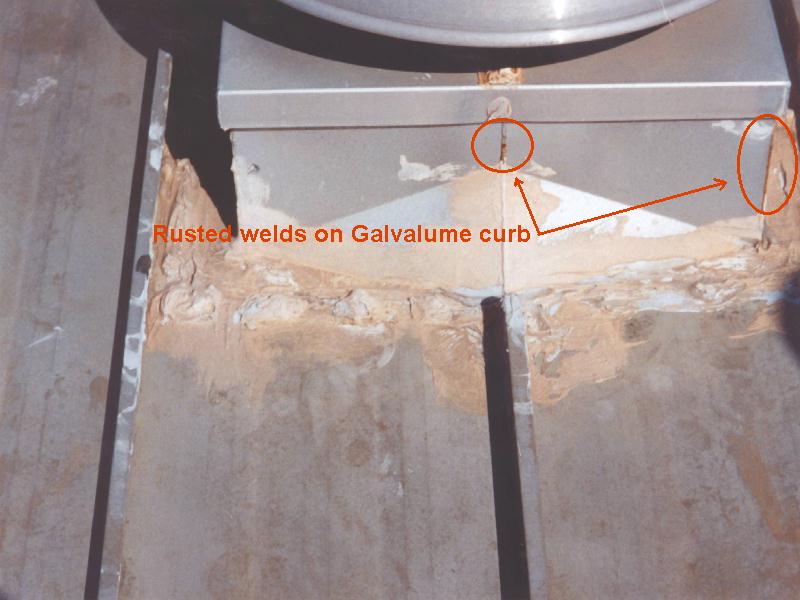
Many metal roofs have roof penetrations for accessories installed by other trades. Unfortunately, oftentimes, these penetrations are improperly made or the accessory material is incompatible with the standing seam roof. A properly installed Galvalume standing seam roof, for instance, can be expected to last 60 years or longer. However, improper work on the roof by other trades can result in leaks and possibly a roof service life far less than 60 years. In order to achieve the best results, the roofing contractor needs to coordinate with the general contractor, the architect, and the building owner to ensure proper installation.

In most cases, it is the roofing contractor who is held responsible for all things roof! If armed with a clear checklist as he or she walks into a pre-roofing meeting with the architect, there will be a significantly greater likelihood of a well thought out and successful process. Here are some suggestions for the roofing contractor (in conjunction with the entire team) to consider.

  • A reminder to specifiers to put in the project specifications that all roof penetrations and roof accessory installation must be coordinated with the roofing contractor. Beyond the obvious issue of maximizing performance, if a manufacturer’s weathertightness warranty is specified, the roof manufacturer must preapprove any work performed on the roof by other contractors.
  • If the above is not in the project specifications, the roofing contractor should initiate the conversation during the pre-roofing  conference with the architect and the general contractor.
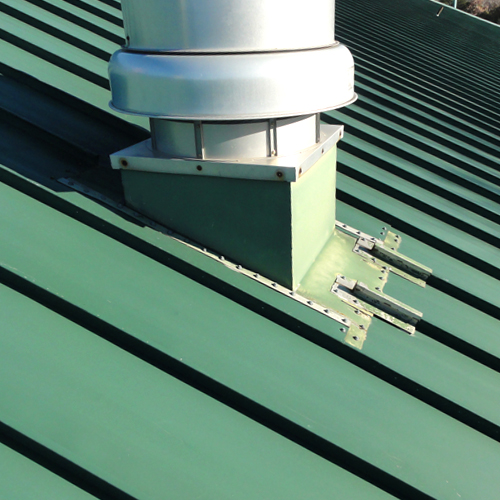
  • Roof curbs should ideally be supplied by the roofing contractor and they should definitely be installed by the roofing contractor. Welded aluminum curbs should be used as specified by the roofing manufacturer. See tips for installing roof curbs, here.
Best practices
Be sure to use the proper roof curb to ensure a well-installed, weathertight condition.
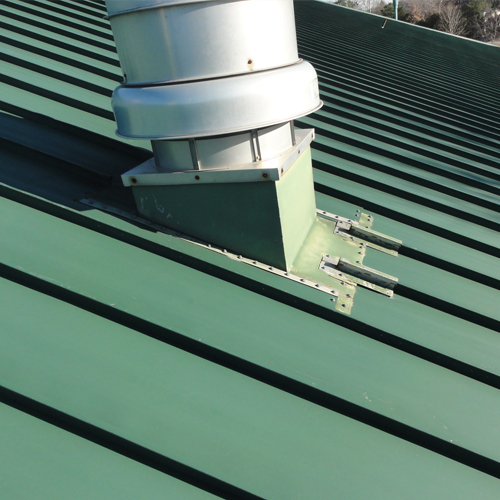
  • Pipe penetrations for vent pipes, heater flues, gas and electric, etc. as well as penetrations associated with lightning protection air terminals and cable management should be coordinated with the roofing contractor and with the roofing manufacturer if there is a  weathertightness warranty. Rubber roof jacks should always be used.
Best practices
The above example is a high temperature rubber roof jack. Pipe penetrations allow for a long-term performance of the roof.
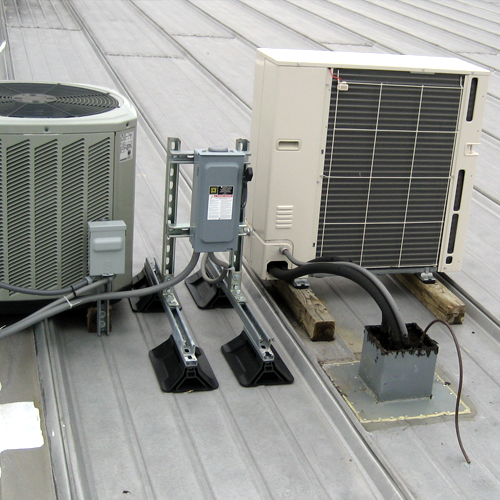
  • Ensure that dissimilar materials such as copper, lead, and graphite are not used on the roof. This includes treated wood, which contains copper. Condensate from roof top AC units must be piped off the roof as it contains dissolved copper.
Best practices
This is an example of wood and HVAC condensation on a metal roof.
  • The roof must be protected from spills of any harmful chemicals or masonry products.

The above represents just an overview of some of the best practices the roofing contractor should consider when entering into a job with other trades. As the roofing contractor, anything that involves the roof will likely be seen as YOUR purview. After all, if there’s a leak, who are they going to call? That said, being proactive regarding roof accessory installation—regardless of who is doing the actual work—will serve all parties in the end. Get in front of any potential issues and ensure everyone is reading from the same playbook. For more information, contact your local sales representative.

Tips for Installing Metal Roof Curbs

Metal roofs made from galvalume-coated steel provide great corrosion resistance and can readily satisfy a 20-year weather-tightness warranty. However, when a large penetration in the roof is needed, such as a large exhaust fan or other equipment, the integrity of the roof can be compromised if not addressed properly. The common method of dealing with large penetrations (i.e., spanning over one or more standing seams) is to install roof curbs that form the transition between the roof and the equipment being installed.

Of course, like most aspects of building construction, there are choices available in materials, methods, techniques, and styles of installing a roof curb. When the key objective is to provide a curb that will perform for the entire life of the standing seam roof, there are four key points to keep in mind.

Roof Curbs
Roof Curbs for Standing Seam Metal Roofs

Pick the Proper Material:

A galvalume-coated roof doesn’t mean that a galvanized steel roof curb is the best thing to use – in fact, galvanized roof curbs are known to rust, corrode, and leak, particularly along weld joints, as soon as a year after installation. Instead, a curb made from aluminum (preferred) or stainless steel should be used to prevent premature corrosion. To put any concerns about dissimilar materials and galvanic corrosion to rest, keep in mind that galvalume is approximately 80 percent aluminum by volume, so they are highly compatible.

Rusted Roof Curbs
Rusted Welds on a Galvalume Roof Curb

Use the Proper Roof Curb Type:

It is not uncommon for a roofer to choose a curb type referred to an an “over/over” curb, meaning that, after the opening is cut, the curb is installed over the roofing on both the upslope and the downslope sides. This might be the easiest to install during construction, but it will very likely create more work and callbacks when the upslope side starts to get water into or under the joint, and leaks. Instead, it is well worth taking a few extra minutes to install an “under/over” curb, which places the upslope side under the roofing in a true shingled lap between the curb and the roof. This way, the upslope edge is much more protected and less likely to leak using the same shingled condition occurring on the downslope side – all creating a properly water-shedding, weathertight condition.

Provide the Proper Water Flow Clearance:

We all know that water seeks the path of least resistance, so the key to keep water flowing down a roof is to avoid creating pockets of resistance. This is particularly true on the upslope end of a curb as well as on the two sides parallel to the slope of the roof. A curb with a minimum clearance of 12 inches between it and any other object on the upslope end will give water enough room to flow around the curb easily. Similarly, once the water reaches the two sides, at least 6 inches of free clearance is needed (i.e., without being encumbered by standing seams or other features) to allow the water to keep going and not back up to create a water head at the upslope end of the curb. Simply put, clearance means free-flowing drainage; lack of clearance can mean water buildup and leaks.

Install Roof Curbs Rib to Rib:

Installing curbs that rest in the flat, lower, panel area of metal roofing invites water tightness problems since the curb now has to be installed and sealed in the most vulnerable area – the surface where rainwater flows. Instead, coordinating the curb size with the rib spacing to provide a rib-to-rib curb eliminates fasteners down both sides of the curb in the pan of the roof panels. Placing the curb on and attaching it to the ribs also allows better transitioning from under the roofing on the upslope end to cover the roof on the downslope end. This type of curb has the added benefit of being able to be installed either during the roof installation of after the roof is finished.

Taking these four points into account in your next metal roofing project where roof curbs are required will help assure a well-installed, weathertight condition that should last just as long as the metal roofing system itself.

Find a sales representative