Five Installer Responsibilities for Weathertightness Warranties

Every metal roof installation comes with an implied warranty: the roof shouldn’t leak. This is true even if your customer didn’t buy a “manufacturer’s weathertightness warranty.” It’s just the very basic expectation. Any details we send out, any materials, whatever the manufacturer supplies the installer…all go to that simple premise that you are buying a quality roof system from the get go.

Beyond that, though, a purchased manufacturer’s weathertightness warranty takes it a step further. It’s added insurance. In order to get the full value and peace of mind from a warranty, there are certain considerations the installer needs to keep in mind. Let’s take a look at five key installer responsibilities on projects with manufacturer weathertightness warranties—beyond, of course, putting down the roof correctly!

MBCI Calhoun GA 4-09, 06_resized

1. Understanding the weathertightness warranty type selected for the project.

MBCI sells two types of weathertightness warranties: Standard and Single Source. The approval process up front is the same for both but it is crucial to know the scope of the project’s warranty. With a standard warranty, the only real expectation is that the roof will remain watertight for 20 years. It is a very basic, very inexpensive warranty in which the manufacturer and the installer jointly warranty the roof for that period of time. The manufacturer covers all the materials and the details, and the installer is covering the installation.  

The opposite end of that spectrum is the single source warranty, which is purchased when the customer wants not only the roof warrantied, but prefers everything associated with the roofany accessories, anything else penetrating the roofto be 100 percent covered by the manufacturer, if applicable. These warranties do cost more, require inspections, and require an installer to have completed the manufacturer’s certified installer training program. 

It’s important for the installer to know what warranty was sold, particularly because he/she may not have been the one involved from the start. They may be coming in to bid the job as the installer onlyTherefore, he/she needs to ask questions because they may or may not have the personnel on their crew that meets the requirements to install that roof for the weathertightness warranty purchased. 

2. Obtaining/confirming building geometry approval for warranty. 

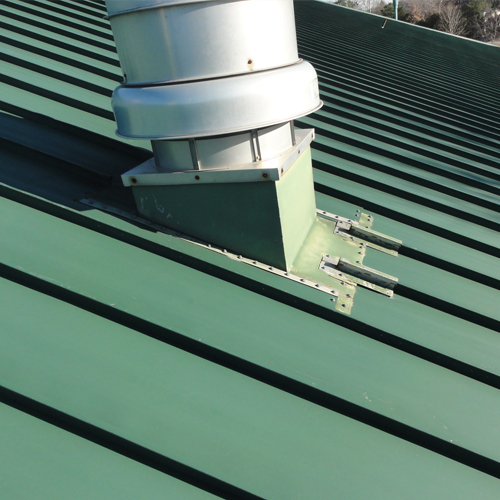
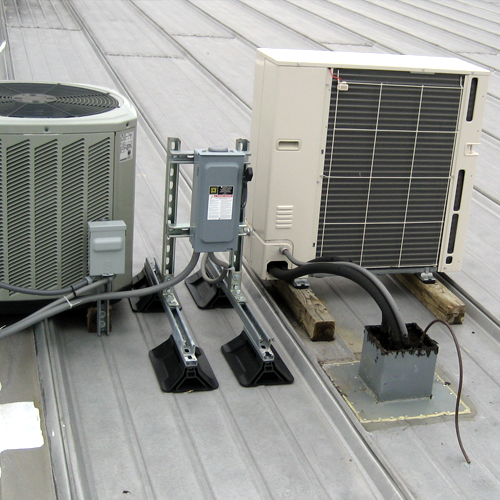
Beyond the type of warranty, it is simultaneously necessary to investigate whether there are additional procedures related to the building geometry. Has everything been correctly noted so that the warranty itself will be valid? Is the manufacturer aware of transitions, edge conditions, roof penetrations, roof accessories (snow guards, solar, etc.)? It is extremely important to make sure that the geometry—or the conditions of the roofare covered within a particular warranty. 

MBCI, for instance, will review your roof plan and see the eave gutters, the ridge, the rake, etc. and we can survey what’s going on. Is that roof tying into something else? Will there be materials on that roof that aren’t provided by us or not being installed by the roof installer? As the manufacturer, we would be taking a cursory view to say, yes, we can warranty the roof or no, revisions are needed. If there is anything that we can’t warranty, we’re going to spell that out upfront. We will give as much direction as possible to get the project to a point it can be warranted.  

That said, it’s the installer’s and customer’s responsibility to make sure that the manufacturer knows what’s happening. Think about it this way. Many times, there are other trades involved outside of the roofing contract. Along comes someone who says, “I need to run something  through your roof,” or six months down the road the owner wants a satellite dish on the roof and the installer incorrectly penetrates the roof., causing a leak. Guess who they’re going to call? The installer/customer/owner needs to get that approved by the manufacturer. Otherwise, the warranty could be voided.  

The main takeaways here: Do not make modifications to that roof without the manufacturer’s approval because the roof installer can end up inheriting the liability for that if they do. And, communicate the criteria or the requirements of the warranty to the customer. Don’t just hand them the paperwork. Make sure they understand what’s in it and their responsibilities as metal roof owners. 

3. Ensure proper installer certification and training as required by the warranty type. 

This sounds self-explanatory, but it goes back to the warranty type and the necessity to make sure the warranty selected is appropriate for the job. Verify whether or not the job requires a certified installer and if so, ensure certifications are current. If the installer is not certified, then they need to take the steps to get certified in order to meet that warranty requirement.  

A common situation: A warranty gets sold by a general contractor and he/she subs it out to another roofing contractor. That sub comes in and says not to worry, “we know how to put the roof on. We’re certified.” Then, MBCI gets ready to issue the warranties or schedule inspections and finds out the subcontractor doesn’t know our system that wellAnd remember—for certain types of weathertightness warranties the installer needs to be certified via our training program.

4. The installer is responsible for correct installation per manufacturers details. 

The onus is on the installer to follow the details and directions provided by the manufacturer. If you install the roof per those details, and then there’s a problem, the responsibility falls back on the manufacturer unless determined otherwiseIf, however, the installer doesn’t follow the details provided and the manufacturer comes out to do a warranty claim or warranty inspection, then the installer is going to be responsible for correcting it. The installer can’t put it in wrong and just say, oh, well, that’s covered by the warranty. It’s not. A manufacturer’s warranty is not for covering a bad installationparticularly in the case of a standard warranty. If the installer does a poor install and the roof leaks, that’s not covered by the standard warranty; it falls back on the installer. Of note, this scenario can be different with a single source warranty, since the manufacturer will be out there doing ongoing inspections and ultimately can become responsible for the installation as well. 

And, it goes without saying, the warranty doesn’t cover the interior contents of a building that may be damaged due to an installation issue.  

5. Do not make adds or changes to an installed system once completed and the warranty has been issued without first getting manufacturer approval. 

The warranty only covers the installed product per details, as mentioned. It does not cover additional materials added to the roof or any changes made, at least without the manufacturer’s prior approval—after the install is complete. 

Some examples would be adding a mechanical unit to the roof, a plumbing vent added through the roof, or the satellite TV cable through the roof. Putting a penetration, fasteners, holes of any kind, into a previously installed roof system, unless approved by the manufacturer, will void the warranty in that location. If the manufacturer does not give approval, the installer, along with the customer, would need to make the decision—is it worth the risk to proceed knowing that if the roof leaks, that location would no longer by covered by the warranty.  

To find out more about MBCI warranties and installer certification, contact your local MBCI representative or visit our website.

Best Practices for Ensuring Metal Roof Accessories are Properly Installed

Best practices for roofing contractors, general contractors…and even architects—from spec’d work to pre-roofing conferences.

Many metal roofs have roof penetrations for accessories installed by other trades. Unfortunately, oftentimes, these penetrations are improperly made or the accessory material is incompatible with the standing seam roof. A properly installed Galvalume standing seam roof, for instance, can be expected to last 60 years or longer. However, improper work on the roof by other trades can result in leaks and possibly a roof service life far less than 60 years. In order to achieve the best results, the roofing contractor needs to coordinate with the general contractor, the architect, and the building owner to ensure proper installation.

In most cases, it is the roofing contractor who is held responsible for all things roof! If armed with a clear checklist as he or she walks into a pre-roofing meeting with the architect, there will be a significantly greater likelihood of a well thought out and successful process. Here are some suggestions for the roofing contractor (in conjunction with the entire team) to consider.

  • A reminder to specifiers to put in the project specifications that all roof penetrations and roof accessory installation must be coordinated with the roofing contractor. Beyond the obvious issue of maximizing performance, if a manufacturer’s weathertightness warranty is specified, the roof manufacturer must preapprove any work performed on the roof by other contractors.
  • If the above is not in the project specifications, the roofing contractor should initiate the conversation during the pre-roofing  conference with the architect and the general contractor.
  • Roof curbs should ideally be supplied by the roofing contractor and they should definitely be installed by the roofing contractor. Welded aluminum curbs should be used as specified by the roofing manufacturer. See tips for installing roof curbs, here.
Best practices
Be sure to use the proper roof curb to ensure a well-installed, weathertight condition.
  • Pipe penetrations for vent pipes, heater flues, gas and electric, etc. as well as penetrations associated with lightning protection air terminals and cable management should be coordinated with the roofing contractor and with the roofing manufacturer if there is a  weathertightness warranty. Rubber roof jacks should always be used.
Best practices
The above example is a high temperature rubber roof jack. Pipe penetrations allow for a long-term performance of the roof.
  • Ensure that dissimilar materials such as copper, lead, and graphite are not used on the roof. This includes treated wood, which contains copper. Condensate from roof top AC units must be piped off the roof as it contains dissolved copper.
Best practices
This is an example of wood and HVAC condensation on a metal roof.
  • The roof must be protected from spills of any harmful chemicals or masonry products.

The above represents just an overview of some of the best practices the roofing contractor should consider when entering into a job with other trades. As the roofing contractor, anything that involves the roof will likely be seen as YOUR purview. After all, if there’s a leak, who are they going to call? That said, being proactive regarding roof accessory installation—regardless of who is doing the actual work—will serve all parties in the end. Get in front of any potential issues and ensure everyone is reading from the same playbook. For more information, contact your local sales representative.

The Right Team Holds Your Standing Seam Roof System Together – Part 1

The architect, roof manufacturer and roof construction installer are parts of a team that can work together like a well-oiled machine to get the best result – a professionally installed roof that looks beautiful and will last for decades.

I now invite you to think of your metal roofing system as a “team” in the sense that all parts must work effectively and efficiently together like pieces of a puzzle to function optimally as designed. A well-thought-out process puts the right combination of materials together in the right way to produce an optimum roofing system.

The process requires identifying a reputable manufacturer of standing seam roofs – one that meets your specific performance and aesthetic needs, and that provides the required warranties. Once chosen, the designer may think, “Voila! Mission complete,” when in fact, the process is just beginning.

BattenLok and LokSeam
Mitchelle Elementary School features BattenLok HS and LokSeam


Since metal roofs are being used in increasingly more complicated designs, the roof panels and related accessories that attach the roof to the substructure are a part of the total roof system. The added roof curbs, pipe penetrations, crickets, snow retention devices and lightning protection equipment all become part of the standing seam roof system.  And it really matters how each of these items attach to the roof.  Though it sounds logical to do so, don’t leave it up to the roofer or another tradesperson to decide how these items will be installed.

Take control and make sure the following are adhered to when specifying a standing seam metal roof system:

Do not use dissimilar materials.

 Copper, lead and graphite can all cause galvanic corrosion. Even water dripping from these materials onto the roof can cause it to corrode. And manufacturers’ warranties are often void if this situation exists.

Some examples: Copper lightning arresting equipment is a typical use of dissimilar material found on Galvalume roots. Use aluminum instead. Lead hats are often found on Galvalume roots. Rubber jacks can be substituted.

Compile a qualified list of acceptable curb manufacturers. Choose only those that use aluminum or stainless steel. Many curb companies use Galvalume, which seems reasonable since most standing seam panels are made from this material. But when Galvalume-coated steel is welded, the Galvalume-coating melts at the weld. Even when a coating of corrosion inhibitor is used, it will never be as good as the uncontaminated Galvalume coating.

You also want a curb manufacturer that offers a weathertightness warranty if required for the roof. Roof manufacturers will generally warrant the attachment of the roof curb to their roof panels, but it’s up to the roof curb manufacturer to warrant the construction and performance of their product.

Be careful with roof curbs.  First off, they should be “shingled” into the roof. This way, all laps shed water as it drains from the roof. Curbs that lap on top of the roof panels on the upslope side will cause problems.

Roof curbs must allow plenty of room for water to drain around them without building up a waterhead at the upslope end.  Provide clearance on both sides of the curb and a long flange on the upslope end so the roof panels can lap onto the flange and maintain a 12” upslope from the top of the water diverter built into the curb.

Finally, if AC units will be placed on the roof, include PVC condensate lines to carry the water off of the roof. Never allow the condensate to drain directly onto the roof. The dissolved copper ions which will cause galvanic corrosion of the roof panels.

This is a lot to consider, possibly more than you thought was involved. Well friends, there’s even more. I’ll explore this even further in my next post.

In the meantime, learn more about MBCI’s rigorously-tested, standing seam metal roof systems and how it’s one of the most durable and weathertight roof systems available in the industry.

Find a sales representative