
Tag: roof slope
Planning for Metal Roof Retrofitting
Structural Penetrations in Standing Seam Metal Roofs
In our prior post on “Pipe Penetrations in Standing Seam Metal Roofs,” we identified important guidelines for when pipe penetrations are made to metal roofing systems, typically after the metal roofing is installed. That means an opening is cut in the metal roofing, it is properly flashed or sealed, and the penetrating member is passed through it. However, some penetrations are already in place before the roofing contractor shows up. These can be things like vertical members resting on the building structure that support a platform for HVAC equipment above the sloped roof. Or, it can be parapet wall with offsets or other conditions that are already in place. In cases like this, a different approach is needed to assure that the roof remains watertight.
Equipment Platforms for Structural Penetrations
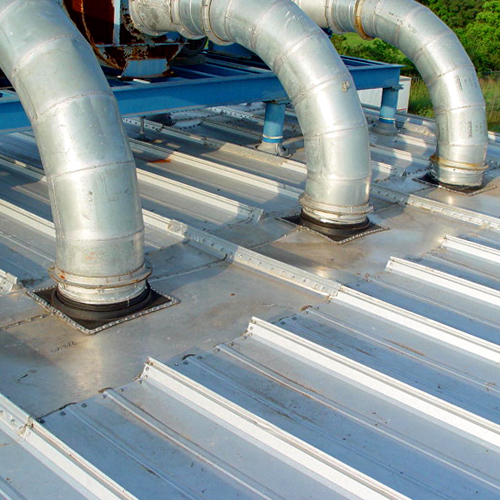
From the standpoint of a roofer, a structural equipment platform is a pre-existing condition. The metal roofing industry already recognizes the need to address such situations, particularly on existing buildings, by offering retrofit flashing and curb products. The same, proven approach can be used when pre-existing conditions are encountered on new buildings as well. For example, when structural posts for equipment platforms are encountered running up through the roof plane, roof jacks and curbs specifically designed for retrofit applications should be used. The retrofit roof jack, or boot, should be made out of rubber and be designed to install around the penetration, rather than over it. The boot should ideally rest on a two-piece retrofit pipe curb which can span across one or more standing seams and create a smooth, flat surface for the boot to be attached and sealed. The two-piece design allows for the pipe curb to be properly shingled on the up slope and down slope side of the roofing, thus preventing a “backwater lap,” which will leak. Trying to use only products intended for new construction on such conditions will require unwarranted field modifications or an over-reliance on caulking and sealant, all of which can be prone to problems and failure of the watertight abilities of the roofing.
Parapets
The use of parapet walls around some or all of a perimeter of a building is a common condition. However, if the building shape varies, and the parapet along with it, then there may be some rather uncommon conditions in which the roofing meets an offset or irregularly shaped parapet walls. The issue is that water coming down the sloped roof runs into the offset or other obstruction, causing a buildup of water and a potential leak. The typical approach is to provide a cricket, which is flashed into the parapet wall and diverts water away from the corner created by the offset. It is important, in this case, to be aware that standard sheet metal crickets have not proven to be effective. Instead, welded aluminum crickets and fixtures are recommended to create a truly watertight seal. Also, the welded cricket can be “shingled” into the roof to prevent “backwater laps.” The key is to provide a complete seal at the corners by welding the material, which cannot be done with sheet metal crickets.
Design Planning
The best way to address all of the structural roof penetration issues described here is with proper upfront planning. Avoiding any of these conditions would of course be ideal, and perhaps they can be designed out of some projects. However, if they’re unavoidable, then the roofing contractor and the design professionals need to review the conditions together ahead of time. This advance design planning is the best way to assure that the best, most effective detailing is employed and the proper materials are available on site.
Snow and Metal Panel Roofs: Part I
It’s February; winter storm Jonas happened last month. Snowstorms will continue to occur, and heavy snowfall can have many negative effects on roofs. What should you consider when designing a roof in snow areas, especially those with high snow amounts?
What to Consider when Building Metal Roofs
Roofs on buildings in snow areas—from a structural capacity point of view—can be designed to be any low-slope or steep-slope roof system. Roof structures can be designed and built to accommodate any anticipated snow loads. From a weather-protection point of view, snow buildup on a roof can be problematic. The extra load and the risk of leaks are not desirable; however, keeping snow on a roof is often the acceptable way to deal with it.
Roof Slope
Unquestionably, the slope of the roof matters when it comes to snow staying on or sliding off. Once a roof slope gets to be about 45 degrees (i.e., 12:12), slope becomes the overriding factor for sliding snow. The amount of snow and the roof type also matter. From a designer’s perspective, there are also a number of localized issues to consider when designing for snow on roofs.
Snow Density
The amount and density of snow also matters. More snow means more weight. More weight means a greater sliding force down (along) the slope of the roof. On slopes less than 45 degrees (e.g., 6:12 to 9:12), a low coefficient of friction (such as on smooth pan metal panels) means less resistance to sliding. Striations and embossing add a small 3D profile and improve the resistance to sliding, especially if they run transverse to the slope.
When heavy, dense snow slides it can pack a punch. Such snow sliding down a roof can shear off exhaust vents; therefore, rigid vent pipes are needed, along with a secure method of attachment. Further, installing vent pipes as high up on the slope as possible reduces the amount of potential shear load. Consider the potential load on a vent pipe that’s 5 feet from the eave with a 40-50-foot eave-to-ridge length! Reverse that and most of the load goes away.
Roof Material Type
Material type and surface color make a difference, specifically a roof’s emissivity. Metal roofing absorbs heat more quickly and radiates heat more effectively than most other roofing materials. Darker colors enhance this effect. Even with as much as 3 to 5 inches of snow, UV light passes through it; less light passes the denser the snow. (The proof: solar energy panels [photovoltaics (PV)] work when covered in some snow.) This effect only happens on sunny days, and is most effective on south-facing roof areas. If there is heat loss from the building up through the roof, the heat will help melt the snow at the roof/snow interface. This creates a potential for sliding snow.
In part II of this blog, I’ll discuss the logic, experience and engineering that goes into designing a metal roof for snow. In the meantime, learn how to properly install snow retention devices, and watch how a New Jersey home heats and cools itself by gathering snow and rainwater.