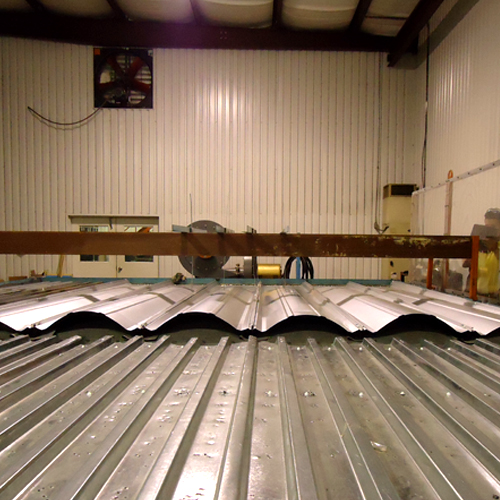
Sloped, standing seam, metal roofing provides a continuous surface that is designed to shed water efficiently while providing a long-lasting and great looking roofing solution. When the roof design and shape is simple, (i.e. continuously extending from ridge to eaves with no changes or interruptions) then all of the attributes of the metal roofing can be assured by using some very conventional and well-known details for design and construction. But in the real world, there are lots of conditions that require more specialized attention to detail. For our purposes here, we will simply refer to those as “specialty roof conditions.”
What types of roofing conditions warrant the special attention? Most are associated with changes in the shape or surface of the roof, say where the ridge line is interrupted or offset. Others could be a means to accommodate a roof feature such as a dormer, a dutch hip type of roof, or the intersection between a ridge and a parapet wall. Some might be related to the design of a valley, particular if it is a “dead valley” that doesn’t drain directly to the gutter but stops short, as around a dormer or elsewhere. Or some could be the result of some special conditions created by the roof design such as cascading water over an edge or heavy snow accumulation conditions. There are certainly many others too, but the point is that any of them are a potential source of water leakage and building damage if they are not properly addressed.
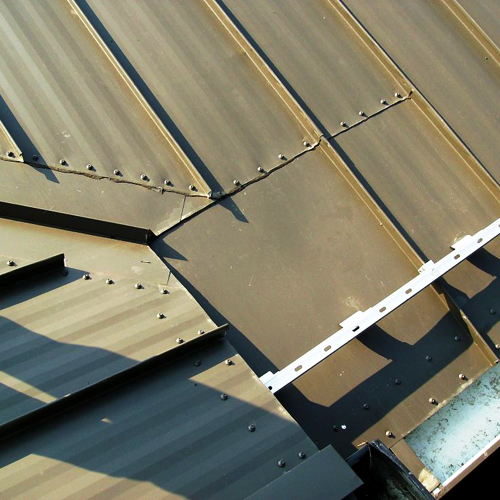
Above is an example of a special roof transition created by MBCI.
Most metal building manufacturers not only recognize the importance of such specialty roof conditions, but they also have lots of experience in developing very workable solutions for them. The key for success is found in the fundamental principles of properly overlapping (i.e. “shingling”) all materials to allow water to drain smoothly away where it is intended without getting diverted to places where it shouldn’t go. That means the metal roofing panels need to be cut, fit, and installed properly, but it also means that flashing, sealants, and fasteners need to be installed correctly too, all regardless of the slope of the roof. To communicate ways to achieve better results in the field for specialty roof conditions, manufacturers like MBCI make step-by-step details available for installers. The significance of using and following these details can not be overstated since they are a key component in getting a weathertightness warranty from the manufacturer.
As an example of how this might play out on a specific building, let’s look at a dead valley that occurs because a gable roofed dormer is installed in the main area of a roof. The first thing to recognize is that multiple layers of materials are involved in the transition around the dormer, all of which need to be installed in the proper location, following the proper sequence, and with the proper connections. A step-by-step process as detailed by the manufacturer might look like this:
Step 1:
With the substrate in place (rigid insulation over a metal deck), a special width panel will likely need to be installed and serve as the collection area for the dead valley to drain into. Then, plywood spacers and nailers are installed, and the main lower valley area is covered with “rubber” (EPDM) flashing.
Step 2:
Secure continuous eave trim over the plywood nailers and add and offset cleat on top to receive roof panels, all secured with tri-bead tape sealer and fasteners as shown.
Step 3:
Install extended valley trim across the valley with an offset cleat on either side secured as shown.
Step 4:
With all of the prior steps in place, then the installation of upper panels can begin to interface with the edge of the dead valley.
Step 5:
Continue cutting and installing panels to fit over and drain into the dead valley, which then drains without interruption onto the special width panel and the roof.
By following step by step details from the manufacturer for this or other specialty roof conditions, then the likelihood increases that everyone involved in the project is both proud and satisfied with the end results. The key is to start at the beginning with the proper planning and preparation by communicating with the manufacturer about all roof conditions that require special attention like this example.
Energy codes and increasing energy costs have prompted the installation of more roof insulation into metal buildings in recent years to make them more energy efficient. That is fundamentally a good thing and metal building manufacturers have developed ways to accommodate a variety of building enclosure packages that increase energy performance while still being engineered to meet the structural requirements of the building. This allows the whole building envelope to be designed and fabricated so it works as a complete, coordinated system.
Insulation helps maintain a comfortable interior temperature in your metal building during the winter and summer months.
The metal roofing or metal building suppliers typically don’t design the insulation systems. However, it is important to include them in the discussions or make them aware of what type of system is to be installed. It is not uncommon for a metal building to be ordered with the design stipulation of “insulation by others.” In that case, coordination is needed between the person ordering/designing the insulation system and the metal building manufacturer or roofing supplier. Since there are a great many variables in the way that insulation can be provided, it is not appropriate to think that the design of structural systems (purlins and roof bracing) and cladding systems (clips, fasteners, and metal roofing profiles) will necessarily accommodate all the same insulation in all conditions. Rather, unless the specific details of the insulation system being used in the building are communicated effectively at the time of the order, the manufacturer can not assure compatibility of the systems used with the insulation system that is to be installed.
In order to understand some of the variability in the options, let’s look at some of the common ways that metal buildings are or are not insulated.
Uninsulated Roofs:
Buildings that do not have any heat or air conditioning in them may not need for an insulated roof. This could be true for outdoor shelters, some agricultural buildings, or vehicle storage buildings. However, uninsulated metal roofs have the potential for “roof rumble” as they move due to thermal expansion and contraction, wind, or weather as there is no insulation to mask or deaden this noise. Absence of insulation can also lead to condensation during certain times of the year if temporary heat is added to the building. This condensation builds up and can drop or fall onto whatever is below. Many times condensation issues are mistaken for roof leaks when in fact it’s a mechanical design issue of the building envelope that’s not been properly addressed. If neither sound nor potential condensation are a concern, then there’s no problem. But if either or both need to be avoided, then some basic level of insulation may be prudent.
Over the Purlin Systems:
One of the most common insulation systems for metal buildings and/or open framing systems is to simply install rolls of blanket insulation. In this case, fiberglass insulation with a reinforced liner is draped over structural beams and purlins. The rolls are supplied to length by the insulation supplier based upon the roof structural layout and the required “R” value necessary for the building envelope in thicknesses that can vary from 3″ to 12″. Is is this thickness to be installed over open framing that the metal building/roofing supplier must be made aware of. Based on this thickness, the panel profile can be verified to determine if it can be used as well as confirmation of the correct clip heights and screw lengths for installation. Keep in mind that the supplier will offer a guide to the installer based upon insulation thickness. As insulation can vary by manufacturer, it will be up to the installer to make adjustments as needed in the field to ensure proper placement and hold modularity of the steel system. (See Respect the Module: Metal Roofing Panels are Modular for Good Reason)
Cavity Fill Insulation Systems:
When higher “R” values are required for roof insulation, a single layer over the open framing system may not be sufficient. When that occurs, the designers of the building envelope may need to employ the framing cavity to add more insulation. There are also variation on the cavity fill approach.
One means is to simply introduce a second layer of unfaced blanket on top of the faced insulation. Sometimes referred to as a “sag and bag” approach, here the first layer of insulation over the purlins is ordered to accommodate larger amounts of drape between the roof structure to permit another layer of unfaced insulation to be added on top. This increases the insulation thickness between the purlins but keeps it thin enough to be compressed to accommodate the roof panel installation. For coordination purposes, the thickness of this upper insulation over the purlins needs to be known by the building manufacturer so the clips and fasteners can be properly sized. Likewise, the amount of insulation draping between the purlins needs to be known to determine if purling bracing or other accessories may potentially interfere with the insulation installation.
Other types of cavity fill system may include a faced batt or face roll insulation with long tabs, which are secured to the tops of roof purlins and nest fully into the purlin cavity to fill the space more effectively. This helps in eliminating greater compression of multiple layers of insulation on top of the purlins and permits an additional layer of unfaced insulation on top of the roof structures and/or a thermal spacer block. This system may also require some intermediate banding to support the insulation between the primary supports.
A liner system may be installed that employs a continuous vapor retardent material. This liner is secured to the bottom of the roof structure and additionally supported with metal banding allowing the cavity to then be filled with unfaced insulation between the purlins. More unfaced insulation can also be added on top of the purlins as well. In all of the cases where cavity fill systems are used, it is important to advise the building manufacturer/roof supplier which type is being used to ensure proper panel clip heights and screw lengths. This is important because these systems can and will interfere with the roof structural bracing making them more difficult to install. The metal building supplier may be able to offer bracing alternatives or remedies to eliminate some or all of the bracing that would otherwise be in the way when installing the roof insulation. There may also be suggestions on how to avoid impeding or penetrating the vapor barriers which could lead to condensation issues. Overall, it is best to discuss and coordinate all of these items ahead of time.
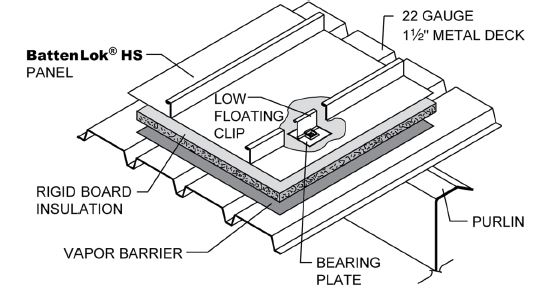
Rigid Board/ Composite Systems:
In this insulation approach, rigid foam insulation board is used to achieve the sought after energy performance. Commonly, these use metal deck panels over the roof structure thus supporting the insulation and a vapor retardant material on top of the deck. The insulation and the metal roofing can then be secured to the framing substructure or to the metal deck itself, which means the details of attachment need to be reviewed and engineered to avoid adverse affects on the roofing system.
Minimum decking gauge, clips spacing and clip screw lengths should be considered as well as associated adjustments to labor costs.
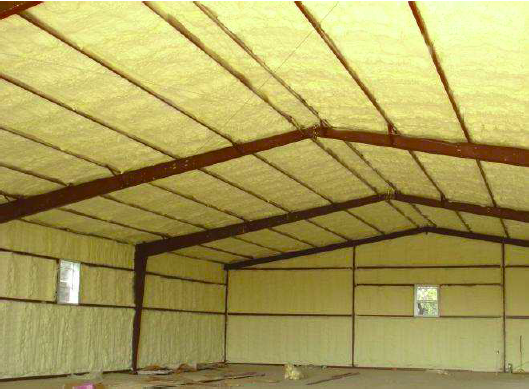
Spray-on Insulation:
All of the above systems typically require attention to providing additional air and vapor barriers and proper cutting and fitting during installation so as not to cause unwanted infiltration or to prevent condensation from occurring. For these reasons and more, some people will consider the use of closed cell spray-on foam insulation, which can continuously provide all of these features in one product. It can also be installed after the roof is completed and structure is weathertight.
Any corrosion of the panel due to adhesion of the insulation is not covered by the panel.
In the case of metal buildings, spray-on insulation is typically applied in the field onto the inside face of installed roof panels and sometimes wall panels too. There are, however, a few concerns with this approach in metal buildings. First, if conditions are not right and the panels are not properly prepared, then the spray foam can, in fact, trap moisture between the insulation and the metal components it is sprayed onto. That can lead to corrosion of the metal or deterioration of the insulation. Secondly, not all spray foams on the market are intended for this type of use so they don’t always adhere well to some metal panels, meaning it could become loose and fall away. Finally, continuous spray foam in this application will not always be able to expand and contract at the same rate that metal does. In some cases, that could mean that the foam suffers from differential movement causing it to break or lose adhesion.
For all of these reasons, be certain to research all options before considering or selecting a foam spray-on insulation that will not negatively impact your roof performance. If a foam insulation is preferred, it may be worth considering the use of insulated metal panels (IMPs) that are designed, engineered, and fabricated to be compatible with metal building construction.
Recognizing all of the above variations and options, the key point to remember about insulating metal buildings is the importance of communication between those designing and ordering an insulated metal building and those who are manufacturing and fabricating it. To find out more about the best ways to do that, contact your local MBCI representative.
Performance-based building product testing and accreditation is a critical piece of just about every aspect of construction—affecting everyone from the manufacturer to the installer and ultimately to the owner and occupant. These certifications ensure real-world property loss will be prevented and provides protection when certified products are installed correctly.
With roofing being such a vital part of any building project, roofing manufacturers must take certifications for roofing products (in this case, metal roofing products) very seriously. Below, we’ll give a brief overview of the main certifications that we—and other metal roofing companies—test to and are audited for in order for the overseeing bodies to confirm that we’re producing what we’re testing it to. In the simplest terms, these specifications, such as UL or FM, will give the contractor peace of mind that he or she can provide what is spec’d.
At MBCI, we have several certifications through which we have ratings. These include:
1. UL (Underwriters Laboratories).
UL certifies roofing materials and roof assemblies for fire performance, hail resistance and/or resistance to wind uplift. Roof deck assemblies are investigated for performance under internal fire exposures and for uplift resistance. MBCI does a good deal of testing and we have UL constructions for many of our roofing products. We get the UL construction number, impact ratings and fire ratings. UL does quarterly audits in the manufacturing areas to make sure that we’re producing the panels the way we test.
2. IAS (International Accreditation Service) certification.
IAS accreditation programs are based on recognized national and international standards that ensure acceptance of its accreditations. To meet this standard, MBCI is “Part B” of the process, as we are responsible for the components. The auditor comes in to certify that we do what we say we do. Once IAS accreditation requirements are met, the company receives a certificate of accreditation.
3. FM (Factory Mutual) approvals.
MBCI has three roofing products that are FM approved for wind uplift standards, hail resistance, internal and external fire ratings. For each, we test the product and FM comes out yearly to do an audit.
This is an example of FM wind uplift testing.
4. Dade County roofing product approvals.
Miami-Dade and Broward Counties are classified as High Velocity Hurricane Zones (HVHZ), which are rated as 150 mph plus winds. It is Florida’s highest rating. An updated testing approval process has been instituted for building products and materials used in these counties. The purpose is to mitigate damage caused by wind-borne debris resulting from hurricane-force winds. MBCI does testing and this stringent certification is applicable for anything that ships into Dade County or Broward County in Florida. Product Notice of Acceptance can be located on the Miami-Dade website for roof and wall panel systems that are Dade County approved.
Safety and performance are the most important goals. All in all, these certifications ensure that we, the manufacturer, are doing our job and that customers are getting everything they’re paying for. For more information on MBCI’s product testing, please contact a sales representative.
Many metal roofing installers may think that their years of experience on the job is enough. But even for those who have been putting up metal roofs for a long time, the truth is that if they haven’t put up a particular brand’s roof before, they need to go through that manufacturer’s installer training and get certified. There are several reasons for this.
More and more, architects are starting to specify that an installer must be certified by the manufacturer of the product being installed.
Installers need to know the proper technique and protocols—for a particular manufacturer’s product! After all, you don’t make any money by going back and fixing leaks.
There are many other standing seams that are very similar to those that MBCI sells, and while they may look similar, there will be a number of small differences, such as the way panels are notched or the way sealants are put in. Even the way companies test panels can be different. For instance, if you have a Florida or Dade County approval or an FM approval, that’s all tied into the way the roof system is tested. So, if someone has a project where one of those things is required, it is imperative to make sure the installer is using that brand’s system of doing things, down to every last detail. These are some of the things covered in certification courses.
Certification Courses and Installer Training
At MBCI, we offer a three-day course that covers all of our standing seam panels, and have a separate two-day course for insulated metal panels, which provides advanced installer training in metal roof installation through classroom lecture and hands-on application in a variety of MBCI’s products, assembling roof systems on a mockup to reinforce what was learned from the presentations. Courses take place once a quarter in different locations throughout the United States.
In terms of who should attend certification courses, generally speaking, it’s the person from the company who will be doing the actual work since a certified installer needs to be on the roof any time any work is being done on the roof. He or she is the one we train. And that installer is tied back to the company in order for them to receive certification. That company has to have workman’s comp and general liability insurance. If the certified person leaves the company to go elsewhere, the first company needs to certify someone else.
The Bottom Line of Certification
From a bottom line perspective, it’s important for companies to be proactive in making sure there is always someone on their team who is a certified installer for the products they use—or might use. Not only will they learn tips and tricks for proper installation, but it will also avoid a situation where you have a job, the panels are being delivered the next week and you realize you need someone to be certified. Maybe it’s three weeks until the next certification opportunity. You’ll want to have all that settled before you need it.
Just because you’ve been installing roofing for 30 years, doesn’t mean installer training and certification isn’t necessary. Our best advice is to come to the class and learn all the little idiosyncrasies about whatever manufacturer’s roofing panels you’ll be installing. This is a case where even a little knowledge goes a long way.
One of the most misunderstood aspects of a metal roofing system is the proper use of a vapor barrier. There are many sources of information about this topic – some of which are based on science, some based on anecdotal field experience, and some based on journalism. Here, we will try to break it down to the basic principles that can be used to understand the latest options for a metal building roof system today.
What is Vapor?
The observed science tells us that water can take three forms, depending on temperature and its ability to interact with other things around it. Water can be a liquid that we drink, solid ice that we can skate on, or a gaseous vapor that is part of the makeup of the air we breathe. We can’t see water vapor in the air but we can feel it – we call that humidity. High humidity means a lot of water vapor is in the air, typically coupled with higher air temperature – and both can make us feel uncomfortable and “sticky.” Low humidity means the air is dryer – more typical in lower-temperature air – but this may also be uncomfortable for our breathing, skin dryness, etc.
Why is Vapor a Concern?
As long as the gaseous water vapor stays in the air at a moderate or comfortable level, there is no real concern. However, since water vapor responds quickly to temperature, it can turn back into water as soon as it encounters a surface that is cold enough for it to make the transformation. We know this phenomenon as condensation, and anyone who has seen a cold drink collect water on the outside of a glass on a humid summer’s day has experienced it. It is the same phenomenon that shows up on the surface of windows in a building when there is a big difference between inside and outside temperatures. We know that the amount of water vapor (i.e., humidity) present and the air temperature can both be variable at any given time, but there is always a predictable point at which water vapor will condense and form water drops – this is called the dew point. When vapor in the air encounters a temperature at or below the dew point, condensation occurs.
What Does This Have to do With Metal Roofing?
Metal roofing systems and condensed moisture are not a good combination. If airborne moisture seeps into a metal roof assembly, finds a cool surface, and condenses on any surface there, it likely won’t be visible from inside or outside of the building. That trapped water can then cause rust and corrosion of metal parts, resulting in real damage. It can also collect and saturate building insulation, rendering it ineffective. If enough water condenses, it can cause visible staining or grow mold, causing concerns for people inside the building.
Vapor barriers are used in metal buildings to reduce the rate at which vapor can move through a material.
Do Building Codes Address This?
Absolutely – they require that the building be protected from the possibility of damage caused by water vapor. Since the concern is to restrict the flow of airborne moisture in relatively warm air from reaching a cooler surface to condense on, they call for something to be installed on the “warm” side to prevent that flow. For most buildings across the United States, the warm side is the interior face of the roof and walls. However, if the building is kept cold as in a refrigerated warehouse or storage building, then the warm side is likely on the exterior. The same is true in southern climates where warmer, humid air is the exterior condition and cooler interiors are common.
What is the Best Solution?
Manufacturers of insulating products have been involved in addressing the best ways to provide not only insulation to keep building temperatures warmer, but also vapor barriers to restrict the flow of airborne moisture. After literally decades of trying different types of vinyl and polyethylene facings over fiberglass insulation, most have realized that those membranes simply don’t provide enough protection to be effective. Instead, most are now offering a choice of laminated facings over the insulation that can be installed so they are exposed to the appropriate warm side of the roofing system. These fairly sophisticated laminations include:
Polypropylene-scrim-kraft consisting of layers of white or metalized polypropylene, fiberglass reinforcing, and white kraft paper on the order of 11-30 lb. weight
Polyprolene-scrim-kraft consisting of aluminum foil, fiberglass reinforcing, and 30 lb. kraft paper
Vinyl-reinforced polyester
All of these latest advancements in vapor barriers can provide comparable, high levels of protection, but their selection can depend on a variety of other building factors. Therefore, it is always best to engage an architect or engineer in the design to review the needs of the entire building to select the most appropriate, specific solution for an given project. It will also be important that all seams, connections, and penetrations of the vapor barrier are addressed in the design and construction, which are similarly best addressed by an architect or engineer to assure there are no breaches in the protection provided by the barrier.
Metal roofing is commonly installed on residential or light commercial buildings, where longevity and aesthetics are a priority. When those buildings are wood framed or use roof sheathing, the desired results can still be achieved, as long as some basic guidelines are followed. One of the most fundamental items to address is making sure that the roof system is properly ventilated in a manner that works with the rest of the building construction. Let’s take a look at the two most common means to achieve that.
Ventilated Attic:
Conventional residential roof construction typically involves a trussed or rafted roof system with insulation installed along the ceiling line and a ventilated attic above it. The premise here is that the ceiling is sealed tightly to prevent any conditioned air from entering the attic, but if it does, then any moisture in that air is ventilated out of the attic, preventing any build up and potential damage.
The most effective way to ventilate an attic is with continuous vents along the soffits and a corresponding continuous vent along the ridge. The International Residential Code (IRC) recognizes this approach and provides the formulas for determining the proper amount of net free vent area (NFVA) required for the total roof assembly. It then goes on to state that 50 percent should be split between the ridge vent and 50 percent along the total soffit area. Some building experts suggest, however, that 60 percent along the ridge and 40 percent along the soffits will provide a slight pressurization of the attic and help with the desired proper venting flow.
Either way, the overall intent is to create a situation where outdoor air is moving freely in through the soffit vents and up through the ridge vent. The continuously moving air then helps keep the roof sheathing, and the roof cooler than it would be when compared to sitting in the sun without the ventilation – on the order of at least 2-3 degrees Fahrenheit.
Ventilated Roofing:
Not every roof system is built with an attic and insulated ceilings. Sometimes, the roof deck defines the building enclosure either in the form of an upper floor ceiling or as a cathedral-style ceiling and roof system. In some of these cases, insulation may be installed between the roof framing which still requires ventilation between the roof sheathing and the insulation on the order of an inch minimum of air space (2 inches preferred), as in an attic.
In other cases, the insulation may be rigid foam that is installed above the roof deck or sheathing. Here, the insulation needs to be thick enough to keep the exposed ceiling warm and prevent any condensation inside the structure. The International Energy Conservation Code prescribes the minimum R-values of insulation based on climate zones, and typically, the required amounts for energy control also assure condensation control.
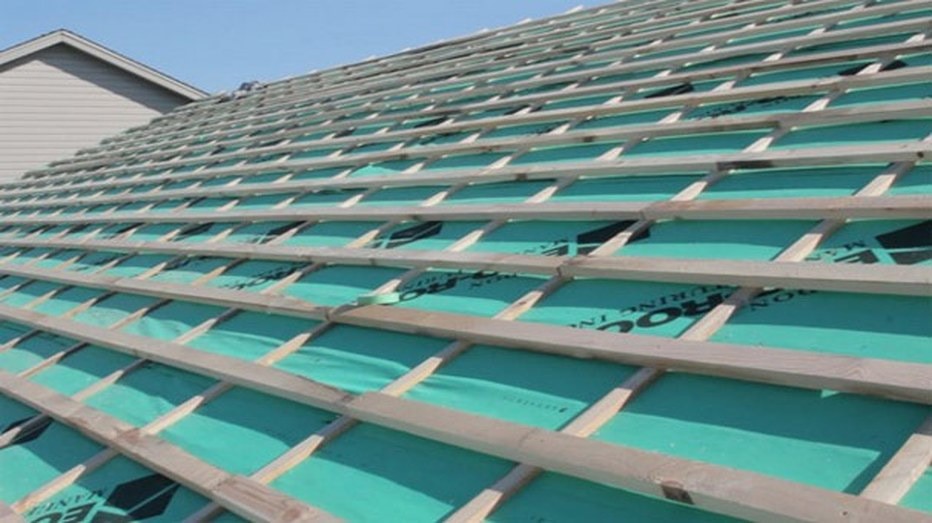
Above sheathing ventilation (ASV) is achieved by having continuous air flow between the roof sheathing and the metal panel system.
Nonetheless, if a layer of wood sheathing is placed directly on the insulation and then the metal roofing placed directly on top of that, the metal roofing will tend to get warmer in the sun than in a ventilated condition. Therefore, metal roofing manufacturers often recommend providing an air gap between the metal roofing and the sheathing. This is achieved with furring strips ran vertically to assure air flow, and then run horizontally to support the roof. The spacing and details of these supports should be determined by a structural engineer who can perform the needed analysis and calculations, taking into account the panel strength and imposed loads from snow, wind, etc.
Is this approach effective? A series of studies undertaken at Oak Ridge National Laboratory and sponsored by the Metal Construction Association has determined the answer is yes. These studies used a common asphalt-shingled roof without any ventilation above the sheathing as the control case. Then different versions of a metal roofing system with ventilation between the sheathing and the roofing were tested and compared to each other and the asphalt-shingled roof. The results found that “all test roofs were highly effective in reducing the heat flows through the roof and ceiling, and in reducing the diurnal attic temperature fluctuations.” (References below)
Clearly, paying attention to ventilating the roofing system, regardless of the type of construction, can make a difference in the overall performance of a roof. To find out more about ventilated roofing systems for a current or upcoming project, contact your local MBCI representative.
References:
Performance Evaluation of Advanced Retrofit Roof Technologies Using Field-Test Data – Phase Three Final Report
Installing metal roofing and siding requires placing and aligning metal panels over the structural supports. But ultimately it requires installers to spend a fair bit of time fastening them in place, typically using a great many fasteners. It is easy to get complacent about this repetitive activity, but the reality is that every fastener plays a crucial role in the integrity and longevity of the installation. Properly selecting, installing, and using the right tools, allows for a proper fastening process that assures a weathertight installation. But if a few fasteners are installed poorly, causing water or air leaks, then the installer is called back to correct the condition. Do a lot wrong, and warranties can be void, with the durability of the building left compromised, possibly requiring a total do-over.
What’s the difference between a good fastening installation and a problematic one? Here are some of the things to pay attention to onsite:
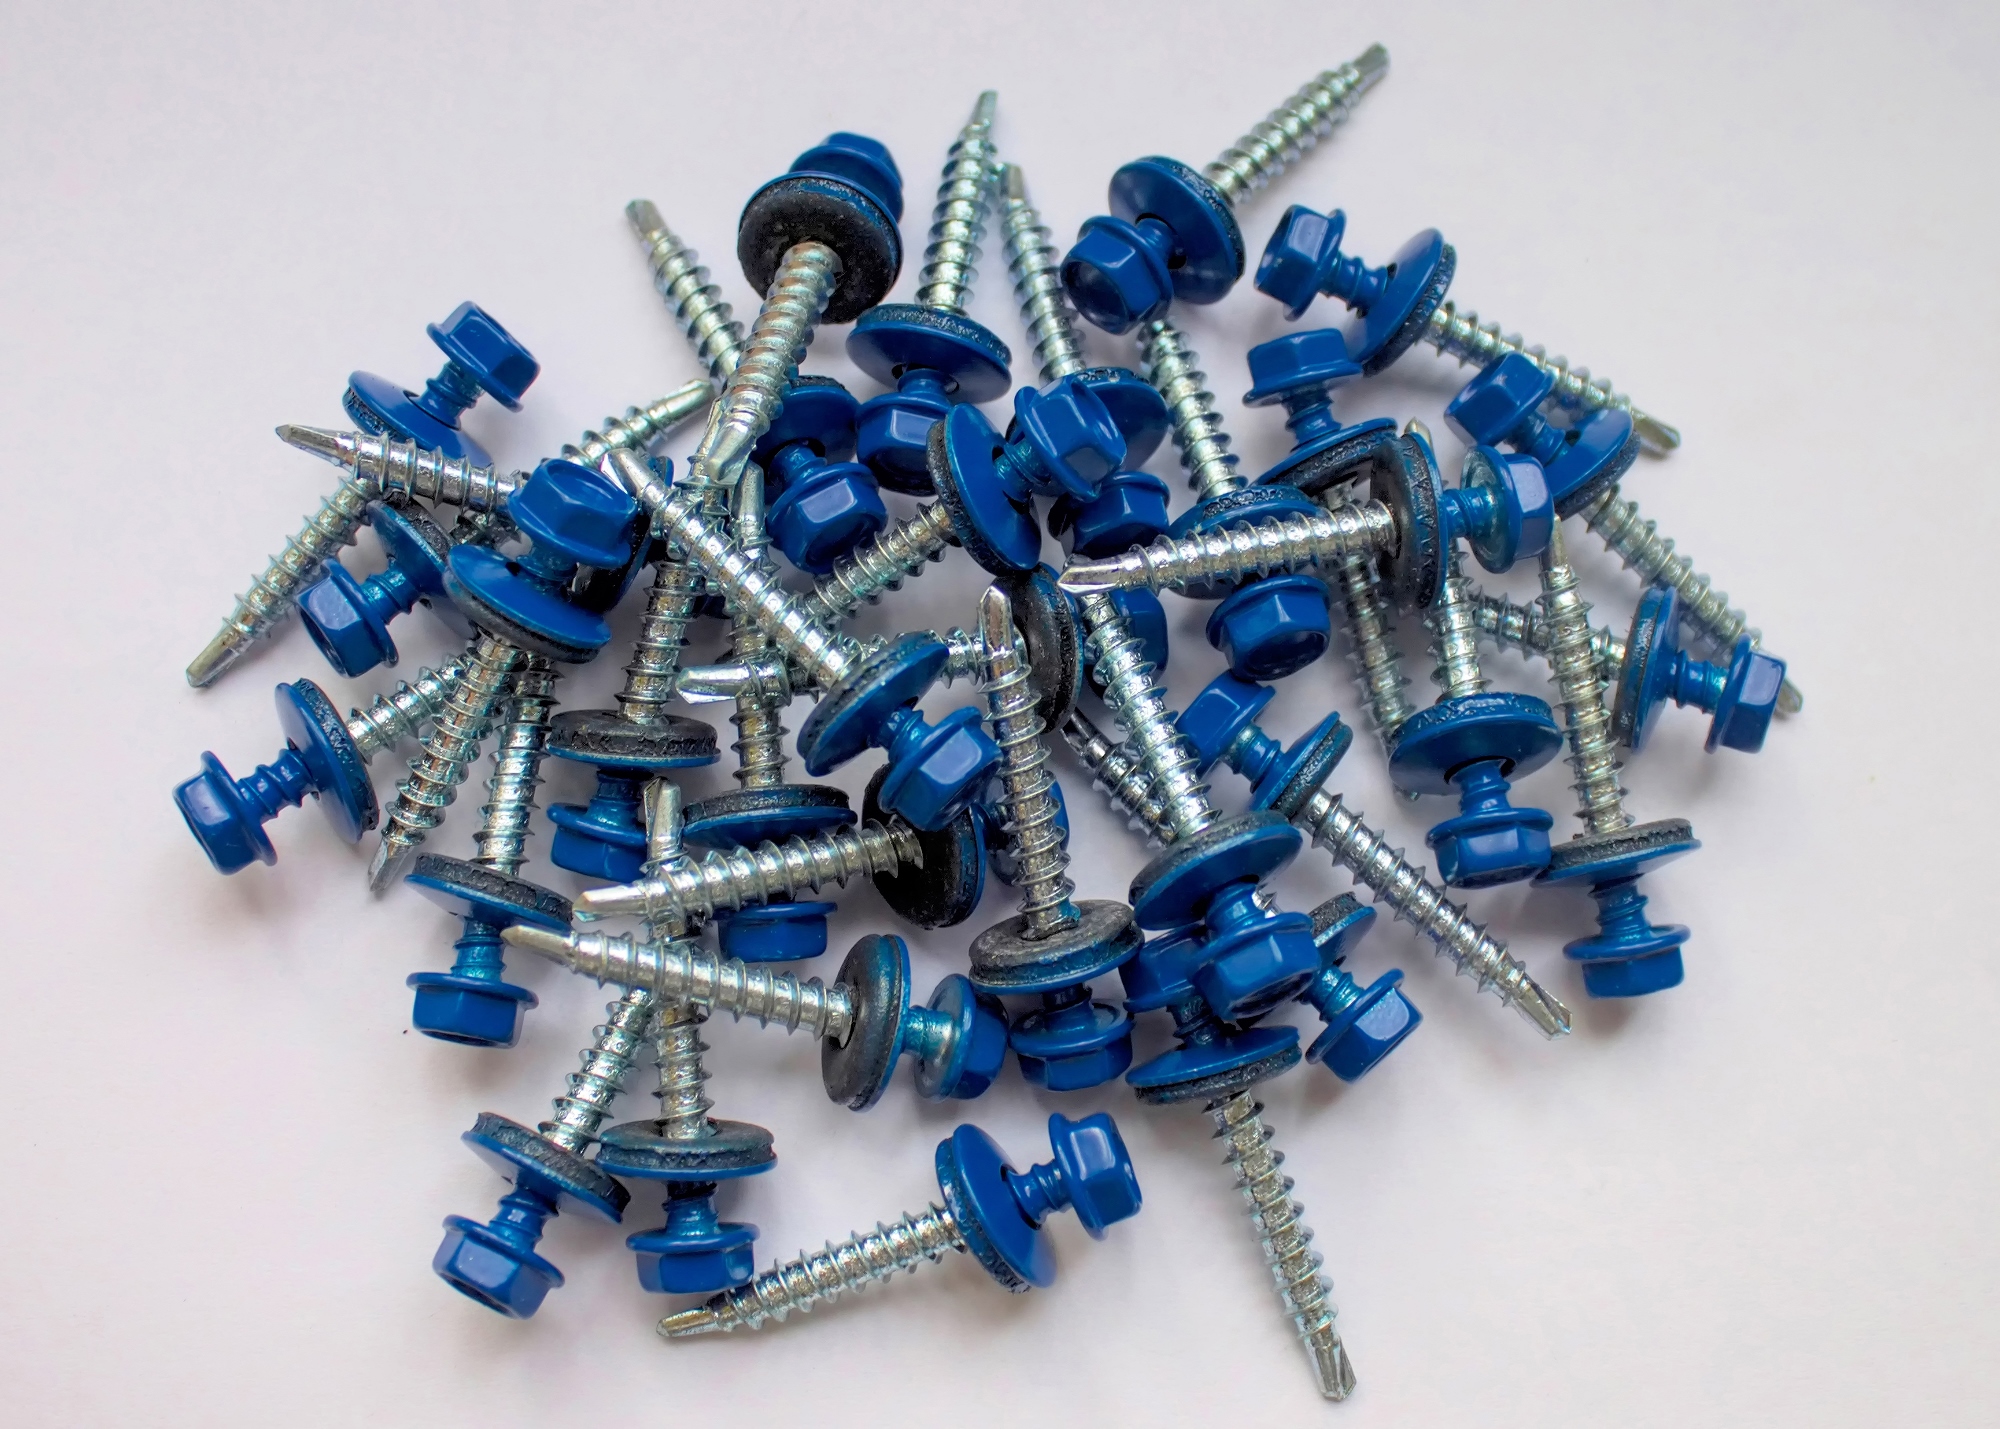
Fastener Types:
The most common type of fasteners used in metal buildings are self drillers, which vary based on diameter, length, head shape, and material. They are also specifically designed for use in metal substrates. Different fasteners are also available for wood versus metal, and either type can be sized for different substrate and panel thicknesses. Zinc alloy or stainless steel fasteners are common choices for durability, longevity, and avoiding galvanic action with other metal products. Selecting and using the right fastener type for each of the different locations on a metal building begins with determining what is being attached and what is it attaching to.
Fasteners can also be colored to match the roof or wall panel.
Weathertightness:
Fasteners of any type cannot be relied upon by themselves to keep out the elements. Instead, a sealing washer is used that is compressed between the fastener head and the metal panel as the fastener is tightened to form the weathertight seal. High-performance or long-life fasteners may be required for a durable approach to weathertightness and/or may be required by the metal building manufacturer to receive a weathertightness warranty.
Installation Process:
With the right fasteners onsite, the success of the installation now rests with the field crews. A few minutes to review the different fasteners and match them with the right tools and settings for installation is time very well spent. Since electric screw guns with or without impact drivers are common on the jobsite, it’s easy to think any tool will do, when it probably won’t. The wrong tool at the wrong setting can place too much torque or other force on the fastener, causing it to crush or damage washers or even the metal panels. Impact drivers are rarely needed in most cases and, while the fastening needs to be tight, overtightening is never a good thing.
Fastener Locations:
In addition to weathertightness, fasteners provide a structural function as well. Their location and spacing will directly correlate to the ability of a panel to resist wind and other forces after installation. Therefore, it’s always best to use information prepared by a professional engineer on the proper fastening locations, spacing, and sizes. The calculations behind such information can prove to be the difference between a successful installation and one that creates problems.
Understanding the importance of fasteners and the role they play in the integrity of the building, and corresponding warranties, allows installers to see beyond the repetitive task of fastening and into the craft of assembling a durable, long-lasting building. To find out more about fasteners for metal products and systems for your next project, contact your local MBCI representative.
The movement of the construction industry to create buildings that are more sustainable throughout their life cycle continues to be a fundamental part of a well-designed and well-constructed building. This comes from the building owners who are expecting it, designers who are more skilled at achieving it, construction companies who have incorporated it into their workflows, and manufacturers who have invested significantly in it. These sustainability efforts include the design, fabrication, and construction of pre-engineered metal buildings across the country.
A number of different certification programs (LEED, Green Globes, The Living Challenge, etc.) promote and can independently certify buildings as meeting different levels of “green” or “sustainable” designs. And the recently released International Green Construction Code has been adopted by a number of localities to codify green design and construction. While the details of these programs vary, they all address some fundamental aspects of buildings, and all apply to metal buildings.
Building Site Impacts:
Shop fabrication of metal buildings means the onsite work can be focused to stay close to the building footprint. Once built, the roofs of metal buildings can further reduce site impacts. For example, metal roofs provide an excellent opportunity to collect rainwater so it can be used for non-potable purposes, such as landscaping or toilet flushing. Further, by specifying metal roofing with a high Solar Reflectance Index (SRI) value, the roofing remains cooler than a dark-colored roof and reduces the so-called “heat island effect” surrounding the building.
Reduces Energy Usage:
Metal buildings can also be designed and constructed to create an energy-efficient building enclosure. The Metal Building Manufacturers Association (MBMA) publishes an Energy Design Guide for Metal Building Systems, available at www.mbmamanual.com, which can help in the process. As MBMA points out, builders can “select the best balance of high-performance roof and wall insulation (including fully insulated metal panels), windows and doors, and foundation insulation that works best and saves the most energy and money when considering all the project requirements.” A metal building with a sloped roof can also be the ideal base to support solar panels that can provide an onsite source of renewable energy for the building to capitalize on.
Responsible Material Usage:
The construction industry has become attuned to looking at the impacts of materials over their full life cycle, and this includes the metal building industry. The MBMA has taken the lead on preparing an industry-wide Life Cycle Assessment (LCA) (http://www.mbma.com/Life_Cycle.asp) that includes primary structural steel frames and secondary structural steel (purlins and girts), along with roof and wall products used in metal buildings. MBMA has also prepared Environmental Product Declarations (EPDs) based on the LCA and industry-wide product category rules. By using this information, designers, building owners, and constructors can determine the environmental impacts of metal buildings from the extraction of raw materials through manufacturing and preparation to ship to the construction site (“cradle to gate”). The fact that steel products of all types contain a significant percentage of recycled material, and can be again recycled at the end of the service life of the building, helps present a more sustainable picture of steel than does some other building products. Further, the shop fabrication of components helps eliminate construction waste on the job site.
At MBCI, we take LEED project documentation seriously and issue only project-specific documentation for USGBC submittals, so please contact your sales representative for LEED documentation on existing contracts.
Indoor Environmental Quality:
The interior spaces of buildings are generally considered sustainable when they protect the health and well-being of the people who use the building. In the regard, metal buildings provide some advantages over others. First, many of the metal building components can be pre-finished before ever arriving at the site. This means that onsite finishing, which can release harmful volatile organic compounds (VOCs) or other substances into the air, are notably reduced or eliminated a the building location. Further, the structural flexibility offered by steel construction means that windows, doors, and skylights can be appropriately spread throughout a building to provide natural daylight and exterior views, which have been shown to have great benefits to the people who work in, visit, or otherwise use the buildings.
Overall, it is the full interaction of all parts of a building, including the owners and users of a facility, that will determine the final sustainability of any building. Nonetheless, it is clear that metal buildings can be a great place to start on the sustainability path. To find out more about metal products and systems that can help your next building be more sustainable, contact your local MBCI representative.
Are you involved with a building project along the Gulf Coast of Texas in which metal roofing or siding is involved? If so, obtaining a building permit may be subject to compliance with the Texas Department of Insurance (TDI) Windstorm Inspection Program. Here is some information that can help.
What is the TDI Windstorm Inspection Program?
In 1987, the Texas Legislature enacted HB 2012 with a requirement to mitigate losses to structures due to hurricanes along the Texas Gulf Coast. On January 1, 1988, the Texas Department of Insurance (TDI) began administrating the Windstorm Inspection Program in support of this legislation. The program is centered in Austin, with four other field offices also located along the Gulf Coast.
Where does the TDI Windstorm Inspection Program apply?
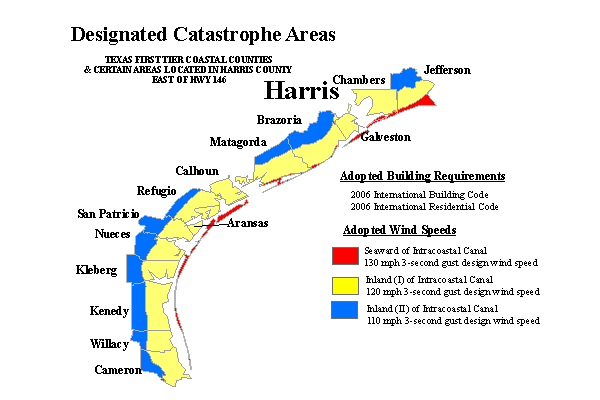
The Windstorm Inspection Program applies to all commercial and residential structures located primarily along the Gulf Coast of Texas. TDI has designated specific areas as catastrophe areas, also known as Texas’ First Tier Countries. The affected countries include Aransas, Brazoria, Calhoun, Cameron, Chambers, Galveston, Jefferson, Kenedy, Kleberg, Matagorda, Nueces, Refugio, San Patricio, Willacy and certain cities east of State Highway 146 in Harris County (La Porte, Morgan’s Point, Pasadena, Seabrook, Shoreacres).
Designated Catastrophe Areas
What is the Texas Windstorm Insurance Association?
The designated catastrophe areas often use Texas Windstorm Insurance Association (TWIA) as the insurer of last resort for the wind and hail portion of their building insurance. To qualify for wind and hail insurance through TWIA, all new structures plus any alterations, additions, or repairs to existing structures (including re-roofs or roof repairs) located in the designated catastrophe areas must be constructed and inspected according to the building specifications adopted by TDI.
How are Building Permits Affected?
All building work needs to meet the requirements of the adopted building codes in Texas (currently the 2006 version of the International Building Code and the International Residential Code). However, in addition to the codes, the TDI requirements must also be complied with in the designated countries. This is similar to other parts of the country that experience severe weather events (e.g., Dade County, Florida) where additional requirements above the code have been instituted for safety reasons. At the time of building permit application, evidence will need to be shown of TDI compliance in design documents; therefore, many times the local TDI office is contracted first and an application is submitted (Form WPI-1). Then, during construction, a TDI certified inspector (usually an engineer) will inspect the work, as will the regular building inspectors. Compliance will need to be shown with the TDI requirements (Form WPI-8) in order to obtain final sign off and a Certificate of Occupancy.
What Building Products are Approved for Use?
In order to be compliant with TDI standards, building products must be independently tested and shown to be able to withstand different levels of severe weather. For products like metal roofing and siding, the testing needs to include the method of attachment and the substrate type (metal, wood, etc.). Product evaluations are available by product type (such as “Exterior Coverings” for metal siding or “Roof Coverings” for metal roofing) and then by manufacturer all by either contacting a local TDI field office or on TDI’s website: www.texas.gov/wind/prod/index
When designing and constructing metal buildings, an increasing number of professionals are using a computerized building information model (BIM) as their primary tool. This allows for detailed, three-dimensional computer models to be created, not only to develop the design, but to identify material lists, coordinate details, avoid conflicts between building systems and streamline the design and construction process.
Problem: BIM Coordination
Of course, design is a process that requires some back-and-forth between multiple parties to arrive at the best final solution. So, when a metal-building supplier or manufacturer is asked to provide their information to be incorporated into a BIM process, the question that naturally comes up involves the level of detail. This is common across all trades, and fortunately, there is an organization that is addressing this issue. Known as the BIMforum (www.BIMForum.org), is is the not-for-profit United States chapter of buildingSMART International, and its mission focuses on improving BIM technology, collaboration, education, innovation and open information exchange. As they describe themselves, “Co-sponsored by the Associated General Contractors of America (AGC) and the American Institute of Architects (AIA), BIMForum seeks to lead by example and synchronize with counterparts in all sectors of the industry to jointly develop best practice for virtual design and construction.”
Solution: Level of Development (LOD) Specification
A flagship publication of BIMForum is the 2016 version of Level of Development (LOD) Specification. Having evolved over several years, this publication is “a reference that enables practitioners in the AEC Industry to specify and articulate with a high level of clarity the content and reliability of Building Information Models (BIMs) at various stages in the design and construction process.” Coordinated with other industry standards, it “defines and illustrates characteristics of model elements of different building systems at different Levels of Development.”
Essentially, it defines and standardizes how much detail is expected in a building information model at different stages of design development. Therefore, if a metal-building manufacturer or any other trade is asked to supply its BIM information, then it needs to ask “What Level of Development?” so that is it providing the right amount of information to coordinate with the larger computer model for the building.
How LOD Works:
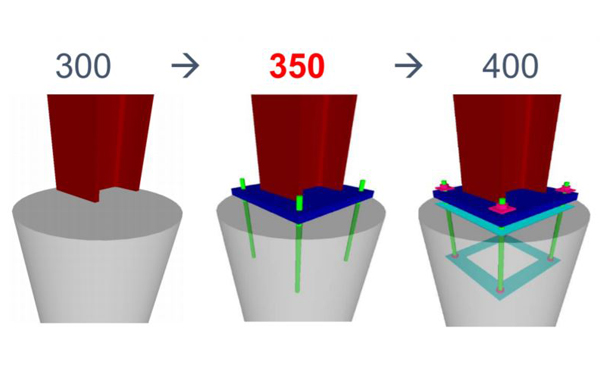
The LOD Specification is based first on the familiar Uniformat specification sections used by most spec writers. Metal Buildings commonly fall under Special Construction in Section F1020.40 in the Uniformat approach, or 21-06 10 20 40 in the Omniclass approach, and are found that way in the LOD Spec. From there, five levels of detailing are described by the numbers 100, 200, 300, 350 and 400, as described further below.
LOD 100 – This is the most basic of model, described as “Generic mass of special structure with system typically noted with a design narrative for conceptual pricing.” It is likely that this level of BIM is already developed by an architect or engineer and given to a manufacturer or supplier as a starting point.
LOD 200 – This level calls for basic primary structural member sizing, generic representation of secondary framing, and general cladding and exterior trim to be provided, including openings.
LOD 300 – More-specific sizing of all needed primary frame structural members, web tapers, frame connections and similar details are called for at this level. Similarly, secondary framing needs to be shown, including purlins and bridging, girts, subframes and base conditions. Exterior panel and trim with actual profiles, actual openings and all significant trim and accessories are shown here.
LOD 350 – This level starts to show coordination with other elements or building systems. Therefore, for the primary structure, things like base plate locations, bracing/gussets, clips and any reinforcement all need to be included. Secondary framing elements need to include similar details, such as nested members, connections to primary structure, any miscellaneous or secondary steel members, bridging, etc. Cladding and exterior trim would include all actual profiles, closures, downspouts and all minor trims shows at least generically.
LOD 400 – This is the full-fabrication level equivalent to shop-drawing level of detail. As such it includes all final details, including welds, bolts, holes, cinching and all other details of fabrication and assembly for primary and secondary framing, plus all cladding and trim.
Level of Development (LOD) Specification Example – image courtesy of BIMForum.org
By using these standardized Levels of Development, all design and construction professionals can proceed in an orderly sequence to provide the appropriate information, receive coordination feedback and then move on accordingly to the next level.
The full 2016 LOD Specification can be downloaded for free at http://bimforum.org/log/. The specific information for Metal Building Systems can be found on pages 177–186. For information on how to work with a manufacturer to provide the appropriate BIM information, contact your local MBCI representative.