Whether it is wind speed, sun exposure or the proximity to a coastline, these factors would be the major considerations when choosing metal roofing for a project in coastal areas. The good news is that metal panels can be used in just about any coastal area so long as you find the right product profile and finish that meets your specific requirements to maximize performance given the variables of the environment.
There are a number of special considerations given the environmental conditions inherent to a coastal area, including the impact to paint systems and certain unique maintenance requirements, wind ratings, hurricane conditions and certifications/regulatory product approvals that will limit the panels you can you use within specific coastal areas, for instance Dade County, the state of Florida, and the Texas Coast.
Finishes: The 1,500-Foot Rule
Metal components can be a great roofing choice, even in a coastal area, whether a bay, gulf, or ocean water. Key is how you manage the finish on the products and how close you are to the actual salt environment. Simply stated, if you’re outside of a 1,500-foot range from the coastline or salt water, then standard metal roofing would be suitable, but if you’re closer to the coastline there are special paint options or finishes you’d need for the product to withstand the coastal environment.
At MBCI, we use Flurothane Coastal coil coating system* as our standard solution to the challenge of salt spray and harsh coastal environments. This coating is a premium fluoropolymer (PVDF) system developed for use in the most extreme coastal environments. This system is unique in its use of an innovative thick film primer. The two-coat system has a total dry film thickness (DFT) of 1.7 to 2.0 mils.
Choosing an appropriate coastal finish can also affect your product’s warranty. If, for example, your project is within the 1,500-foot range and you don’t choose the required coastal finish, if the panels were to rust there would be no warranty offered and it could affect your warranty for weathertightness as well.
Suitable Panel Types and Additional Coastal Conditions
Overall, roof failures are the largest hurricane loss due to wind and water damage. For this reason, metal roofing is a highly recommended option for coastal regions where hurricanes and high force winds are prevalent. The appropriate metal panel type for these areas is mainly contingent upon what you want to accomplish. Because MBCI does have high wind ratings for most of our panels, whether it be a screw down (aka through-fastened) panel or a standing seam profile panel, selections should be determined by the complexity of the roof itself and the roof conditions. There are standing seam panels and through-fastened panels that can be approved for both roof and wall applications in many coastal areas.
Also, of note, different types of coastal areas may receive higher wind speeds. There is obviously a wide difference in wind speeds between the East Coast and the West Coast, for example, although both are coastal communities. In an area with higher wind speeds and/or hurricane conditions, you would want to consider panels that achieve higher wind ratings. Since there are many different panel options, and some may not be able to achieve as high wind ratings as others, you should look at what those values would be for wind and what testing has been done. MBCI’s metal wall panels and roofing systems are able to resist and withstand extreme environmental conditions, such as those in Florida or the Texas coast where strict product approval and testing processes are required.
MBCI has panels that meet requirements for Florida Approval, Dade County and Broward County for instance, where you need to have an NOA (Notice of Acceptance) for those county areas, as well as products that are TDI approved (Texas Department of Insurance), which is usually seen in the Texas coastal area.
Additionally, sun exposure and color can have an impact as far as solar reflectance, so that is another consideration. Somewhere like Florida gets a lot of sun yet a coastal area in Washington State would be mostly cloudy. If you are in an area that has more sun, then you may want to consider a panel with a higher solar reflectance value.
Maintenance Requirements
If you have metal roofing in a coastal area, you’re going to follow much of the same maintenance as you would on any metal roof, but you would want to inspect it for damage, especially after a wind event or storms. One of the main differences, though, especially if you’re within the 1,500-foot limit where you needed a special finish, is that you’re going to have to do a fresh water rinse regularly on the panels a couple of times a year. What this means is you are basically hosing it off with fresh water to get the potentially corrosive salt spray residue off of it.
* (1) All substrates must be properly pretreated. (2) American Society for Testing and Materials. (3) Flurothane Coastal system is not designed to bridge cracks in the substrate. (4) Varies by color. (5) Flurothane Coastal system will generally meet the requirements for most post-painted fabrication processes. However, variations in metal quality, thickness or cleaning/pretreatment applications can lead to diminished flexibility.
SOURCE: Valspar Corporation
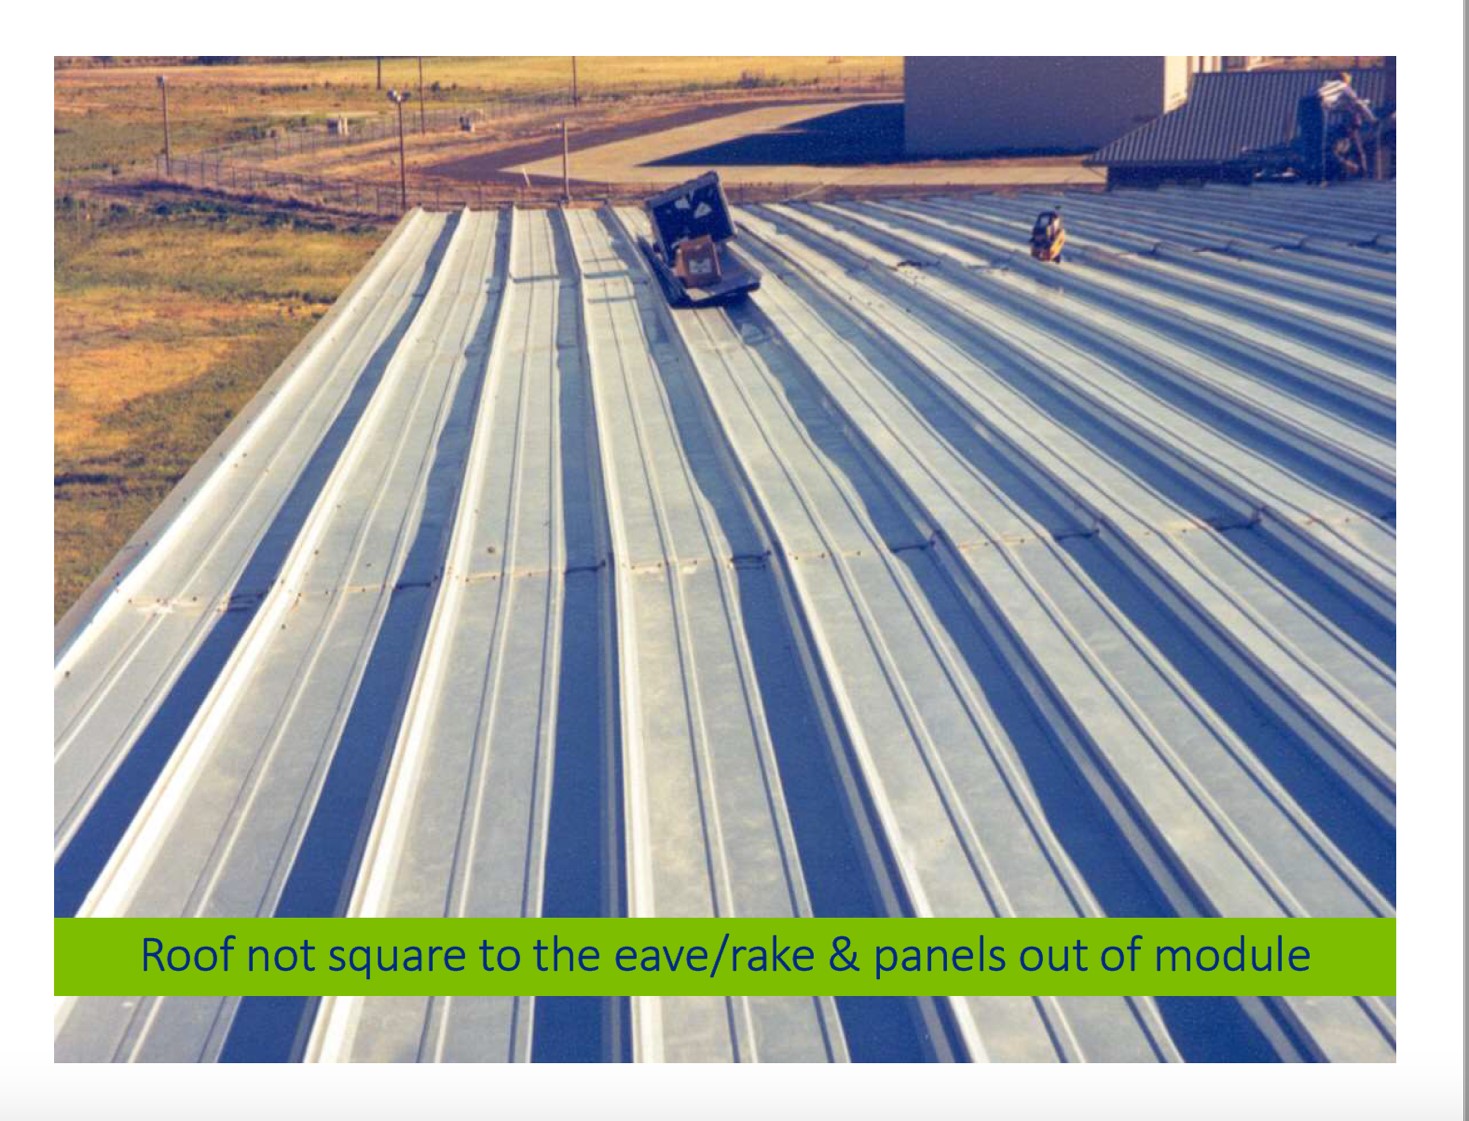
Most metal roofing system installers know the importance of keeping panels on module, i.e., holding the width of the panel. But holding module alone isn’t enough; keeping panels square is equally important as the two go hand in hand. When proper attention is paid to both, you will have a faster install—ensuring longevity and functionality of the roof system so that it will be able to properly expand and contract as designed—not to mention improved appearance.
The ability to hold panel modularity is directly dependent upon several factors, including:
Skillset of the installer
Frequency that modularity is checked
Substrate deficiencies
Insulation system
Appropriate methods being used to hold panel modularity during panel installation
Keeping symmetry/maintaining squareness
Here are some important considerations for ensuring success for panel alignment.
The Relationship Between Holding Module and Squareness
The roof panel is not going to “hold itself” 100% on module and square by installing just as received using only the hardware components supplied from the manufacturer. It is the installer’s responsibility to ensure the proper alignment and squareness of the panel install in order to hold panel module. For example, if you’re working with a 16-inch panel, installers need to keep the spacing of the panel ribs at 16 inches. In this way, the panel doesn’t become stretched or compressed. So, holding module is key along with holding square; the two are connected. If an installer doesn’t start the building out square, it will make it even harder to keep module with regards to the alignment of the panel.
As far as the overall appearance and performance, the success of the metal roof is going to be heavily dependent on how square it is installed and an ability to maintain proper modularity. There are a number of suggested methods for doing so outlined below. Installers must decide which method works best for their them and their roof panel application.
Methods to Ensure Success
The key method is measuring ahead and monitoring your installation so you know where you should be along that roof install. The metal panel is typically 24-gauge or 26-gauge material and therefore it’s easy enough to pull it ahead or have it become crowded during installation if you’re not staying close to your marks, and therefore it’s easy to get the panel out of module. The bigger impact, aside from just aesthetics of being on or off module is the performance of the system itself, to where it could become under stress or it could go through extra deformation due to being out of module and out of square. Its important to verify/measure the panels leading edge and adjust as needed via roof clips or other panel hardware. Some suggested methods include:
Run a string line from eave to ridge square to the eave and measure from the string back to each panel run. The string line is moved ahead as the roof installation progresses. If installing over solid substrate, snap chalk lines for alignment points along the roof.
Use a metal measuring tape permanently secured to the substrate at panel endlap locations, ridge and other intermediate points for permanent reference to check module.
Mark the eave line for every rib installation to ensure the panel stays on module. Trapezoid panels offer metal closures for proper placement at the eaves to assist in holding module while vertical rib panels do not.
Pre-drill substrates at the endlaps and ridge locations for clip alignment ahead of roof panel installation. A hole can be located at the leading edge of clip location so that an awl or punch can be inserted into the hold to align the clip and adjust accordingly. The holes drilled ahead of the panel at the corresponding panel module.
To assist with holding the panels’ shape when checking modularity, utilize outside panel closures or cut wood blocking to the panel’s correct width and insert between panel ribs. Note that a bad roof substrate that is out of tolerance for “flatness” will not be hidden or magically corrected by the panel installation. The alignment and tolerance of the substructure are equally critical to the panels’ squareness and being able to hold module. Substrate should be should be installed to a level plane tolerance that is no more than ¼” in 20-ft or 3/8” in 40-ft variance.
Do not stand in panel and/or keep as much weight as possible out of panel while installing clips. Not only is it unsafe but it changes the width of the panel and thus impacts modularity.
Use the correct combination of roof clip heights, insulation thickness and thermal spacers to maintain level panel installation and prevent panels from gaining or losing module. MBCI provides recommendations in its installation manuals regarding most common types of insulation thickness and means of attachment to various substrates. Additionally of note:
Trimming of insulation or adjusting thermal block thickness can help control/modify panel modularity as needed.
Alignment straps for trapezoid panels can be purchased from the manufacturer and installed on top of purlins before insulation. These set the clip spacing at 2-0” o.c and can be utilized at the endlap and ridge locations minimum or added at other locations.
At MBCI, we recommend that installers check module/square every three to four panels. If the panel grows or shrinks 1/8th of an inch or 3/16th of an inch with three or four panels or shows signs of being out of square, there’s time to recover from it by making adjustments to correct. If an installer just blindly puts the roof on for 50 feet or so and then realize they’re off module or out of square, it will likely be past the point of return to hold module and keep square.
For more information on installing metal roof panels to hold module, see our previous blog post on the topic.
For more information on our installer training sessions, click here, or submit your technical or installation questions by filling out our Ask An Expert form here.
Back in the days of the Wild West, the term “branding” meant leaving your unique mark on your cattle, identifying ownership among the herds on the open range and creating loyalty for those who graced the saddle. In today’s business environment, the concept of branding takes on a slightly different meaning. Instead of leaving a differentiating mark on physical property, brands today need to make a deep mental and emotional impression on their customers. It is, therefore, up to you to make sure your brand not only sends the message you wish to convey but also cuts through the noise of the crowded construction field to get you noticed.
What Is—and Isn’t—a Brand?
Let’s start with the basics. Company brands are created through perceptions and associations. That means a brand is NOT a logo, corporate identity, a product…or especially, what YOU say it is. Rather, a brand is what your customer feels it is because it is defined by individuals and is emotionally based. Bottom line, your brand is the sum of all the experiences your customer has with your organization.
Brand Awareness
Recent data indicates people are now exposed to over 5,000 different brand messages per day. Brand proposition and brand purpose are still important, but given the sheer amount of competition both within the construction industry and simply out there in the atmosphere as individuals’ daily digital intake increases, your brand really needs to stand out in order to be noticed.
A winning brand is one that is remembered. A key strategy to do that is through an innovative brand campaign. Even if you have a service that stands apart, no one will know about it if you don’t also have a brand campaign that stands out. As individuals, we only retain 10% of what we hear three days later, but we will retain 65% if it is paired with a relevant visual. So, your brand strategy needs to be something that is shareable, memorable and breaks through the immense chatter out there.
To ensure it is your message customers and prospects are clicking on and engaging with, you need to sear your brand into people’s memory. Statistics show that it takes five to seven impressions before a brand is even remembered. So, it is your job is to get people to take notice of what your brand is doing, talk to each other about it, and share your story with their own channel. If you can do that numerous times each week, you’ll be in a winning position.
Tools to help build that brand awareness include traditional marketing, website development, search engine optimization (SEO), email marketing, social media, and other digital marketing.
Traditional marketing
We know marketing is important and provides results but be aware that not all traditional marketing approaches (ex: print newspaper, radio, television, billboards, yellow pages and trade shows) will produce the desired results. Yes, they’re tried and trusted, but due to the vast digital playground and the lack of trackable performance results, traditional marketing platforms are losing popularity. Additionally, traditional marketing doesn’t give you the opportunity to engage in a conversation with your audience. That said, it can still be a viable option for brand awareness in some circumstances—which is why traditional approaches remains popular with builders—but only if used in conjunction with other strategies.
Website development
Having a website is key to any modern business and can be an incredibly valuable piece of marketing real estate for a construction firm. Although you might guess the obvious reasons as to why, there are some you might not have considered. A few are:
Smart economics and practical application. Websites are an affordable, expected and easy way to help people find and learn about your company.
Accessibility. Your website is there when you aren’t and can help sell your product and/or services. People can study your expertise at their leisure, including after-business hours. If readers like what they see and can find the necessary information about you, they may take a chance on you.
Trustworthiness. Today, without a website, you’re behind the curve. If you don’t have a website, the persona you deliver is one of an outdated, indifferent, unprepared and questionable business—all of which could have a negative effect.
Marketing. A website is an integral part of marketing your business, and that leads us to the design of your website; 75% of users make judgments on a company’s credibility based on website design alone.
SEO (Search Engine Optimization)
Search Engine Optimization is the process of getting traffic from the “free,” “organic,” “editorial” or “natural” search results on search engines. It includes anything that can enhance your online presence, aka your content. SEO can be overwhelming, which is why many marketing experts recommend hiring a professional that is well versed in SEO methodology. But, until you get to that point, there are a few basic steps you can take on your own to get started:
Include keywords in strategic places on your website, such as title tags, page headings and site content.
Publish custom content on your site to address relevant topics for potential customers.
Streamline your site’s navigation to make it easier for visitors to find the information they need and contact you.
Probably easiest of all: Be human. Think like your customer. What do they want and need? How can they get it? What are they interested in? How would you go about finding that information?
Email Marketing
Now that you have a website with good SEO, you’ll want people to visit your site in other ways, not just through online searches. For this, try putting your time into an email marketing campaign. Advantages of email marketing include:
Email is part of everyday life. Unlike other digital platforms that people may not embrace, most people are email savvy.
Email marketing provides solid, trackable metrics, such as growth of lists, open rate, click rate, complaints and unsubscribes. With the right provider, you can even track your company’s sales and revenue earned from your email campaigns.
Messages can be personalized to each audience member and provide answers that they want to hear. It can be simple, or sophisticated, with automation so that when the reader takes an action, e.g., downloading a white paper, a follow-up email is automatically sent to that same person with information about what they just downloaded. With an auto-response feature, these can all be sent automatically, without you having to be at your computer or on your phone 24/7. All you have to do is think like your audience. Consider what actions they will take and create automatic “if, then” scenarios.
Email marketing is cost effective.Many email providers are free to use or have minimal costs based on how detailed you want your campaign to be. If you’re not seeing results, you can take steps to switch things up, such as changing the frequency of your emails, changing the copy, or stopping the campaign completely until you are more comfortable with the process.
When choosing a provider, make sure you pick one that will clean your email lists (meaning scrub for duplicates, errors, etc.), as well as provide analytics and automation so that there is less for you to worry about after the initial setup. Mailchimpand Sendinblue areexamples of popular email marketing services that are easy to use and offer free basic plans that will help get you started.
Social Media
Social media channels are excellent at increasing brand loyalty, creating engagement, generating piles of hot leads, managing your reputation, creating a community and making sales. Studies have shown that social media has a 100% higher, lead-to-close rate than traditional, outbound marketing methods. Social media is a way to hear what your customers think about your business—for free. Here are a few suggestions to consider when creating a social media presence and how to track success:
The best way to capture your audience’s attention is with simple and short messaging.
Be visual! Use photos, videos, infographics, colors, etc. instead of just text. For example, based on your product or service, you may be able to create valuable, interesting videos. If so, YouTube, Instagram and Pinterest are very useful, due to their visual nature. If you are very focused and known in the community, Facebook or LinkedIn may be better options.
Create your social media goals based off your overall business goal, and determine your key performance indicators to see if social media is working. Success can also be measured in how your audience responds to messages and how much interest you’re creating for your brand.
Create a content schedule and consider your resources. If you are a one-person shop, it’s better to choose only one social media channel to focus on before branching out. This will keep you from becoming overwhelmed, because to succeed, it’s all about updating your content on a regular basis while ensuring your content is high quality and engaging.
Tailor your content to each social media channel. If you’re running Facebook, Twitter and Instagram pages, post content that is different to each channel. Your followers and the type(s) of content they are looking for is not the same on every social media channel. For example, if you want to promote a blog you posted to your website about a new completed project, consider posting the link to the blog post on your Facebook or LinkedIn page, but a picture with no link to your Instagram page.
Find a tool that lets you auto post. Some great ones are Hootsuite, Sprout Social and Buffer.
Keep the conversation going with your audience. What other people say about you boosts your credibility as much as what you say. Also, don’t be afraid to position yourself as a thought leader. Provide your audience with content that will encourage them to come back again and again, thus becoming their source for industry information.
Engage with influencers and other businesses. Share posts from others that are relevant to your business and social media pages. Tag other people and pages in your posts when appropriate. Involving others in your posts is a great way to gain more organic interactions with your content.
Utilize the analytics on each channel to see how your social media is resonating and how much engagement you have. Each channel has some form of analytics. Use them. If you want to dig deeper, there are options you can purchase for social media analytics.
Consider the 60/20/20 rule, which suggests that 60 percent of your time should be spent engaging your audience in some way, 20 percent should be sharing relevant content for your audience and another 20 percent should be spent talking about your brand.
Digital Marketing
When you have a great organic presence built and want to continue seeing growth, you can consider building a digital marketing campaign to place advertisements across different platforms. All of these will require a budget behind them, but with the extensive targeting options available and large audiences, you will be surprised at how far your dollars will go with digital marketing tactics. Some examples are:
Paid social media ads. Facebook is a great place to start a digital marketing campaign for businesses of all sizes because of the easy-to-use platform and the fact that worldwide, there are over 2.6 billon monthly active users (MAU) on Facebook.
Search Engine Marketing, or SEM, is the placement of ads on search engines like Google and Bing. These ads, often known by the term pay-per-click ads, come in a variety of formats. Some are small, text-based ads, whereas others, such as product listing ads are more visual, product-based advertisements. SEM’s greatest strength is that it offers businesses the opportunity to put their ads in front of motivated customers who are ready to buy in the moment.
Programmatic advertising is the automated buying and selling of online advertising. Targeting tactics are used to segment audiences using data so that advertisers only pay for ads delivered to the right people at the right time and depend less on the “spray and pray” method of digital advertising. Programmatic advertising is typically bought through a demand-side platform or DSP by a vendor who can help make recommendations on targeting and tactics based of your business goals.
Great Marketing Means Business
Hopefully, you are now armed with a clear understanding of what branding is and why it’s so important to the success of your construction business. With a wide spectrum of marketing tools and platforms available to help you connect and engage with your target audience, now is the time to find the right path for your business in order to rise above the noise with clear, compelling messaging—one that will leave a positive, lasting impression.
Traditionally, when we talk about metal products for self-storage facilities, we think about the metal building panels used for exterior wall and roof systems. But, when considered holistically along with interior components such as roll-up doors and hallway systems, the wisdom for contractors and erectors of turning to a single-source supplier comes sharply into focus.
There is, perhaps, some “old habits die hard” thinking behind customers traditionally sourcing interior and exterior components from different suppliers. This has meant that self-storage unit doors and hallway systems or the non-load bearing components inside of a building have generally been sourced from someone other than the company that manufactures the exterior building materials. But, just because this is how it’s been done in the past doesn’t mean it’s the best way moving forward. In fact, utilizing a single manufacturer able to offer a comprehensive, full-scale system—that is providing both exterior building solutions and interior self-storage solutions—can bring untold benefits to a project.
Advantages of Single-Source Provider for Self-Storage Facility Contractors and Erectors
One way to think about the benefits of using a single-source building material supplier for self-storage facility development is with a simple analogy to a consumer buying a car. When you set out to purchase a car, what if you had to buy the body of a vehicle from one dealer, but then you buy the engine, tires, seats, steering wheel, brakes and headlights from all different shops? That would be a rather cumbersome process. In reality, when we buy a new car, we can select the model we want and specify the options we want included—knowing that all the parts and accessories needed to provide the end-result are included when the car is delivered. So, you ultimately deal with one source, one contract and one purchase order to get the complete package.
Similarly, a reputable single-source supplier can help simplify the process needed to develop self-storage facilities. Contractors and erectors can get the materials and resources they need by working with a single point of contact at the single company, thereby streamlining the material ordering and delivery process in alignment with their construction needs and schedules.
With complex projects in mind, an experienced single-source vendor strategy drives successful outcomes and mitigates risk, but no one entity can do everything on its own. Therefore, an ideal vendor needs to have additional, seamless partnerships requiring specific expertise and certifications.
Lead-time and Optimal Delivery
The timing of material delivery can make or break construction schedules and budgets. In this industry, the quicker a building owner can get a facility open and start collecting rent/fees from customers, the greater the financial benefits will be.
When a manufacturer supplies all building materials for a project, they are able to build a relationship with the contractor or builder and optimize the support they provide on projects. This in-depth knowledge of all aspects of the project allows for a single-source manufacturer to ensure materials don’t show up too early, which can cause storage issues on the job site, and also keep them from arriving too late, preventing costly labor issues.
To guarantee reliable delivery, a single-source supplier can address industry concerns related to capacity by optimizing production methods and resources to handle spikes or drastic upticks in workload. Ideally, this would result in leveling off to a two- to three-week lead time rather than the typical eight-week lead time for delivering material you’d see on a given self-storage project.
Buying Power
Working with a single-source manufacturer leverages bulk buying power to ensure materials are sourced at the best rates possible. This cuts down on the time spent negotiating material costs with other manufacturers and suppliers. In addition, using a single-source supplier means spending less time finding and managing vendors and more time servicing your customers.
Material Compatibility
Another key benefit to using a single source for self-storage facility development projects is the inevitability of fewer potential product compatibility issues than might be experienced when sourcing different materials from several different manufacturers. By turning to a manufacturer that is essentially providing an envelope solution for self-storage facilities—not just a single part that must coexist with another manufacturer’s part—that expertise will help ensure all materials work together seamlessly and not jeopardize the build.
Selecting the right overhead door shouldn’t be an afterthought. As with metal panels, they should be a key consideration when planning and designing a commercial or industrial metal building. Functionality (i.e., size, operation and environmental concerns), security and quality are priority factors. In addition, location, climate and building codes should also be part of the overhead door solution decision. Selecting a door type and framing, in fact, can further depend on end use, strength/longevity needs, access and clearance/framing restrictions. Additionally, the type of door requested or required will impact the framing and support needed for installation.
With these criteria in mind, its of note that metal building manufacturers don’t always supply the overhead doors for a project. Therefore, ensuring compatibility and optimal performance requires viewing door options from top to bottom and side to side—figuratively and literally.
Overhead Door Types
Although MBCI primarily offers roll-up doors, these are not the only door options for metal buildings. The primary types of commercial doors for large metal building openings can include the following:
Roll-Up Doors aka coiling/drum doors are typically a continuous corrugated sheet that nests into itself as its rolled around a cylindrical drum at the top of the door opening. This nesting allows them to take up far less overhead space as compared to doors that slide on tracks. Generally less expensive to purchase, roll-up doors also boast durability, maintenance and longevity benefits.
Sectional Doors are typically smaller horizontal door leafs/ panels hinged together and mounted between two tracks on both sides of the door. This permits the sections to be lifted continuously either by transitioning horizontally back into the building above the door opening or vertically only above the opening, clearance permitting.
Vertical or Horizontal Bi-Fold Doors are similar to sectional doors but have much larger panel sections, requiring fewer door panels. Manual operation is an option, however operation most often occurs via hydraulics with the support of door headers or jambs only and not via a full track system.
Sliding Doors may be mounted via an external or internal horizontal track system at the top of a frame’s opening. Depending on door weight and size, sliding doors may rely on support from the top track system or lower guide rail mounts and wheels as well. Top-mount-only systems are prevalent on smaller commercial doors or in agricultural uses. Larger versions typically support industrial applications like airplane hangars and freight facilities.
Once you’ve selected the overhead door type best suited to your project, coordination with the building manufacturer is a must. Specifically, be certain that the building manufacturer knows the type and size of your doors before ordering your building materials. Here are some factors and situations you will want to account for:
Door Opening Size: Allow ample space to ensure no obstructions when the door is in its maximum open position. Even partial obstructions may require building design adjustments to accommodate for larger openings.
Door System Weight: The weight of the entire door system—including framing, sheeting, hardware and drive systems (if applicable)—can require certain design considerations.
Clearances: When open, the horizontal and vertical panel clearances shouldn’t foul trims or building exterior cladding.
Installation Clearances: Be sure to understand minimum interior building clear heights needed if installation of track systems are necessary. Or, if using roll-up doors, account for drum clearance and its proximity to roof framing, ceiling liners or roof insulation.
Framing Materials: Be sure surfaces and flanges of framing materials are wide enough for proper attachment of door tracks. The same goes for mounting hardware and mechanical operators if so equipped and required.
Bracing: If appropriate, evaluate any supplemental bracing necessary to keep the door opening square. Additionally, support for the door sheet in all positions should also be a consideration.
Verify Manufacturer Requirements: Work with the door supplier and advise the building materials manufacturer if the door opening, framing and/support require minimum or maximum deflections/limits. This helps ensure proper operation when building framing deflects under various loadings. Failure to do so may prevent the door from opening or closing properly. This coordination is made easier when the same manufacturer providing the roof and wall materials also provides the overhead doors.
In Conclusion
Always ensure you’re getting high quality metal overhead door products and services that seamlessly integrate into new or existing metal building projects. Regardless of scope, MBCI can help you find the best overhead door solution suited to your needs and project specifications. Contact MBCI today!
Cutting metal panels on site is an often-necessary part of installing metal roofing and wall panels. However, using the right tools and methods to ensure the panels remain damage-free is vital. Using the wrong tools can result in rust, rust stains, the voiding of warranties and diminished building service life. In this blog post, we’ll share several common field-cutting techniques and best practices that help ensure good results.
Maintaining Longevity When Cutting Metal Panels On Site
When metal panels are made in a manufacturing facility, the tools and methods used to cut the coated metal coil help protect the cut edge from deterioration like corrosion. When cutting metal panels on a jobsite or in the field, protecting any cut edges is just as important. To understand how to field-cut metal panels without sacrificing the quality and protection delivered from the manufacturing facility, you must first understand the what protects the panels. Most often, metal roof and wall panels are fabricated from Galvalume®-coated steel coil because of its proven longevity. Not only does the Galvalume coating protect the surface area of the metal panels, it has also been shown to be effective along the thin edges of the metal too, as long as those edges are cut properly.
During fabrication, the Galvalume metal panels are cut to length either by shearing while flat before entering the roll former, or by means of a profile shear as the panels exit the roll former. Either method tends to “wipe” the Galvalume coating across the cut edge of the metal panels. This provides superior cut-edge protection from corrosion.
Likewise, when panels arrive on site, any needed field cutting should address the same concerns of protecting the edge of the steel from corrosion. Of course, there are ways of doing the field cutting correctly. However, there are also poor strategies that can lead to real problems. The following are examples of common field cutting tools and the best practices for good results.
Common Tools and Methods for Cutting Metal Panels On Site:
Aviation Snips
Red and green aviation snips are a good choice for small cuts on metal panels, such as around pipe penetrations. These snips will wipe the Galvalume® coating in the same way as factory shears, making them a good choice.
Electric Shears
Electric shears are optimal when making lengthier cuts along the steel, such as cutting a wall panel at a corner or at a door opening. These shears take a ¼” strip of metal out of the panel during the cutting process, which tends to leave both sides of the panel smooth and flat along the cut. Like the aviation snips and factory shears, electric shears will wipe the Galvalume coating and protect the edges.
Mechanical Shears
Mechanical shears are an add-on tool that fit onto a battery-operated impact or screw gun. These shears do not take any metal out of the panel and will leave a slightly wavy edge. Mechanical shears are an excellent choice for bevel cutting standing-seam panels at hips and valleys, since they too wipe the Galvalume coating over the cut edges to offer protection.
Nibblers
A nibbler is a great tool for cutting across corrugations in wall panels to create openings for windows, doors and similar structural additions. A good nibbler typically costs $500-$700 (currently), but is well worth it if you often cut corrugated metal panels. The punch and die in the nibbler tends to wipe the Galvalume across the cut edge as it punches out small, half-moon shaped pieces of panel. However, because these little metal pieces will fall away from the cut, it’s important to contain them so no one walks on them. Otherwise, they can embed in the soles of installer’s shoes and create scratches in roof panels when they walk on the roof.
Skill Saw
Skill saws are an ideal tool for cutting metal panels because of their versatility. This tool can cut either across or parallel to corrugations, whether straight or at an angle. When using a skill saw, it is critical to use a saw blade that cuts cool. Otherwise, the Galvalume coating can melt along the cut edge and become ineffective. In particular, do not use an abrasive blade, which will generate heat and damage the coating.
Panels cut with abrasive blades corrode. A cool-cutting blade leaves a smooth edge.
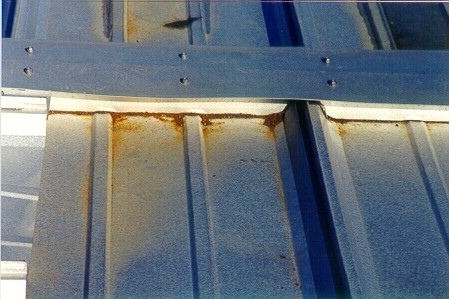
Additionally, its vital to avoid cutting panels on the roof or above other panels. A skill saw blade will throw considerable amounts of steel debris into the air and down onto any panels below. This debris, called swarf, will quickly rust and ultimately cause rust spots in the panels. If enough swarf gathers in one spot, it can rust through the panel.
Steel swarf, like this collected at the ridge will rust through the panel.
Which Tools Should To Avoid When Cutting Metal Panels On Site:
Tools that should never be used include:
Torches
Cut-off saws
Reciprocating saws
Hacksaws
Grinders
All of these tools will melt the Galvalume® coating, causing edge rust just like an abrasive blade would. These tools also throw a lot of steel debris (swarf) onto the panels they cut. This debris will be hot and will embed into the panel coating. This can cause rust spots and bigger problems down the road.
In conclusion, using the right tools and following metal panel manufacturer recommendations when cutting metal on site will help ensure that the panels remain damage-free and the final installation will be a fairly seamless process. Using the wrong tools can result in rust, rust stains, and the voiding of warranties. For more on best practices and recommendations for on-site cutting and installation of metal panels contact your local MBCI representative.
Many large, commercial, low-rise buildings often don’t benefit from steeply-sloped roofs the way residences and small commercial buildings might. This is because a steep roof slope would add unwanted height and unnecessary construction cost. Buildings like warehouses, retail stores, etc. are more appropriately built with low-slope roofing, commonly known as “flat roofs”. The National Roofing Contractors Association (NRCA) defines low-slope roofs as those with “a slope at or less than 3:12″. Anything steeper qualifies as a “high-slope roof”. With this in mind, let’s look at some key points to consider when designing and constructing a low-slope roof.
Low-Slope Roofing Materials
When it comes to selecting low-slope roofing products, there are generally three fundamental choices:
Asphalt/ Bituminuous Products: The traditional commercial roofing norm for many years, the use of asphalt/bituminous products has dwindled as newer, more appealing options have emerged.
Flexible Membrane Roofing: This roofing material can be made from a variety of types of plastic/polymer-based materials (commonly known as EPDM, TPO, PVC, etc.). Rolls of the chosen membrane are laid out on the roof structure and secured in place either with mechanical fasteners (screws with large washers) or with a continuous layer of adhesive.
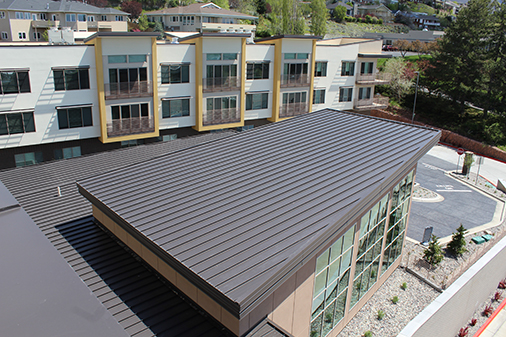
Metal Roofing: Sometimes overlooked, metal roofing is suitable for different roof slopes. Many metal roofs that use standing-seam systems are rated for use with a pitch as low as ½:12.
When considering which type of roofing material to use for a building project, there are a number of significant differences that illustrate why metal roofing is often the ideal choice.
Engineered For Superior Performance
Standing-seam metal roofing is made specifically for use on low-slope roofs as it meets a number of performance requirements:
Water resistance: Precipitation doesn’t penetrate through metal or through the standing seams where the metal panels join together. This is why they can tolerate such low slopes, allowing the water to drain away slowly and predictably without leakage.
Rigidity: The rigid nature of metal means that there is less opportunity for ponding (standing water). This is not always the case with asphalt/bituminous or membrane roofing systems.
Drainage: Metal roofs carry water to the building’s edge toward gutters and downspouts that carry it away from the building. Other roofing systems rely on drainage piped inside the building. This takes up space and has the potential to leak water inside the building and cause damage.
Wind Resistance: Standardized uplift testing shows that metal roofing performs as well or better in extreme weather than mechanically-fastened or fully-adhered membrane systems.
Durability: The most cited advantage of metal roofing is its long-term strength and durability. Engineered design and use of high-quality coatings ensures a longer lifespan—50 years or more. In contrast, other roofing types typically feature lifespan ratings of 20 or 30 years.
Puncture Resistance: Low-slope metal roofing is more puncture-resistant than asphalt/bituminous or membrane roofing. This makes it better able to tolerate foot traffic, hail and other puncture-inducing hazards.
Construction/ Installation Ease: Metal roofing panels are custom-made to suit specific building sizes and end uses. This customization typically means it takes less time to place and install metal roofing in the field. Further, metal panels can tolerate a wide range of temperatures and weather conditions and still install and perform as intended. Low-slope roofs are also safer to walk on with less risk of slips, falls and other hazards.
Cost-Effectiveness
Using metal roofing on low-slope roofing systems can be cost effective in a number of ways:
Fewer labor hours as a result of the ease of installation saves money during construction.
Competitive material costs, particularly if the metal roofing is part of a total metal building package from a single manufacturer.
Minimal maintenance requirements and aversion to rusting, mold growth and decay that save the building owner money over time.
This all adds up to a very favorable life-cycle cost.
The performance, cost-effectiveness and life-cycle benefits of metal roofing panels make them a viable option for low-slope roofing systems. Manufacturers like MBCI can help you select the right metal roofing products and provide information and resources to help ensure proper installation.
It would seem logical that the most important field installation process for a standing-seam metal roof is the actual process of creating the weathertight seams that connect the metal panels together and ensures the structural integrity of the roof. Perhaps for many different reasons, however, this critical seaming process is not always given the proper attention it deserves, nor are installers given the proper training required to ensure installation runs smoothly. This approach can cause some serious issues, not the least of which is the voiding of a manufacturers warranty or the discovery of roof leaks and the resulting damage.
To help, here are some best practices for readily and successfully carrying out the metal roofing seaming process:
Personnel
Because of the critical nature of seaming metal roofs, the crew members doing this work should be properly trained. Team members who will be performing this work should not perform the seaming without having participated in the appropriate installation training required to ensure the seaming process is appropriately managed. Most roofing manufacturers offer installation training that many installers take advantage of—and this training opportunity should be taken advantage of by the staff who will be doing the seaming.
Seaming Equipment
It is very important that the seaming equipment being used is matched to the specific roof panel system being installed. Manufacturers routinely rent out this equipment in order to be sure that the metal panel profiles are installed properly and are not compromised through the use of generic equipment or that of another manufacturer. Using the wrong equipment can end up being costly for everyone if panels and seams are ruined in the process.
Hand Crimper
As metal panels are set in place, they are often secured with metal clips, spaced according to engineering and construction needs. Hand crimpers are used to form the seams around the clips as well as any end laps. This process must not be overlooked as improper hand tooling is the number one cause of faulty seaming. To ensure costly mistakes aren’t made, follow the process described in the “Field Seaming Tool Manual”. This manual should be provided with the equipment and reviewed in training.
Electrical Sources
The next step will involve the use of an electric seamer which obviously needs a source of electricity to operate. However, not just any electrical power source will do. Almost all professional seamers have an AC/DC motor that will require 10 or 15 amps and 120 volts. A dedicated electrical circuit—preferably from a temporary electrical pole or an existing building electrical panel—is the best and most reliable way to go. A generator with 15 amp capacity dedicated to be used only for the seamer (in order to avoid power surging) may be acceptable as well. In either case, the power line to the seamer needs to be 10-gauge (minimum) cord. It should also be no more than 200 feet long (to avoid power drop).
Electrical power sources that are NOT acceptable include outlets from a powered man lift or a generator that is not dedicated to only the seamer. (This includes a generator that is part of a welding machine.) Check the manufacturer’s requirements for any other restrictions that can damage the seamer. Skipping this step can place the responsibility for repair or replacement onto the installer.
Electric Seamer
Once all panels are in place, the hand crimping is done and the power source is set. Then, electric seaming takes care of finishing the roofing system. Again, consult the seamer manual for proper procedures, including which direction the seaming should be done. (Seaming can either be done up or down the roof depending on direction of roof installation.) The electric seamer includes a switch for the operator to control the starting and stopping of the process.
On low-slope roofs, the operator should walk alongside the seamer to be sure nothing is in its path and that the seam is done properly. While stopping and re-starting is fine, the seamer should never be removed in the middle of a seam. Doing this makes it very difficult to set it back in exactly the same spot again. If something appears to be wrong with the seamer or the seams being produced, then don’t keep using it. There is no point in damaging multiple roof panels if any one panel indicates that things aren’t going right. In this case, contact the manufacturer right away for assistance or replacement of the seamer.
Safety
Electrical seamers are heavy and—if not used and secured properly—can cause harm or injury. Therefore, they should always be tied off with a safety line—the same type used for workers—not a common rope and definitely not the electrical cord. The safety line should be properly secured to the seamer and then attached to something rigid on the building. Never attach this to a person who could be pulled off of a roof by it.
Cleaning
Before use each day, check the electric seamer and remove any oils, debris or dirt. Make sure the seamer is unplugged from the electrical power source before you begin cleaning. Also, check the grease level in the machine daily and only add a little bit (2-3 pumps from a grease gun) as needed. Too much will cause the grease to leak out onto the roofing.
Following these pointers should help assure the safe and efficient use of the right seaming equipment when installing roofing panels. To find out more about proper seaming or to schedule training, contact your local MBCI representative.
Designing and constructing sustainable buildings has become a mainstream expectation of most building owners. Whether for reduced energy costs, higher returns on investment, or as an organizational philosophy, “green” building solutions are in demand. Perhaps the best known and most often cited program to achieve these goals is the US Green Building Council’s (USGBC’s) LEED® rating system. While some may think that green buildings are more complicated and costly to build, that is not actually the case. This is especially true when metal building materials are used. In fact, metal buildings are an ideal and economical way to pursue sustainability goals and LEED certification. How? We break it down as follows:
The LEED® Program
The LEED program has been in use since 1998 and is now used worldwide. It is a voluntary, point-based rating system that allows for independent review and certification at different levels. These levels include Certified (40-49 points), Silver (50-59 points), Gold (60-79 points), or Platinum (80 or more points). Since it allows for choices in which points are pursued, innovation and flexibility are entirely possible as long as specific performance criteria are met. It also encourages collaborative and integrative design, construction and operation of the building.
Points are organized into six basic categories, many of which can be addressed through metal building design and construction, as summarized below.
Location and Transportation: Metal buildings can be manufactured and delivered to virtually any location. That means they can support LEED criteria for being located near neighborhoods with diverse uses, available mass transit, bicycle trails, or other sustainable amenities. Metal building parking areas can also be designed to promote sustainable practices for green vehicles and reduced pavement. This all contributes toward obtaining LEED eligibility.
Sustainable Sites: Adding a building to any site will certainly impact the natural environment already there. Delivering portions of a pre-engineered metal building package in a sequence to arrive as needed means that the staging area on-site can be minimized—reducing site impacts. Additionally, using a “cool metal roof” has been shown to reduce “heat island” effects on the surrounding site and also qualify for LEED.
Water Efficiency: Any design that reduces or eliminates the need for irrigation of plantings and other outdoor water uses is preferred. Incorporating metal roofing with gutters and downspouts, as is commonly done on metal buildings, allows opportunities to capture rainwater for irrigation or other uses. It also helps control water run-off from the roof and assists with good storm water control.
Energy and Atmosphere: Metal buildings can truly shine in this category. Creating a well-insulated and air-sealed building enclosure is the most important and cost-effective step in creating an energy conserving building. A variety of insulation methods for metal building roof and wall systems are used to achieve this. Typically, metal building construction uses one or more layers of fiberglass insulation and liners combined with sealant and air barriers. Alternatively, insulated metal panels (IMPs) provide all of these layers in a single manufactured sandwich panel with impressive performance. Windows, skylights and translucent roof panels can provide natural daylight, allowing electric lighting to be dimmed or turned off. For buildings seeking to generate their own electricity, standing-seam metal roofing provides an ideal opportunity for the simplified installation of solar photovoltaic (PV) systems. Metal roofs generally provide a sustainable service life in excess of 40 years. This means they can outlast the PV array, thus avoiding costly roof replacements during most PV array lifespans.
Materials and Resources: Life Cycle Assessments (LCAs) are recognized by LEED as the most effective means to holistically assess the impacts that materials and processes have on the environment and on people. Fortunately, the Metal Building Manufacturer’s Association (MBMA) has collaborated with the Athena Sustainable Materials Institute and UL Environment to develop an industry-wide life cycle assessment report. There is also an Athena Impact Estimator that can help with providing LEED documentation. Metal buildings support exceptional environmental performance through the significant use of recycled steel and the reduced need for energy intensive concrete due to lighter weight buildings.
Indoor Environmental Quality: Most people spend much more time indoors than outside, which impacts human health. Therefore, LEED promotes or requires using materials that don’t contain or emit harmful substances. It also promotes design options for natural daylight, exterior views and acoustical control to promote psychological and emotional well-being. Metal buildings are routinely designed to readily incorporate components that help achieve these indoor qualities.
In addition, some LEED points are available for demonstrating innovation and addressing priorities within a geographic region.
Considering the qualities listed above, metal buildings clearly provide a prime opportunity to pursue LEED certification at any level. To find out more about the LEED rating system, visit https://new.usgbc.org/leed. To find out more about successfully designing and constructing metal buildings pursuing LEED certification, contact your local MBCI representative.
Installation techniques vary greatly depending on the metal roof’s fastening system. For single skin roofing, there are three fastening system options: concealed, exposed and standing seam. Proper execution of the correct installation techniques helps preserve roof structure and longevity.
Exposed Fastened Metal Roof Panel Installation
Exposed-fastened panels are installed over solid substrates or open framing using many screws that are visible from the outside of the structure. Field-applied systems ensure proper fastener alignment and engagement. The spacing of these screws is dictated by:
Substrate type
Project design loads (up to 12” on center with patterns)
Location on the roof (i.e. eaves, rake or ridge)
Roof slopes can vary from ½:12 minimum to 1:12 depending on product profile and building design requirements. Sidelap sealants are field-applied for all panel profiles, and using washers for weathertightness is ideal for this panel application system.
These roofing systems are low cost, easy to install and offer a wide variety of profiles for light applications, including:
Commercial
Industrial
Agricultural
Residential
Concealed Fastened Metal Roof Panel Installation
Concealed fastened metal roofing systems feature fixed fasteners hidden by either a snap-over sidelap or—in some cases—a snap-on batten cap. Installed directly over solid substrates with a waterproof membrane, they require a minimal number of fasteners per panel sidelap or clip. Special tooling is not necessary to snap laps or engage the panel battens.
These panels are typically 16” or less in width and ideal for roofs that have a 3:12 or greater slope. In addition, installation of these panels over conventional or wood-framed structures is possible, making them suitable for the following industries:
commercial
architectural
residential
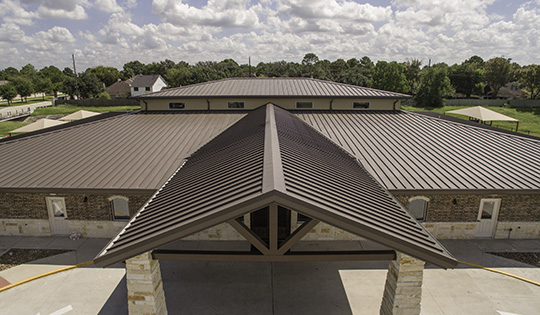
Standing Seam Metal Roof Panel Installation
Standing seam metal roof panels require application to solid substrates or open framing with concealed mechanical clips available in a variety of stand-off heights. These clips allow space for various insulation thicknesses, depending on the clip height. The design of most clips allows the roof panel to expand or contract independently of the substrate. This feature contributes to the panel durability and longevity as they can adapt to the thermal movement of large roof surfaces.
These panels are ideal for use in the following industries:
heavy commercial
industrial
architectural
residential
During installation, it’s important to pay close attention to proper panel alignment and engagement as well as substrate squareness and modularity of the install. As a result, proper panel seaming is possible via Snap Lok or Mechanical Seaming. Either seaming method, depending on the panel profile, will encompass the panel clip into the panel seam, contributing to the roof system’s ability to expand and contract.
All sidelap sealants for this type of roofing system are factory-installed. In addition, most roof slope applications are ¼:12 and ½:12, but some require 3:12 or greater depending on profile and seam type.
Learn More About Metal Roof Installation Techniques