How to Avoid Common IMP Installation Mistakes

Insulated metal panels (IMPs) are ideal for many roofing and wall applications. They are considered a top-of-the-line choice known for their superior insulation value, high performance air barrier, design flexibility, and fast installation. The simplicity of installation creates a high-performance building envelope. The many design options provide a versatile building solution for commercial, industrial, and institutional projects.

Sounds great, doesn’t it? What’s the catch? Well, those benefits won’t mean much if proper care is not taken during the installation process to ensure you’re getting what you paid for. Potential consequences can span the gamut—from minor aesthetic headaches to extremely costly errors such as leaks and structural issues.

Here are some ways to avoid common pitfalls when installing IMP panels on your next metal wall or roof project.

MET_DoubleLok, 7.2, CFR, CF Mesa_Boston Sports Institute_BARNES buildings_Ext_021_0419_resized

1. Pay attention to the manufacturer’s product installation manuals.

Installation manuals are not just for show! Even the most experienced installer should read, review and understand the installation guide before installing IMPs, and the panels should always be installed in accordance with the project’s installation drawings.

Don’t simply rely on the “what-you’ve-done-before” mindset. Take the time to review the specifics for every individual project. In addition to providing the information needed to execute a successful install, it can also give installers an opportunity to build upon their own knowledge base. One of the most common errors is related to proper receipt and handling of the panels. Investing a few minutes before the project starts and at the start of each day to review key topics helps avoid costly errors and improves production.

If you have a question or something does not seem right stop and call the manufacturer. It is always best to address a problem up front than try and fix a problem after the building is in operation.

2. Equipment check. Do you have what you need?

To keep your IMP installation on track, it’s imperative to ensure you have the equipment you’ll need for the job. Does your project need one or two forklifts, is a crane a better option? Will your project include longer-length IMPs being installed in a vertical orientation? If so, you may need special lifting equipment so as not to damage the panels. Whatever the details, crews need to be prepared to receive a project’s specific materials on site. A little advance planning will ultimately save you time and money by reducing labor and avoiding costly mistakes.

3. Don’t assume every IMP application is the same.

All buildings are not created equal. Just because a construction crew has had experience installing insulated metal panels on past jobs, doesn’t mean they can assume the process will be exactly the same every time. There will always be specific conditions and variables that need to be taken into consideration. Techniques used for vertical industrial panels will be different for horizontal architectural panels.

The vapor barrier (a key function of an IMP) is a great example of how a miscalculation can be problematic. Depending on the panel, the vapor barrier may be applied either at the factory or at the jobsite. If the project calls for a cold storage environment, the “warm” side of the vapor barrier will be on the exterior. Alternatively, a commercial or industrial application generally calls for the vapor seal to be on the opposite side of the panel. Confuse placement of the seal and you’re bound to run into problems down the road.

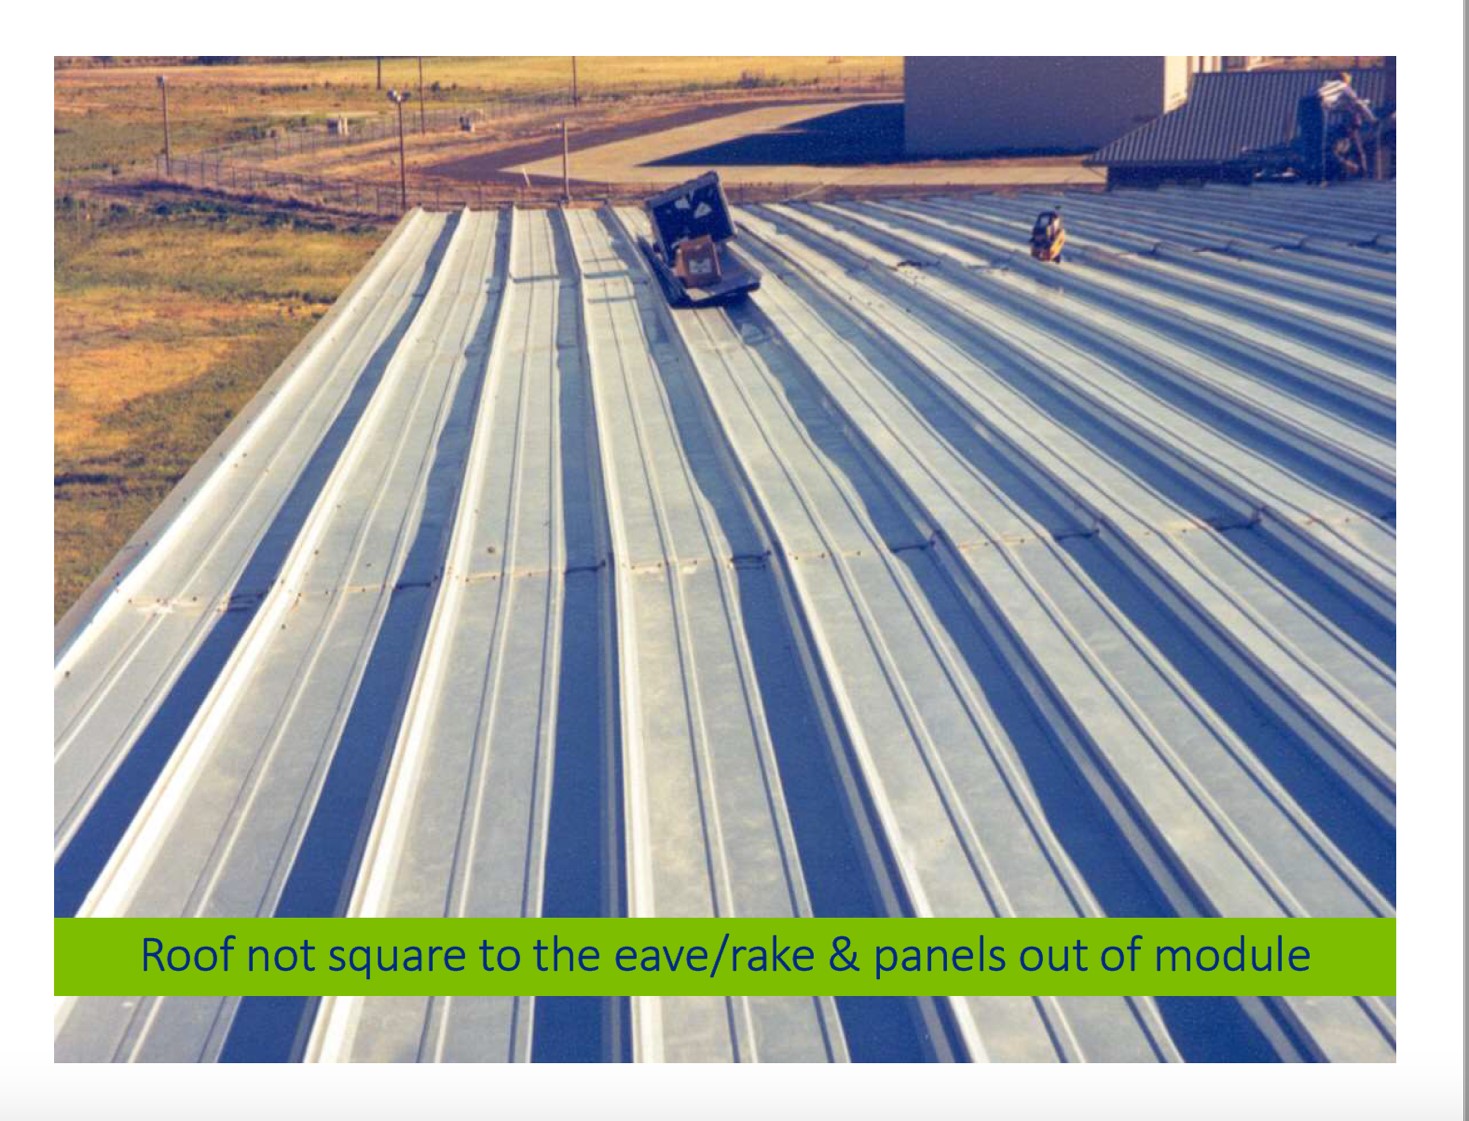
4. Be on the lookout for creases, buckles and framing alignment.

A crease or buckle on the face of a panel might seem like no big deal, but that couldn’t be further from the truth. In fact, framing alignment is one of the most critical aspects to ensure a proper fit-up of the construction as a whole. In terms of the panels themselves, not only will a framing misalignment not LOOK right but can also cause numerous efficiency and performance issues. Installing inexpensive shims can avoid panels needing to be replaced.

Additionally, make sure the first panel is plum and square, if you start right it is much easier to finish right.

Purlins must be level and square and all framing and bracing should be installed before installing panels. (The IMP manufacturer should specify the amount of tolerances allowed.) Also, take care with caulking and taping, foam-to-foam connections (in order to mitigate potential vapor leaks), seaming, and lap joints.

Attention to detail will avoid costly mistakes.

5. Always think ahead.

Being proactive may be the most important piece of advice construction crews need to hear.

For one, be sure to have a panel surplus on hand. You may be of the mindset that ordering extra panels is at worst a waste or at best, not worth the effort. This is a common judgement error that often leads to installation delays. If a crew has only ordered the exact number of panels needed for a job and there is any damage to the product, whether prior to delivery, on-site or during the installation, there a risk to the project schedule. Waiting on replacement panels can wreak havoc on schedules, especially with panels that may need special manufacturing due to custom components, finishes or colors. What do you do with extra panels you don’t need on the initial installation? Building owners can hold on to any surplus panels to be used as replacements, as needed, over the lifecycle of the building. A little preparation today can go a long way.

Other best practices include understanding the project’s site conditions and ensuring crews remain crews up to date on proper installation techniques—including staying current with training and certifications.

By taking this advice to heart, you can exponentially increase your ability to enjoy the many benefits of IMPs and be confident in your investment. For more information on MBCI’s insulated metal panels and proper installation guidelines, we encourage you to contact your local MBCI representative or visit our website.

Maintaining Panel Modularity and Square When Installing a Metal Roof

Most metal roofing system installers know the importance of keeping panels on module, i.e., holding the width of the panel. But holding module alone isn’t enough; keeping panels square is equally important as the two go hand in hand. When proper attention is paid to both, you will have a faster install—ensuring longevity and functionality of the roof system so that it will be able to properly expand and contract as designed—not to mention improved appearance.

Blog Image

The ability to hold panel modularity is directly dependent upon several factors, including:

  • Skillset of the installer
  • Frequency that modularity is checked
  • Substrate deficiencies
  • Insulation system
  • Appropriate methods being used to hold panel modularity during panel installation
  • Keeping symmetry/maintaining squareness

Here are some important considerations for ensuring success for panel alignment.

The Relationship Between Holding Module and Squareness

The roof panel is not going to “hold itself” 100% on module and square by installing just as received using only the hardware components supplied from the manufacturer. It is the installer’s responsibility to ensure the proper alignment and squareness of the panel install in order to hold panel module. For example, if you’re working with a 16-inch panel, installers need to keep the spacing of the panel ribs at 16 inches. In this way, the panel doesn’t become stretched or compressed. So, holding module is key along with holding square; the two are connected. If an installer doesn’t start the building out square, it will make it even harder to keep module with regards to the alignment of the panel.

As far as the overall appearance and performance, the success of the metal roof is going to be heavily dependent on how square it is installed and an ability to maintain proper modularity. There are a number of suggested methods for doing so outlined below. Installers must decide which method works best for their them and their roof panel application.

Methods to Ensure Success

The key method is measuring ahead and monitoring your installation so you know where you should be along that roof install. The metal panel is typically 24-gauge or 26-gauge material and therefore it’s easy enough to pull it ahead or have it become crowded during installation if you’re not staying close to your marks, and therefore it’s easy to get the panel out of module. The bigger impact, aside from just aesthetics of being on or off module is the performance of the system itself, to where it could become under stress or it could go through extra deformation due to being out of module and out of square. Its important to verify/measure the panels leading edge and adjust as needed via roof clips or other panel hardware. Some suggested methods include:

  • Run a string line from eave to ridge square to the eave and measure from the string back to each panel run. The string line is moved ahead as the roof installation progresses. If installing over solid substrate, snap chalk lines for alignment points along the roof.
  • Use a metal measuring tape permanently secured to the substrate at panel endlap locations, ridge and other intermediate points for permanent reference to check module.
  • Mark the eave line for every rib installation to ensure the panel stays on module. Trapezoid panels offer metal closures for proper placement at the eaves to assist in holding module while vertical rib panels do not.
  • Pre-drill substrates at the endlaps and ridge locations for clip alignment ahead of roof panel installation. A hole can be located at the leading edge of clip location so that an awl or punch can be inserted into the hold to align the clip and adjust accordingly. The holes drilled ahead of the panel at the corresponding panel module.

To assist with holding the panels’ shape when checking modularity, utilize outside panel closures or cut wood blocking to the panel’s correct width and insert between panel ribs. Note that a bad roof substrate that is out of tolerance for “flatness” will not be hidden or magically corrected by the panel installation. The alignment and tolerance of the substructure are equally critical to the panels’ squareness and being able to hold module. Substrate should be should be installed to a level plane tolerance that is no more than ¼” in 20-ft or 3/8” in 40-ft variance.

Do not stand in panel and/or keep as much weight as possible out of panel while installing clips. Not only is it unsafe but it changes the width of the panel and thus impacts modularity.

Use the correct combination of roof clip heights, insulation thickness and thermal spacers to maintain level panel installation and prevent panels from gaining or losing module. MBCI provides recommendations in its installation manuals regarding most common types of insulation thickness and means of attachment to various substrates. Additionally of note:

  • Trimming of insulation or adjusting thermal block thickness can help control/modify panel modularity as needed.
  • Alignment straps for trapezoid panels can be purchased from the manufacturer and installed on top of purlins before insulation. These set the clip spacing at 2-0” o.c and can be utilized at the endlap and ridge locations minimum or added at other locations.

At MBCI, we recommend that installers check module/square every three to four panels. If the panel grows or shrinks 1/8th of an inch or 3/16th of an inch with three or four panels or shows signs of being out of square, there’s time to recover from it by making adjustments to correct. If an installer just blindly puts the roof on for 50 feet or so and then realize they’re off module or out of square, it will likely be past the point of return to hold module and keep square.

For more information on installing metal roof panels to hold module, see our previous blog post on the topic.

For more information on our installer training sessions, click here, or submit your technical or installation questions by filling out our Ask An Expert form here.

Find a sales representative