Insulation Considerations for Metal Building Projects

Once you’ve set your sights on metal panels for your next building project, insulation will be one of the first, and most important, considerations. There are so many variables, though, so how do you know what’s best?

When you’re trying to make a determination of the insulation type, you should first identify what’s driving your decision making. Are your insulation requirements based on external parameters, such as job specs or established code requirements, or is there some other self-proposed condition at play like the end-use function of your building? Do you require upfront cost savings or is long-term value what you’re after?

Here we’ll take a look at some of the most common determining factors and how they might affect your insulation choices.

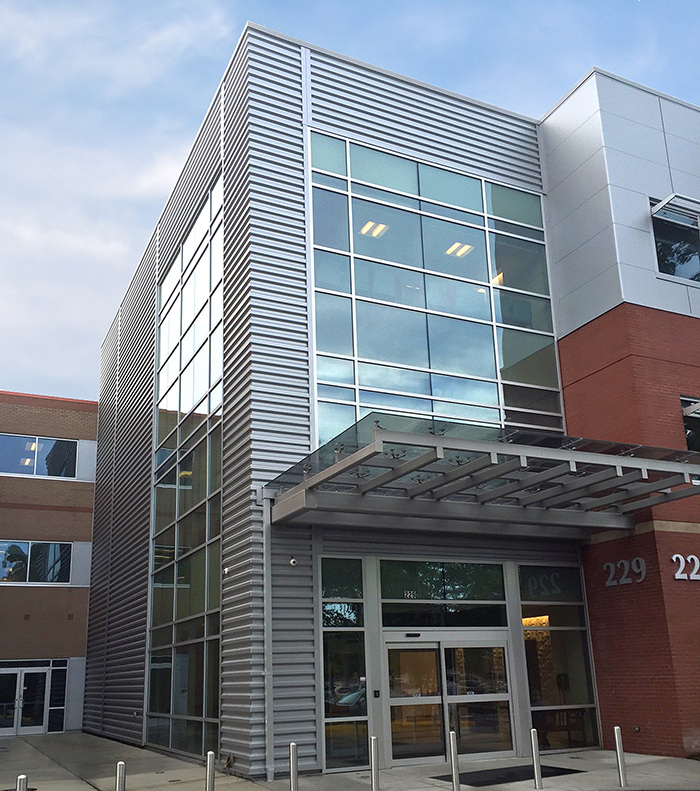
Urology Medical Office_1_resized

Energy Codes

Depending on whether you’re building in the commercial or residential arena, and what the physical location of your project is, you may have to adhere to strict energy/building codes that will be an unmovable goal post in your decision making.

Are there any local code or project-specific stipulations as far as minimum R-values for the roof or for the walls? What must you be in compliance with? There can be many different aspects of an energy or building code that you will need to research. For example, there may be an envelope solution where the whole building nets out “X” R-value. Or, a prescribed method could be mandated, where each individual component (i.e., windows, doors, walls, etc.) going into that building cannot exceed (or must meet) a particular requirement.

Let’s say, as an example, you have a code that requires you to have a continuous R-value at your structural attachment point. Depending on what that requirement is, it may be harder to achieve that by using a rolled or batt fiberglass systems. You might be able to achieve it much more easily with a componentized system using metal decking/liner and rigid board insulation, or perhaps an insulated metal panel (IMP) may be better suited. In that case, you could be looking at spending more money for that panel system while saving money on the labor … which brings us to the next variable: upfront costs.

Upfront Costs

Another critical factor is the cost associated with materials and labor of the system you’re going to install. Let’s say, for instance, your needs require a higher-end type installation in order to reach higher R-values or a code-prescribed method. How are you planning to achieve that?

In some instances, you may be looking toward an insulated panel system, which can readily give you those higher installed R-values. While these are extremely efficient systems, there can be a notable bump in the panel material price to get to that same level than if you choose a single-skin approach with a fiberglass or rigid board insulation system. You would, therefore, need to accurately compare the installed costs of the two systems versus just the material alone. Which will be less expensive/more efficient: the multiple components with lower individual costs plus more labor time and expense to assemble OR the potentially higher individual IMP panel price but with less time and expense to install? You will need to look at the project holistically to determine which is more cost-efficient for the specific situation.

Long-term costs, value and end-use functionality

Oftentimes, upfront material and labor costs need to be evaluated in terms of potential long-term savings and value. Some things to consider here are what your big picture needs are for the structure, including an assessment of how it will be used now and in the future. Unlike with dictated codes and regulations, here it may be more a question of wants vs. needs or owner-occupying vs. vendor leasing.

While you might want an R-30 building, for instance, is it economically beneficial for your end use of the building? Let’s use this example: If you’re a homeowner using a metal structure to store relatively non-valuable belongings, how well does it have to be insulated? Is it worth a high price point? In this case, perhaps single layer roof and wall insulation will be adequate for your needs.

If on the other hand, you’re a builder contracted to construct a structure for which interior climate control is critical for the end use—either because of the production to occur inside or perhaps due to food storage or other temperature-sensitive contents—then you might lean more toward an insulated panel system. In another example, if there’s going to be the potential for an abundance of heat or moisture in the building, as with paper products production or wastewater treatment, then you’ll want to be certain that the insulation system you use best resists such an interior climate and doesn’t permit condensation to form. In this example, it is critical that the structure is significantly protected so that moisture cannot become trapped in the roof or wall assemblies leading to reduced building efficiency or even formation of mold.

You should also consider how long it will take to recoup your initial investment. Obviously, for instance, you may spend less money upfront by only putting 4-inch blanket in your single layer metal walls as opposed to choosing to install an insulated metal panel (IMP) system, but long-term, is the money you save by going with the lesser insulation system going to be more than what the energy savings would be over the time that you’re the occupant of the building?

If you’re only going to be in the building for one or two years, or you’re not even occupying the building, you might be tempted to install a lesser expensive system, but then you might be risking not being able to retain tenants or impacting future resale value.

What Are the Insulation Options?

Once you’ve identified what the driving factors are for your insulation system choice, you can match up your needs with most popular options, which are:

Fiberglass insulation solutions, including over-the-purlin systems; cavity fill insulation systems; batt insulation; rigid board insulation via a composite system with metal decking and vapor barrier; or spray-on insulation systems. Alternatively, if a foam core insulation is preferred, it may be worth considering the use of insulated metal panels (IMPs) that are designed, engineered, and fabricated to be compatible with metal building construction as an envelope building solution.

For more specifics on the types of insulation systems that are available, check out this MBCI blog article: https://www.mbci.com/coordinating-roof-insulation-with-metal-building-construction/
Five Installer Responsibilities for Weathertightness Warranties

Every metal roof installation comes with an implied warranty: the roof shouldn’t leak. This is true even if your customer didn’t buy a “manufacturer’s weathertightness warranty.” It’s just the very basic expectation. Any details we send out, any materials, whatever the manufacturer supplies the installer…all go to that simple premise that you are buying a quality roof system from the get go.

Beyond that, though, a purchased manufacturer’s weathertightness warranty takes it a step further. It’s added insurance. In order to get the full value and peace of mind from a warranty, there are certain considerations the installer needs to keep in mind. Let’s take a look at five key installer responsibilities on projects with manufacturer weathertightness warranties—beyond, of course, putting down the roof correctly!

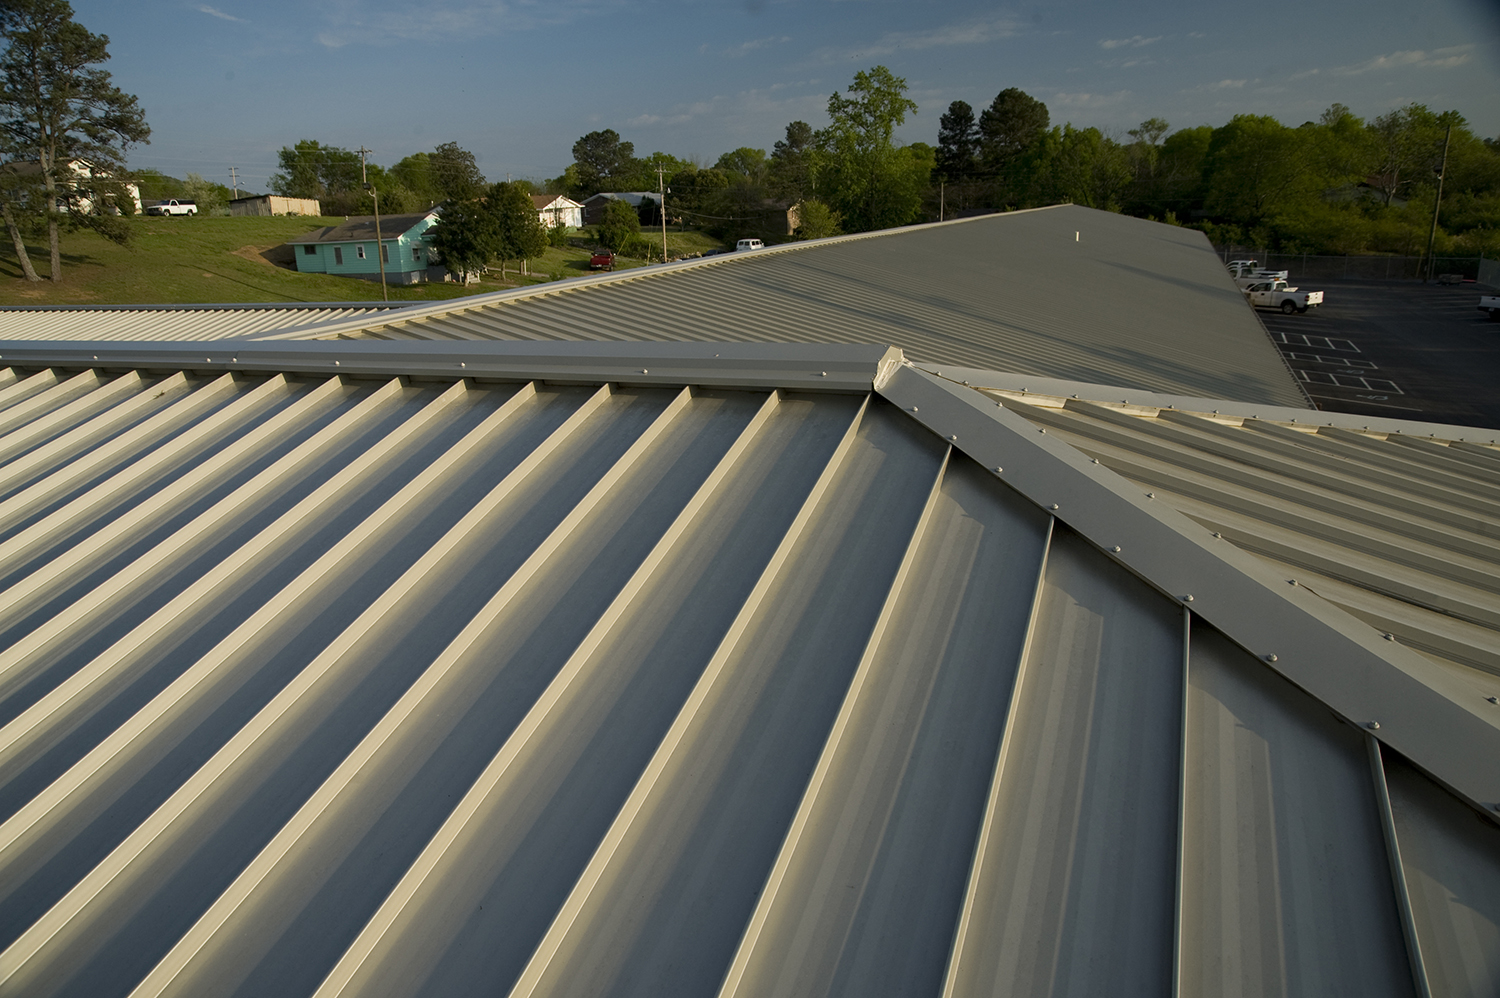
MBCI Calhoun GA 4-09, 06_resized

1. Understanding the weathertightness warranty type selected for the project.

MBCI sells two types of weathertightness warranties: Standard and Single Source. The approval process up front is the same for both but it is crucial to know the scope of the project’s warranty. With a standard warranty, the only real expectation is that the roof will remain watertight for 20 years. It is a very basic, very inexpensive warranty in which the manufacturer and the installer jointly warranty the roof for that period of time. The manufacturer covers all the materials and the details, and the installer is covering the installation.  

The opposite end of that spectrum is the single source warranty, which is purchased when the customer wants not only the roof warrantied, but prefers everything associated with the roofany accessories, anything else penetrating the roofto be 100 percent covered by the manufacturer, if applicable. These warranties do cost more, require inspections, and require an installer to have completed the manufacturer’s certified installer training program. 

It’s important for the installer to know what warranty was sold, particularly because he/she may not have been the one involved from the start. They may be coming in to bid the job as the installer onlyTherefore, he/she needs to ask questions because they may or may not have the personnel on their crew that meets the requirements to install that roof for the weathertightness warranty purchased. 

2. Obtaining/confirming building geometry approval for warranty. 

Beyond the type of warranty, it is simultaneously necessary to investigate whether there are additional procedures related to the building geometry. Has everything been correctly noted so that the warranty itself will be valid? Is the manufacturer aware of transitions, edge conditions, roof penetrations, roof accessories (snow guards, solar, etc.)? It is extremely important to make sure that the geometry—or the conditions of the roofare covered within a particular warranty. 

MBCI, for instance, will review your roof plan and see the eave gutters, the ridge, the rake, etc. and we can survey what’s going on. Is that roof tying into something else? Will there be materials on that roof that aren’t provided by us or not being installed by the roof installer? As the manufacturer, we would be taking a cursory view to say, yes, we can warranty the roof or no, revisions are needed. If there is anything that we can’t warranty, we’re going to spell that out upfront. We will give as much direction as possible to get the project to a point it can be warranted.  

That said, it’s the installer’s and customer’s responsibility to make sure that the manufacturer knows what’s happening. Think about it this way. Many times, there are other trades involved outside of the roofing contract. Along comes someone who says, “I need to run something  through your roof,” or six months down the road the owner wants a satellite dish on the roof and the installer incorrectly penetrates the roof., causing a leak. Guess who they’re going to call? The installer/customer/owner needs to get that approved by the manufacturer. Otherwise, the warranty could be voided.  

The main takeaways here: Do not make modifications to that roof without the manufacturer’s approval because the roof installer can end up inheriting the liability for that if they do. And, communicate the criteria or the requirements of the warranty to the customer. Don’t just hand them the paperwork. Make sure they understand what’s in it and their responsibilities as metal roof owners. 

3. Ensure proper installer certification and training as required by the warranty type. 

This sounds self-explanatory, but it goes back to the warranty type and the necessity to make sure the warranty selected is appropriate for the job. Verify whether or not the job requires a certified installer and if so, ensure certifications are current. If the installer is not certified, then they need to take the steps to get certified in order to meet that warranty requirement.  

A common situation: A warranty gets sold by a general contractor and he/she subs it out to another roofing contractor. That sub comes in and says not to worry, “we know how to put the roof on. We’re certified.” Then, MBCI gets ready to issue the warranties or schedule inspections and finds out the subcontractor doesn’t know our system that wellAnd remember—for certain types of weathertightness warranties the installer needs to be certified via our training program.

4. The installer is responsible for correct installation per manufacturers details. 

The onus is on the installer to follow the details and directions provided by the manufacturer. If you install the roof per those details, and then there’s a problem, the responsibility falls back on the manufacturer unless determined otherwiseIf, however, the installer doesn’t follow the details provided and the manufacturer comes out to do a warranty claim or warranty inspection, then the installer is going to be responsible for correcting it. The installer can’t put it in wrong and just say, oh, well, that’s covered by the warranty. It’s not. A manufacturer’s warranty is not for covering a bad installationparticularly in the case of a standard warranty. If the installer does a poor install and the roof leaks, that’s not covered by the standard warranty; it falls back on the installer. Of note, this scenario can be different with a single source warranty, since the manufacturer will be out there doing ongoing inspections and ultimately can become responsible for the installation as well. 

And, it goes without saying, the warranty doesn’t cover the interior contents of a building that may be damaged due to an installation issue.  

5. Do not make adds or changes to an installed system once completed and the warranty has been issued without first getting manufacturer approval. 

The warranty only covers the installed product per details, as mentioned. It does not cover additional materials added to the roof or any changes made, at least without the manufacturer’s prior approval—after the install is complete. 

Some examples would be adding a mechanical unit to the roof, a plumbing vent added through the roof, or the satellite TV cable through the roof. Putting a penetration, fasteners, holes of any kind, into a previously installed roof system, unless approved by the manufacturer, will void the warranty in that location. If the manufacturer does not give approval, the installer, along with the customer, would need to make the decision—is it worth the risk to proceed knowing that if the roof leaks, that location would no longer by covered by the warranty.  

To find out more about MBCI warranties and installer certification, contact your local MBCI representative or visit our website.

Maintaining Panel Modularity and Square When Installing a Metal Roof

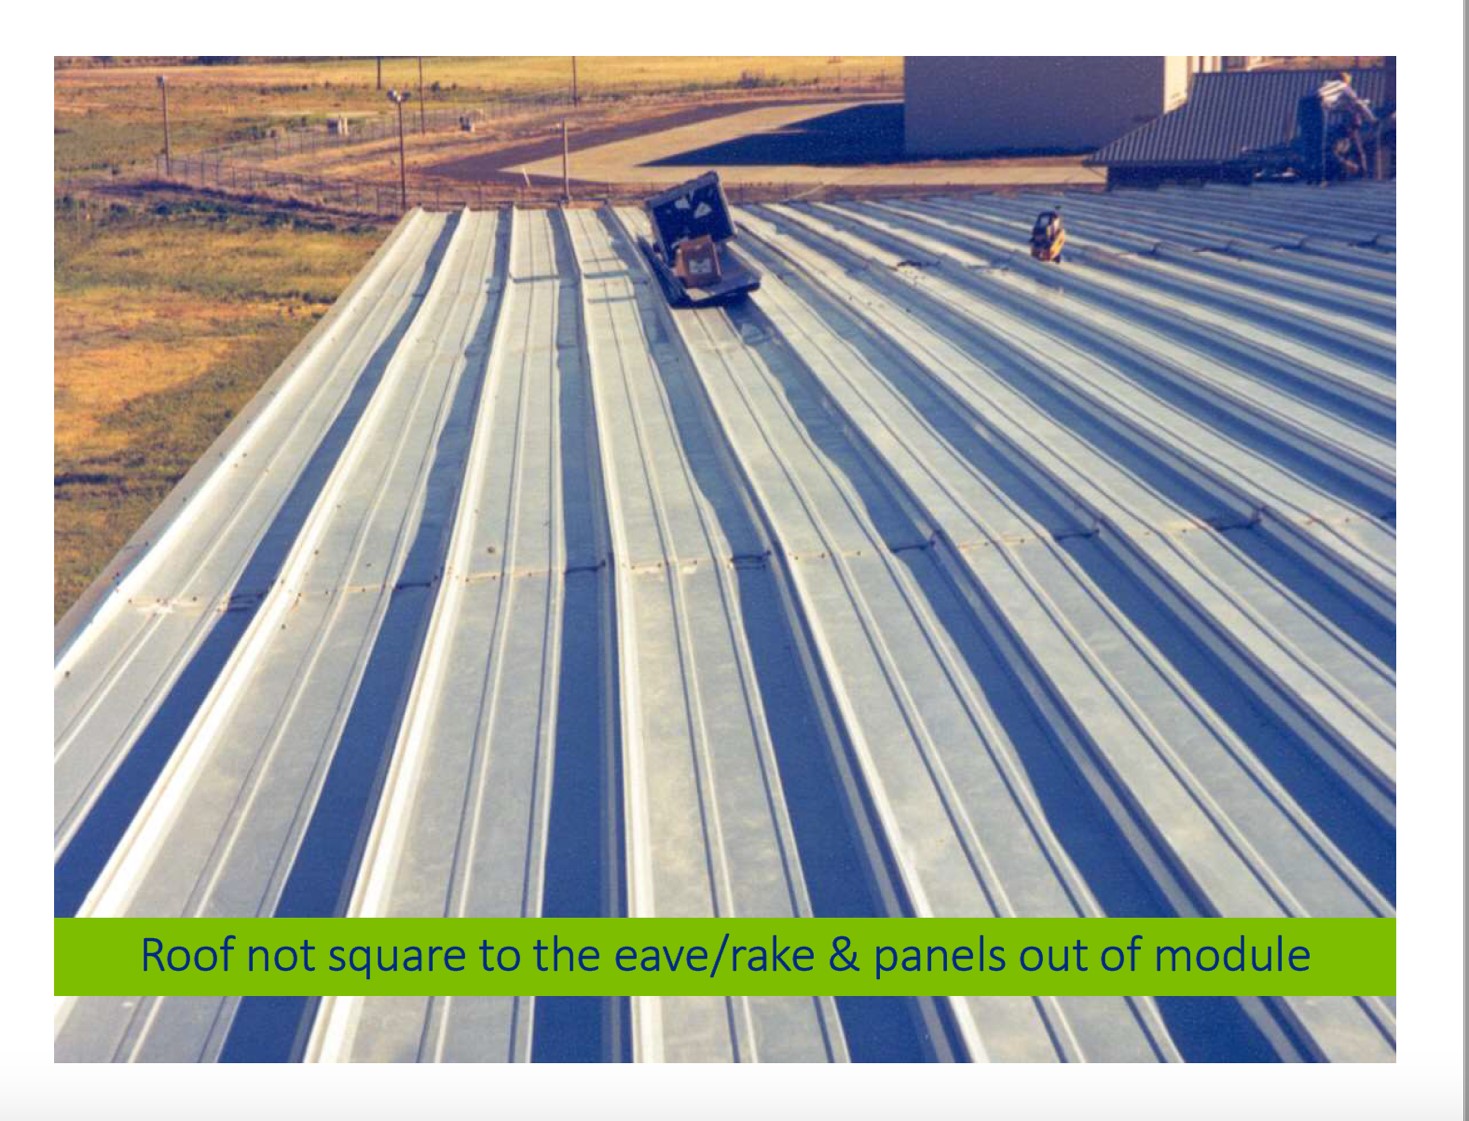
Most metal roofing system installers know the importance of keeping panels on module, i.e., holding the width of the panel. But holding module alone isn’t enough; keeping panels square is equally important as the two go hand in hand. When proper attention is paid to both, you will have a faster install—ensuring longevity and functionality of the roof system so that it will be able to properly expand and contract as designed—not to mention improved appearance.

Blog Image

The ability to hold panel modularity is directly dependent upon several factors, including:

  • Skillset of the installer
  • Frequency that modularity is checked
  • Substrate deficiencies
  • Insulation system
  • Appropriate methods being used to hold panel modularity during panel installation
  • Keeping symmetry/maintaining squareness

Here are some important considerations for ensuring success for panel alignment.

The Relationship Between Holding Module and Squareness

The roof panel is not going to “hold itself” 100% on module and square by installing just as received using only the hardware components supplied from the manufacturer. It is the installer’s responsibility to ensure the proper alignment and squareness of the panel install in order to hold panel module. For example, if you’re working with a 16-inch panel, installers need to keep the spacing of the panel ribs at 16 inches. In this way, the panel doesn’t become stretched or compressed. So, holding module is key along with holding square; the two are connected. If an installer doesn’t start the building out square, it will make it even harder to keep module with regards to the alignment of the panel.

As far as the overall appearance and performance, the success of the metal roof is going to be heavily dependent on how square it is installed and an ability to maintain proper modularity. There are a number of suggested methods for doing so outlined below. Installers must decide which method works best for their them and their roof panel application.

Methods to Ensure Success

The key method is measuring ahead and monitoring your installation so you know where you should be along that roof install. The metal panel is typically 24-gauge or 26-gauge material and therefore it’s easy enough to pull it ahead or have it become crowded during installation if you’re not staying close to your marks, and therefore it’s easy to get the panel out of module. The bigger impact, aside from just aesthetics of being on or off module is the performance of the system itself, to where it could become under stress or it could go through extra deformation due to being out of module and out of square. Its important to verify/measure the panels leading edge and adjust as needed via roof clips or other panel hardware. Some suggested methods include:

  • Run a string line from eave to ridge square to the eave and measure from the string back to each panel run. The string line is moved ahead as the roof installation progresses. If installing over solid substrate, snap chalk lines for alignment points along the roof.
  • Use a metal measuring tape permanently secured to the substrate at panel endlap locations, ridge and other intermediate points for permanent reference to check module.
  • Mark the eave line for every rib installation to ensure the panel stays on module. Trapezoid panels offer metal closures for proper placement at the eaves to assist in holding module while vertical rib panels do not.
  • Pre-drill substrates at the endlaps and ridge locations for clip alignment ahead of roof panel installation. A hole can be located at the leading edge of clip location so that an awl or punch can be inserted into the hold to align the clip and adjust accordingly. The holes drilled ahead of the panel at the corresponding panel module.

To assist with holding the panels’ shape when checking modularity, utilize outside panel closures or cut wood blocking to the panel’s correct width and insert between panel ribs. Note that a bad roof substrate that is out of tolerance for “flatness” will not be hidden or magically corrected by the panel installation. The alignment and tolerance of the substructure are equally critical to the panels’ squareness and being able to hold module. Substrate should be should be installed to a level plane tolerance that is no more than ¼” in 20-ft or 3/8” in 40-ft variance.

Do not stand in panel and/or keep as much weight as possible out of panel while installing clips. Not only is it unsafe but it changes the width of the panel and thus impacts modularity.

Use the correct combination of roof clip heights, insulation thickness and thermal spacers to maintain level panel installation and prevent panels from gaining or losing module. MBCI provides recommendations in its installation manuals regarding most common types of insulation thickness and means of attachment to various substrates. Additionally of note:

  • Trimming of insulation or adjusting thermal block thickness can help control/modify panel modularity as needed.
  • Alignment straps for trapezoid panels can be purchased from the manufacturer and installed on top of purlins before insulation. These set the clip spacing at 2-0” o.c and can be utilized at the endlap and ridge locations minimum or added at other locations.

At MBCI, we recommend that installers check module/square every three to four panels. If the panel grows or shrinks 1/8th of an inch or 3/16th of an inch with three or four panels or shows signs of being out of square, there’s time to recover from it by making adjustments to correct. If an installer just blindly puts the roof on for 50 feet or so and then realize they’re off module or out of square, it will likely be past the point of return to hold module and keep square.

For more information on installing metal roof panels to hold module, see our previous blog post on the topic.

For more information on our installer training sessions, click here, or submit your technical or installation questions by filling out our Ask An Expert form here.

Overhead Door Considerations for Metal Buildings

Selecting the right overhead door shouldn’t be an afterthought. As with metal panels, they should be a key consideration when planning and designing a commercial or industrial metal building. Functionality (i.e., size, operation and environmental concerns), security and quality are priority factors. In addition, location, climate and building codes should also be part of the overhead door solution decision. Selecting a door type and framing, in fact, can further depend on end use, strength/longevity needs, access and clearance/framing restrictions. Additionally, the type of door requested or required will impact the framing and support needed for installation.

MBCI Blog: Overhead Door Considerations for Metal Buildings

With these criteria in mind, its of note that metal building manufacturers don’t always supply the overhead doors for a project. Therefore, ensuring compatibility and optimal performance requires viewing door options from top to bottom and side to side—figuratively and literally.

Overhead Door Types

Although MBCI primarily offers roll-up doors, these are not the only door options for metal buildings. The primary types of commercial doors for large metal building openings can include the following:

  • Roll-Up Doors aka coiling/drum doors are typically a continuous corrugated sheet that nests into itself as its rolled around a cylindrical drum at the top of the door opening. This nesting allows them to take up far less overhead space as compared to doors that slide on tracks. Generally less expensive to purchase, roll-up doors also boast durability, maintenance and longevity benefits.
  • Sectional Doors are typically smaller horizontal door leafs/ panels hinged together and mounted between two tracks on both sides of the door. This permits the sections to be lifted continuously either by transitioning horizontally back into the building above the door opening or vertically only above the opening, clearance permitting.
  • Vertical or Horizontal Bi-Fold Doors are similar to sectional doors but have much larger panel sections, requiring fewer door panels. Manual operation is an option, however operation most often occurs via hydraulics with the support of door headers or jambs only and not via a full track system.
  • Sliding Doors may be mounted via an external or internal horizontal track system at the top of a frame’s opening. Depending on door weight and size, sliding doors may rely on support from the top track system or lower guide rail mounts and wheels as well. Top-mount-only systems are prevalent on smaller commercial doors or in agricultural uses. Larger versions typically support industrial applications like airplane hangars and freight facilities.

Planning Ahead: Coordination Is Key

Once you’ve selected the overhead door type best suited to your project, coordination with the building manufacturer is a must. Specifically, be certain that the building manufacturer knows the type and size of your doors before ordering your building materials. Here are some factors and situations you will want to account for:

  • Door Opening Size: Allow ample space to ensure no obstructions when the door is in its maximum open position. Even partial obstructions may require building design adjustments to accommodate for larger openings.
  • Door System Weight: The weight of the entire door system—including framing, sheeting, hardware and drive systems (if applicable)—can require certain design considerations.
  • Clearances: When open, the horizontal and vertical panel clearances shouldn’t foul trims or building exterior cladding.
  • Installation Clearances: Be sure to understand minimum interior building clear heights needed if installation of track systems are necessary. Or, if using roll-up doors, account for drum clearance and its proximity to roof framing, ceiling liners or roof insulation.
  • Framing Materials: Be sure surfaces and flanges of framing materials are wide enough for proper attachment of door tracks. The same goes for mounting hardware and mechanical operators if so equipped and required.
  • Bracing: If appropriate, evaluate any supplemental bracing necessary to keep the door opening square. Additionally, support for the door sheet in all positions should also be a consideration.
  • Verify Manufacturer Requirements: Work with the door supplier and advise the building materials manufacturer if the door opening, framing and/support require minimum or maximum deflections/limits. This helps ensure proper operation when building framing deflects under various loadings. Failure to do so may prevent the door from opening or closing properly. This coordination is made easier when the same manufacturer providing the roof and wall materials also provides the overhead doors.

In Conclusion

Always ensure you’re getting high quality metal overhead door products and services that seamlessly integrate into new or existing metal building projects. Regardless of scope, MBCI can help you find the best overhead door solution suited to your needs and project specifications.  Contact MBCI today!

Are Metal Panels An Ideal Low-Slope Roofing Material?

Many large, commercial, low-rise buildings often don’t benefit from steeply-sloped roofs the way residences and small commercial buildings might. This is because a steep roof slope would add unwanted height and unnecessary construction cost. Buildings like warehouses, retail stores, etc. are more appropriately built with low-slope roofing, commonly known as “flat roofs”. The National Roofing Contractors Association (NRCA) defines low-slope roofs as those with “a slope at or less than 3:12″. Anything steeper qualifies as a “high-slope roof”. With this in mind, let’s look at some key points to consider when designing and constructing a low-slope roof.

MBCI Low-Slope Roofing

 Low-Slope Roofing Materials

When it comes to selecting low-slope roofing products, there are generally three fundamental choices:

  • Asphalt/ Bituminuous Products: The traditional commercial roofing norm for many years, the use of asphalt/bituminous products has dwindled as newer, more appealing options have emerged.
  • Flexible Membrane Roofing: This roofing material can be made from a variety of types of plastic/polymer-based materials (commonly known as EPDM, TPO, PVC, etc.). Rolls of the chosen membrane are laid out on the roof structure and secured in place either with mechanical fasteners (screws with large washers) or with a continuous layer of adhesive.
  • Metal Roofing: Sometimes overlooked, metal roofing is suitable for different roof slopes. Many metal roofs that use standing-seam systems are rated for use with a pitch as low as ½:12.

When considering which type of roofing material to use for a building project, there are a number of significant differences that illustrate why metal roofing is often the ideal choice.

Engineered For Superior Performance

Standing-seam metal roofing is made specifically for use on low-slope roofs as it meets a number of performance requirements:

  • Water resistance: Precipitation doesn’t penetrate through metal or through the standing seams where the metal panels join together. This is why they can tolerate such low slopes, allowing the water to drain away slowly and predictably without leakage.
  • Rigidity: The rigid nature of metal means that there is less opportunity for ponding (standing water). This is not always the case with asphalt/bituminous or membrane roofing systems.
  • Drainage: Metal roofs carry water to the building’s edge toward gutters and downspouts that carry it away from the building. Other roofing systems rely on drainage piped inside the building. This takes up space and has the potential to leak water inside the building and cause damage.
  • Wind Resistance: Standardized uplift testing shows that metal roofing performs as well or better in extreme weather than mechanically-fastened or fully-adhered membrane systems.
  • Durability: The most cited advantage of metal roofing is its long-term strength and durability. Engineered design and use of high-quality coatings ensures a longer lifespan—50 years or more. In contrast, other roofing types typically feature lifespan ratings of 20 or 30 years.
  • Puncture Resistance: Low-slope metal roofing is more puncture-resistant than asphalt/bituminous or membrane roofing. This makes it better able to tolerate foot traffic, hail and other puncture-inducing hazards.
  • Construction/ Installation Ease: Metal roofing panels are custom-made to suit specific building sizes and end uses. This customization typically means it takes less time to place and install metal roofing in the field. Further, metal panels can tolerate a wide range of temperatures and weather conditions and still install and perform as intended. Low-slope roofs are also safer to walk on with less risk of slips, falls and other hazards.

Cost-Effectiveness

Using metal roofing on low-slope roofing systems can be cost effective in a number of ways:

  • Fewer labor hours as a result of the ease of installation saves money during construction.
  • Competitive material costs, particularly if the metal roofing is part of a total metal building package from a single manufacturer.
  • Minimal maintenance requirements and aversion to rusting, mold growth and decay that save the building owner money over time.

This all adds up to a very favorable life-cycle cost.

The performance, cost-effectiveness and life-cycle benefits of metal roofing panels make them a viable option for low-slope roofing systems. Manufacturers like MBCI can help you select the right metal roofing products and provide information and resources to help ensure proper installation.

View examples of low-slope metal roofing projects and contact your local MBCI representative to start your project today.

Understanding LEED for Green Metal Buildings

Designing and constructing sustainable buildings has become a mainstream expectation of most building owners. Whether for reduced energy costs, higher returns on investment, or as an organizational philosophy, “green” building solutions are in demand. Perhaps the best known and most often cited program to achieve these goals is the US Green Building Council’s (USGBC’s) LEED® rating system. While some may think that green buildings are more complicated and costly to build, that is not actually the case. This is especially true when metal building materials are used. In fact, metal buildings are an ideal and economical way to pursue sustainability goals and LEED certification. How? We break it down as follows:

LEED

The LEED® Program

The LEED program has been in use since 1998 and is now used worldwide. It is a voluntary, point-based rating system that allows for independent review and certification at different levels. These levels include Certified (40-49 points), Silver (50-59 points), Gold (60-79 points), or Platinum (80 or more points). Since it allows for choices in which points are pursued, innovation and flexibility are entirely possible as long as specific performance criteria are met. It also encourages collaborative and integrative design, construction and operation of the building.

Points are organized into six basic categories, many of which can be addressed through metal building design and construction, as summarized below.

  • Location and Transportation: Metal buildings can be manufactured and delivered to virtually any location. That means they can support LEED criteria for being located near neighborhoods with diverse uses, available mass transit, bicycle trails, or other sustainable amenities. Metal building parking areas can also be designed to promote sustainable practices for green vehicles and reduced pavement. This all contributes toward obtaining LEED eligibility.
  • Sustainable Sites: Adding a building to any site will certainly impact the natural environment already there. Delivering portions of a pre-engineered metal building package in a sequence to arrive as needed means that the staging area on-site can be minimized—reducing site impacts. Additionally, using a “cool metal roof” has been shown to reduce “heat island” effects on the surrounding site and also qualify for LEED.
  • Water Efficiency: Any design that reduces or eliminates the need for irrigation of plantings and other outdoor water uses is preferred. Incorporating metal roofing with gutters and downspouts, as is commonly done on metal buildings, allows opportunities to capture rainwater for irrigation or other uses. It also helps control water run-off from the roof and assists with good storm water control.
  • Energy and Atmosphere: Metal buildings can truly shine in this category. Creating a well-insulated and air-sealed building enclosure is the most important and cost-effective step in creating an energy conserving building. A variety of insulation methods for metal building roof and wall systems are used to achieve this. Typically, metal building construction uses one or more layers of fiberglass insulation and liners combined with sealant and air barriers. Alternatively, insulated metal panels (IMPs) provide all of these layers in a single manufactured sandwich panel with impressive performance. Windows, skylights and translucent roof panels can provide natural daylight, allowing electric lighting to be dimmed or turned off. For buildings seeking to generate their own electricity,  standing-seam metal roofing provides an ideal opportunity for the simplified installation of solar photovoltaic (PV) systems. Metal roofs generally provide a sustainable service life in excess of 40 years. This means they can outlast the PV array, thus avoiding costly roof replacements during most PV array lifespans.
  • Materials and Resources: Life Cycle Assessments (LCAs) are recognized by LEED as the most effective means to holistically assess the impacts that materials and processes have on the environment and on people. Fortunately, the Metal Building Manufacturer’s Association (MBMA) has collaborated with the Athena Sustainable Materials Institute and UL Environment to develop an industry-wide life cycle assessment report. There is also an Athena Impact Estimator that can help with providing LEED documentation. Metal buildings support exceptional environmental performance through the significant use of recycled steel and the reduced need for energy intensive concrete due to lighter weight buildings.
  • Indoor Environmental Quality: Most people spend much more time indoors than outside, which impacts human health. Therefore, LEED promotes or requires using materials that don’t contain or emit harmful substances. It also promotes design options for natural daylight, exterior views and acoustical control to promote psychological and emotional well-being. Metal buildings are routinely designed to readily incorporate components that help achieve these indoor qualities.

In addition, some LEED points are available for demonstrating innovation and addressing priorities within a geographic region.

Considering the qualities listed above, metal buildings clearly provide a prime opportunity to pursue LEED certification at any level. To find out more about the LEED rating system, visit https://new.usgbc.org/leed. To find out more about successfully designing and constructing metal buildings pursuing LEED certification, contact your local MBCI representative.

How Metal Panels Support Eco-Friendly Building Practices

The eternal struggle for contractors: to go green or not green? Profit or purpose? The good news is that with metal panels, eco-friendly building is not only possible but profitable, making the choice a no-brainer. Today’s metal panel systems look great and prove to be incredibly sustainable, enabling homeowners and contractors to reap the benefits of going green.

In fact, in today’s building and design market, increasing energy efficiency while reducing energy and maintenance costs are key drivers for a building design’s overall success. The metal panel market offers a number of products to support sustainability efforts, including recyclable metal roof and wall panels and energy-efficient insulated metal panels. Here we’ll take a look at a few of the key ways in which metal buildings and metal building components support enviro-friendly building.

Longer Lifespans

The documented longer lifespans of metal roofing systems (they can last 40 to 50 years) mean lower instances of re-roofing and repair jobs, thereby reducing energy required from such actions as manufacturing of parts, shipping or even energy expended by crews traveling to and from a jobsite.

Recyclability

Every piece of metal scrap can be recycled. That statement speaks for itself but from an economic standpoint, that equates to reduced jobsite costs since there’s no need to cart away or dispose of unused wood or masonry materials.

Energy Efficiency

According to data from ENERGY STAR, heating and cooling can account for up to 50% or more of a home’s total utility consumption. The use of metal roofing can help with energy efficiency through solar radiation reflection such as with unpainted metal and by increased re-emittance of solar radiation with pre-painted or granular coating metal roofing systems.

Salt Lake Stadium

As one example, cool metal roofs use coatings with known radiative properties that are specified in order to keep the roof surface temperature lower than it would have been with uncoated or traditional roofing materials during peak sun times.

Sustainability Certification

Metal building materials can be used to help contribute to earning USGBC LEED credits through a number of ways based on the latest LEED v4 categories and criteria, including sustainable sites, energy and atmosphere, materials and resources, and indoor environmental quality.

For these reasons and more, metal panels and components lend themselves to the best that sustainable building has to offer, protecting the earth and protecting the bottom line. Visit us at mbci.com to find more resources on how metal building construction can be the smart choice in your next sustainable building project.

Project Services for Metal Buildings and Roofing: Part 2

In our last blog posting, we identified the project services that are available from MBCI and the typical process that contractors for metal buildings and roofing might experience in using them. In this posting, we will take a closer look at why so many contractors are taking advantage of these very helpful services and reaping multiple benefits.

We start by pointing out that, while it hasn’t historically been well-known that these project manager led services are available, things are changing. MBCI in particular has seen a 40 percent increase in service requests in just the past 2 years! The biggest growth has occurred in the areas of custom designs, high-end architectural buildings, and projects that use insulated metal panels (IMPs). Nonetheless, it has been recognized that virtually all types of projects benefit from these services. Therefore, it should come as no surprise that the combined MBCI project management teams are servicing 100 to 150 projects at any one time.Project Services Part 2 March 2019 Blog

While it is hard to pinpoint why this impressive growth is happening in the use of project services, there are some commonly reported advantages such as the following:

Single Point of Contact: By having a designated project manager at the manufacturing company, communication is direct and streamlined. Further, the project manager takes care of everything from start to finish in regards to the metal building or roofing package. That means the contractor is freed up to focus on the site-specific aspects of the installation without needing to worry about managing the process on the manufacturer’s end.

Applicability: The range of building types that have benefitted from these services is all-encompassing, indicating that these services are applicable to virtually any metal building or roofing project. Project service teams are experienced in virtually all types of non-residential construction including commercial, retail, hospitality, institutional, schools, higher education, hospitals, government buildings, and many more.

Regional Expertise: The MBCI project service teams are organized so that they can focus on one of four specific regions of the United States. That means contractors receive attention from people who understand localized concerns.

Assistance During Design: When architects and engineers need some information on using metal building or roofing systems, the project manager can, as a courtesy, assist the contractor in providing design assistance. This includes helping designers become more familiar with metal product offerings and generally to become more informed and up to date on options. There is never an intent to lead the design or move the project in any particular direction.

Price Quotes: This is often the biggest and most noted benefit of working with the project service team. By having a relationship with a manufacturer, accurate quotes can be obtained quickly to allow bid deadlines to be met with a clear understanding of scope and confidence in the numbers.

Engineered Drawings: The ability to provide complete, engineered drawings is a big advantage instead of needing to find a local engineer take on that task.

Detailed Bill of Materials: All of the take-offs and ordering are done right from the information prepared by the project services team. There is no need for the contractor to spend the time on a separate take-off.

Scheduling Flexibility: The project manager can work with the contractor and work out a production, fabrication, and delivery schedule that meets the needs of the project. For large projects, this might mean phasing delivery of different parts of the package to suit the overall project schedule. Overall, projects have been done with coordinated schedules that are as short as 2 months, or phased up to 2-1/2 years.

Full Erection Drawings: Along with the full package of building materials, a full set of erection drawings are provided that serve as a virtual “installation manual” to help streamline the work in the field.

There are certainly other reasons for using these project services, but considering that most contractors don’t have the capabilities to do all of these things in-house, it can be a real time and money saver to take advantage of them from the manufacturer. Once contractors become aware of the availability of these services and the streamlined results, they often sign up for them repeatedly.

To find out more about how to successfully take advantage of these services and work with a project manager, contact your local MBCI representative.

Project Services for Metal Buildings and Roofing: Part 1

When a metal building or metal roofing project is being developed, it all starts with a design by an architect or engineer that may be rather standard, very custom, or somewhere in between. At some point a price for the metal portion of that design is requested from the contractor (i.e. an erector or sub-contractor to a general contractor) and of course that means turning to the metal building or roofing manufacturer for help.  Toward that end, MBCI offers a complete range of project services designed to streamline everything that needs to happen next in order to genuinely make life much easier for the contractor.

Project Services Part

What are these services? Essentially, there are four:

  • Estimating and price quoting services for public or private bids
  • Engineering services for the metal building systems involved
  • Drafting services for creation of shop drawings and erection drawings
  • Overall project management of all of the above plus coordination of production, shipping, and delivery.

The key to the success of these services is the assignment of a project manager who acts as the single point of contact between the contractor and the manufacturer throughout the entire project. Having a relationship with a metal building manufacturer who can assign such a project manager right up front is a huge benefit to the contractor. Here’s how the process might work in a standard project:

Cost Quote: The project manager will use the architectural drawings (submitted by the contractor) to have the project services team generate a lump sum price. That price is limited specifically to the metal building or roofing package with a clear description of what is included and what is not. That allows the contractor to develop the remaining costs for labor and equipment to erect the metal building along with any separate project costs as appropriate.

Detailed Drawings: Assuming the contractor is selected to proceed with the work, then an agreement on full project services can be made. Based on the architectural and/or engineering drawings, the project manager will then arrange for the detailed shop drawings to be prepared (including engineering stamp or seal if needed) so they can be submitted to the architect for review and approval. Note, that this will be a requirement of the manufacturer as well since they will not do take-offs from other people’s drawings for their manufactured systems. The shop drawings will notate all of the required components necessary to install and MBCI will order plus deliver all items required upon request/approval.

Scheduling and Production: Once all of the drawings are approved, then a full production schedule can be prepared with delivery dates identified. The project manager will oversee and coordinate the various people involved to see that things are progressing as planned and intervene as needed if any changes come up from the architect, owner, contractor, or manufacturer.

Delivery and Installation: When ready, the metal building package can be prepared and delivered according to the contractor’s schedule. Full erection drawings will be included which have enough detail that they are a virtual “instruction manual” for putting the building together.

That’s the typical process. In our next blog post, we will discuss the many reasons that contractors are taking advantage of these project services to save them time, money, and hassle. In the meantime, to find out more about how to successfully work together with MBCI, contact your local MBCI representative.

Insulated Metal Panels Achieve High-Tech Design Aesthetics

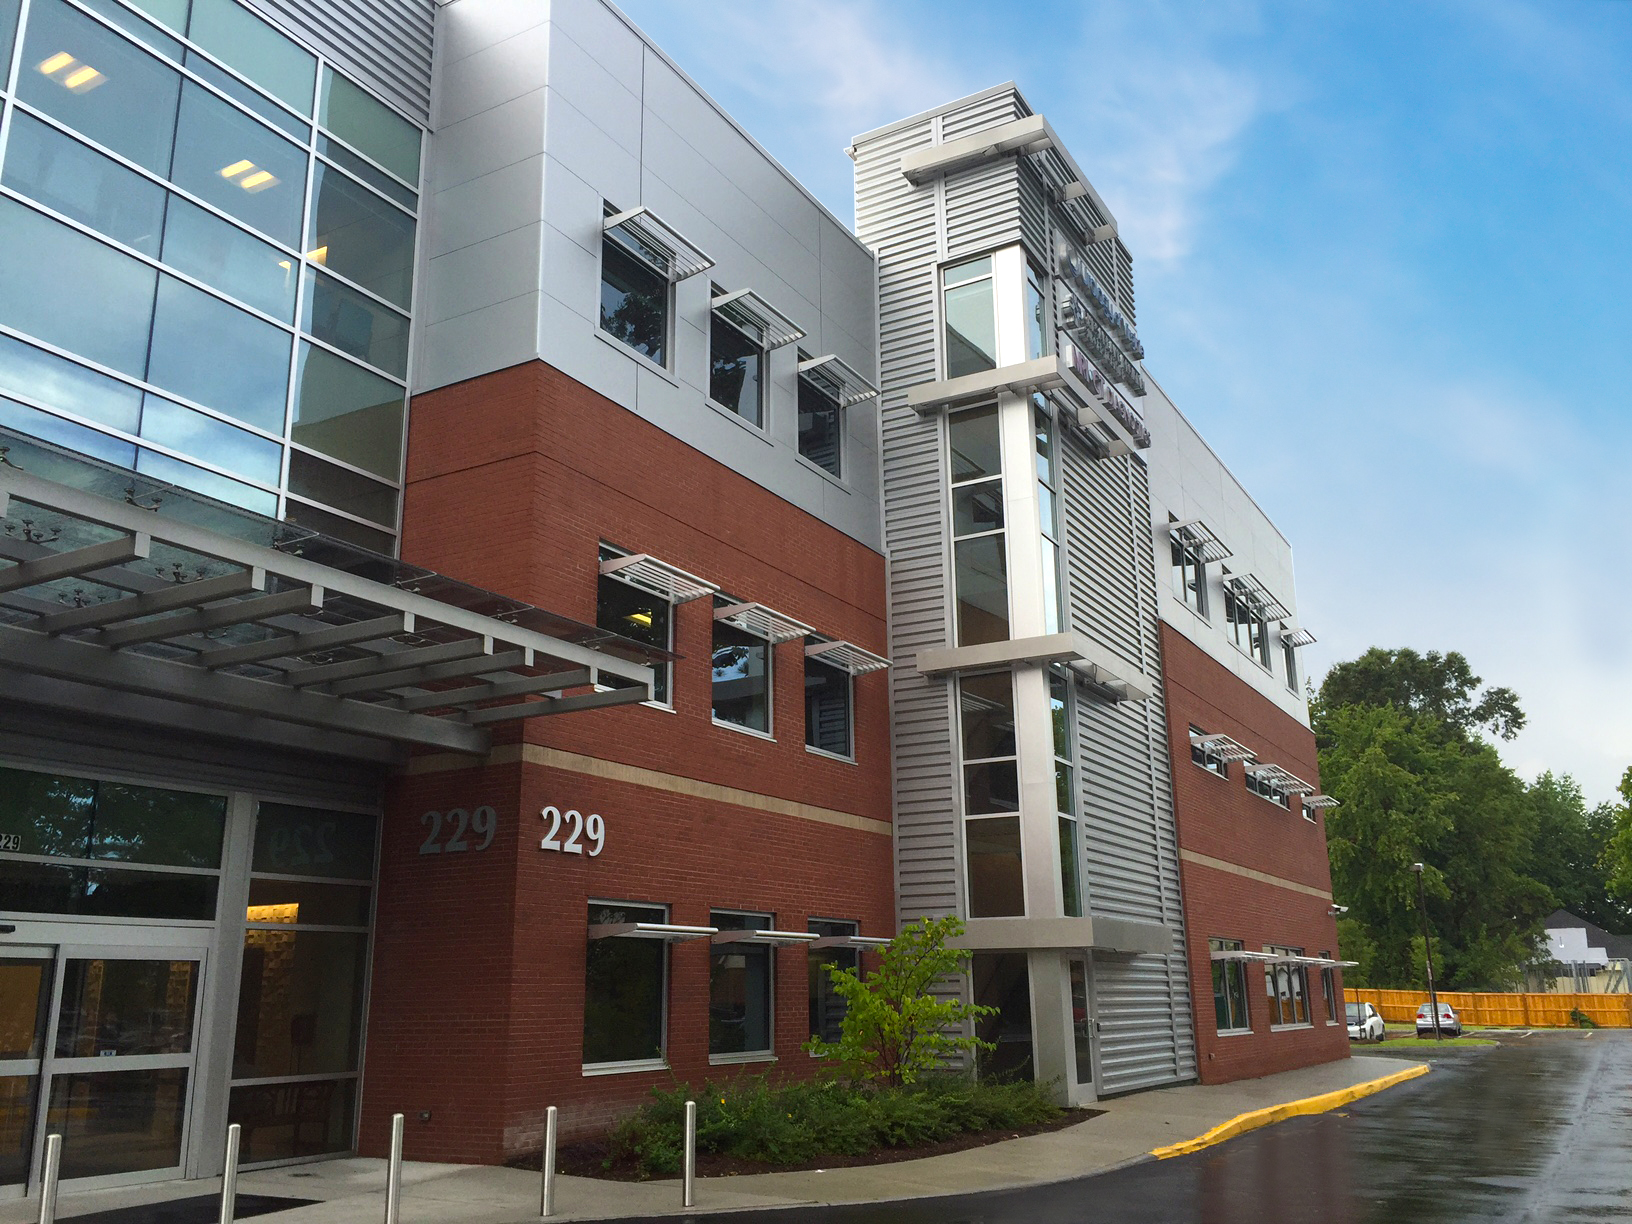
Equipped with the latest tools and technology available, the innovative medical practice known as Urology of Virginia has a long history of diagnosing and treating all urological conditions with the highest quality of care. Over the years, this commitment has resulted in a larger number of patients, requiring the practice to expand their Virginia Beach facilities to service a growing community. The expansion includes a three-story, 44,000 square foot medical office building that features an imagining center with an MRI and CT scanner on the first floor, an ambulatory surgery center on the second floor and space for a cancer clinic with twelve exam rooms on the third floor. The new facility is expected to increase the number of jobs within the community, including 32 physicians and more than 200 other staff members who can work together to provide patients with the most effective treatments and therapies.

Design
The Urology Medical Office Building utilizes insulated metal panels to provide the highest standard of quality and energy efficiency.

The Design Challenge

When designing the new building, the architect, PF&A Design, was challenged to create a high-tech aesthetic concept rather than continuing the traditional use of brick facades found on the existing structure. At the same time, the architects needed to maximize the land available to accommodate the addition of the new building. To avoid wasting space and maximize the footprint of the facility, the new building is placed only about 2 inches from the existing one. This required PF&A to work closely with the local code officials to ensure all codes and regulations related to fire separation and area requirements were satisfied to avoid any construction delays.

The Solution

After reviewing the options, the architects selected metal as the primary exterior building material since they were able to readily provide a more modern and sleek facade appearance. And since fire safety was of great importance, the architect decided to utilize insulated metal panels (IMPs) as they more effectively help slow spread of flame and smoke when compared to non-insulated metal panels. In addition, they found that IMPs offered many advantages over traditional building materials. In particular, the IMPs provided the highest standard of quality and energy efficiency for the new structure which improved the overall building performance. They also include sustainability features which satisfy LEED requirements.

Design
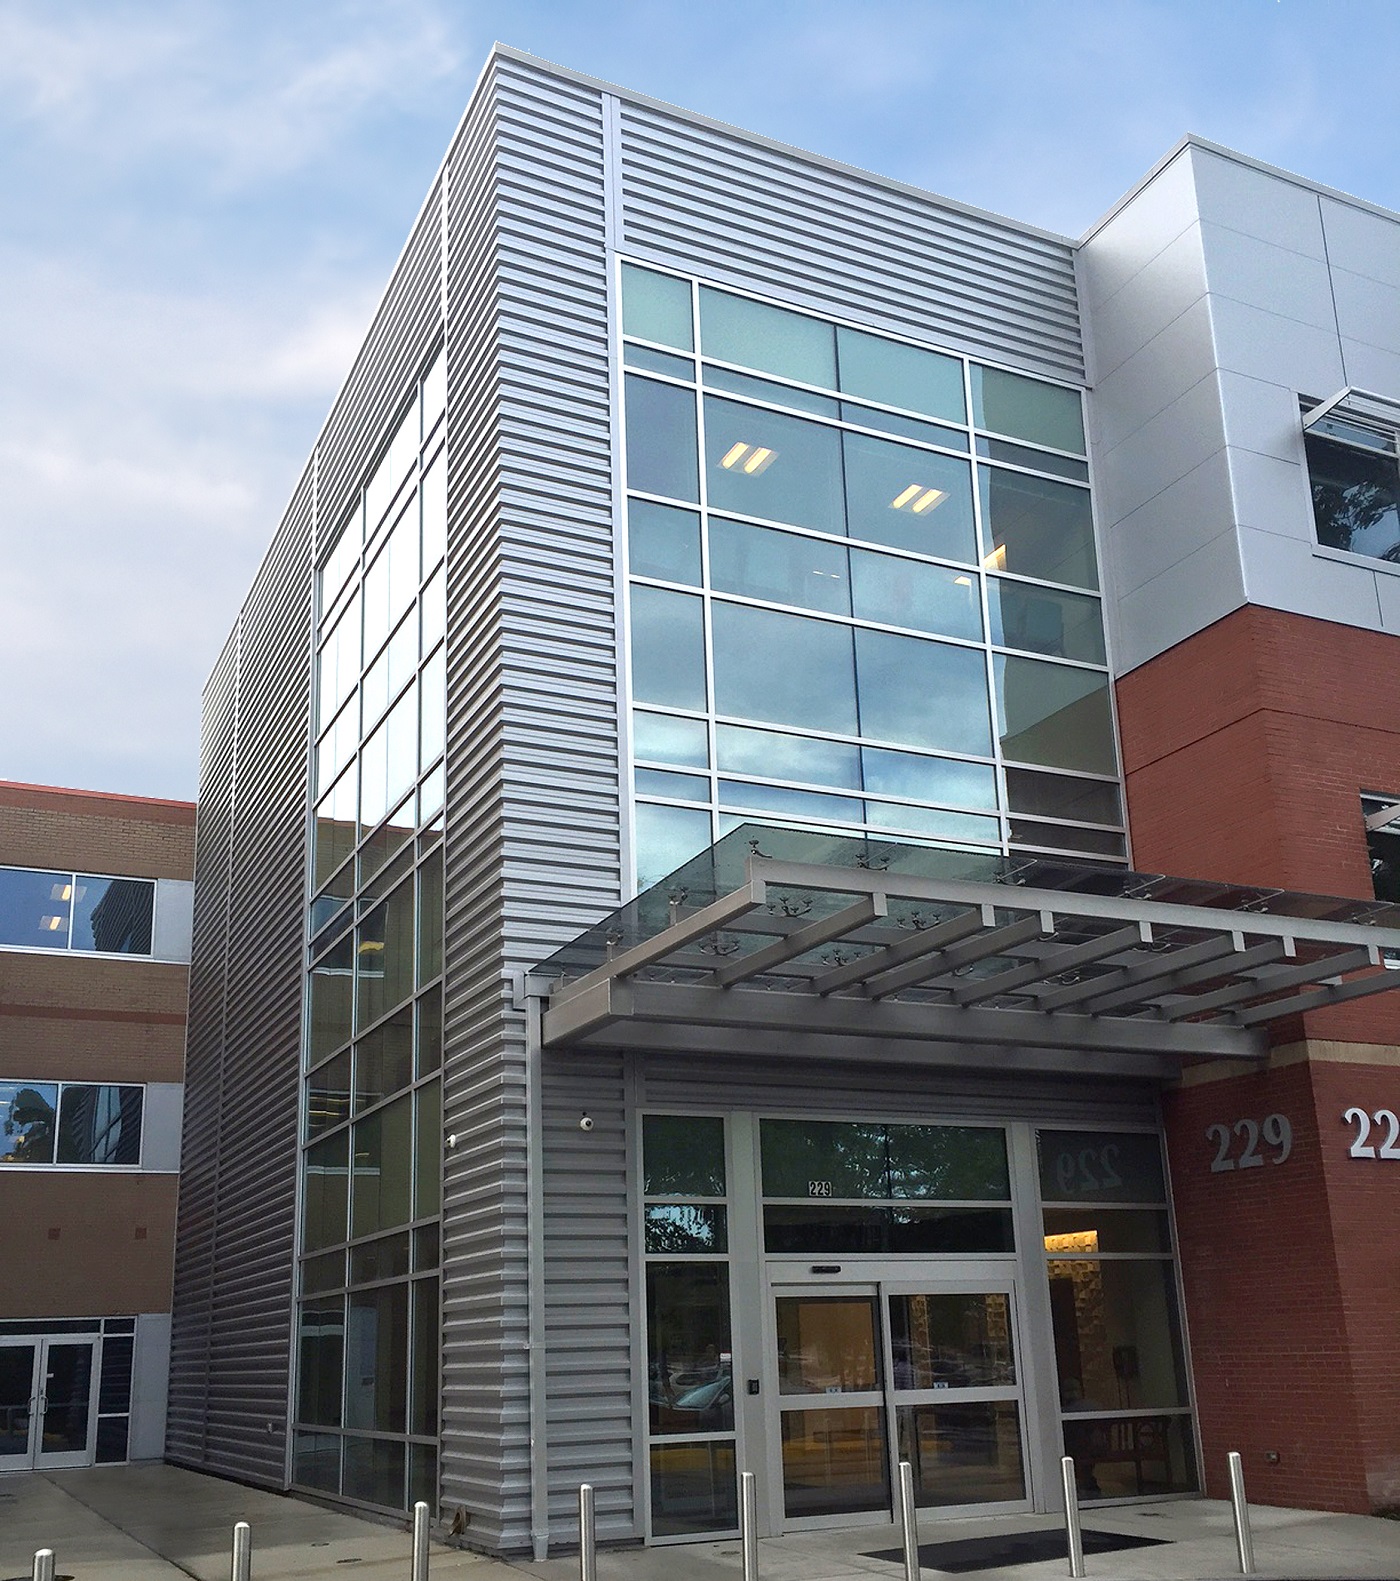
The combination of the corrugated panels in the main entrance and stairwells and the smooth panels for the third floor was key in adding visual interest.

The Design Specifics

In the final facade design, PF&A Design incorporated 12,500 square feet of a combination of MBCI’s deeply corrugated 7.2 Insul-Rib™ insulated metal panels with smooth CF Architectural Horizontal insulated metal panels, all in 22-gauge Signature® 300 Silver Metallic.  The 7.2 Insul-Rib™ insulated panel combines a rib panel design with a premier polyurethane foam core that delivers superior insulation. The CF Architectural Horizontal features stucco-embossed interiors and exteriors that contrast and complement the ribbed panels very nicely. The supremely flexible CF Architectural Horizontal insulated metal panels were also positioned with patterns aligned with the windows on the two floors below to provide enhanced symmetry and cohesion. The flat appearance of this panel provided the flexibility that enabled the corners to continuously wrap around the building.

Conclusion

Without the versatility and high performance of the IMPs used on this project, and the alternative might have been selected that would have proven to be less functional and less aesthetically pleasing. To find out more about how to successfully incorporate IMPs into a building design that you are engaged in, contact your local MBCI representative to get more information. Learn more about this project here and sign up for our newsletter to subscribe to our blog.

Find a sales representative