Roof Penetrations Made by Non-roofing Contractors

In our last two posts, we have looked at the proper ways for roofing contractors to address different types of penetrations in metal roofing in order to assure that a watertight seal is achieved from the outset, as well as over the life of the roof. But what happens when another contractor, such as a plumber, electrician, or other trade needs to penetrate the roof? How is the watertightness of the roof assured then?

Warranty Control for a Metal Roof

Most metal roofing warranties are very specific about what is included or not included should a roof leak occur. Therefore, the manufacturer’s warranty should be the first thing that is checked for a particular project to determine whether a seemingly innocent bit of work on the roof has the potential for a loss of warranty coverage. Commonly, qualified roofing contractors need to do the work and it needs to be inspected, but in some cases, supervised work may be acceptable too. Either way, any penetration installed by a trade contractor other than a roofing contractor should be fully coordinated with the architect or owner’s representative, the roofing manufacturer’s representative, the general contractor, and the roofing contractor. Once reviewed, there may be several options on how to proceed.

Guided Installation

For a single or simple penetration, say for a single small mechanical or electrical line, it may be possible to simply work with the trade contractor on the location of the penetration, review in advance that the proper materials are being used, and check the quality of the work for water tightness when complete. (Note: following the guidelines in our prior post on Pipe and Flute Penetrations will provide a good checklist of things to cover.) If everything is appropriately done, then it may be possible to have the roofing manufacturer add the new penetration to the list of items covered under the warranty.

Lightning Rod
Lightning Rod Application for Metal Panels

Coordinated Installation

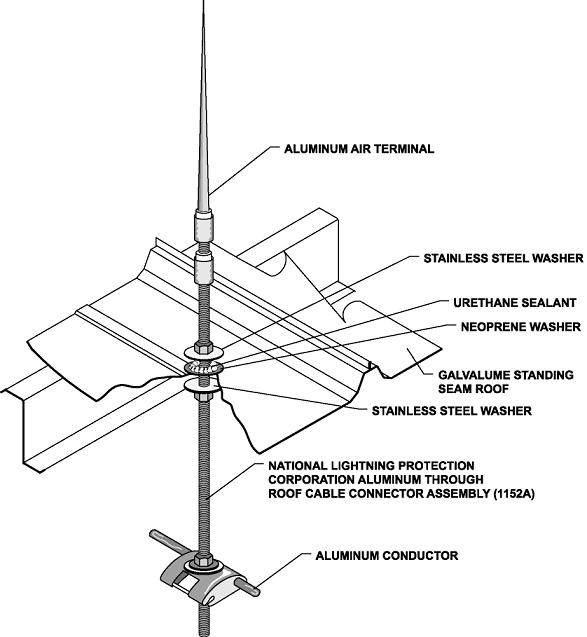
In some cases, numerous penetrations may be required, such as the installation of multiple lightning rods across a roof. In this case, it might be more prudent to consider a coordinated, cooperative effort to allow each trade to do what it does best and keep the warranty in effect. Instead of an electrician being responsible for the roof penetrations and for lightning rods, let him focus on the lightning protection and wiring aspects of the work. But first, bring in a roofing contractor to advise on the proper locations of the lightning rods and to be the one responsible for the watertight seal. Location advice would include things like avoiding valleys, standing seams, or other areas that are difficult to seal or flash around. The electrician could then make the needed lightning rod penetrations in the agreed-upon locations and complete his work. Following right behind, the roofing contractor could install retrofit rubber roof jacks around the lightning rods and assure that they are sealed properly. Alternatively, the roofing contractor could make the penetration and allow the electrician to install the lightning rod, while the roofing contractor installs an appropriate rubber roof jack over or around it. Either way, the two trades need to  review the process ahead of time and be sure that everyone is on board to produce the best results for everyone involved.

Bottom Line: Think Through Penetrations

roof penetrations
Standing Seam Roof Penetration

Standing seam metal roofs have become more complex in recent years, with more and varied types of roof penetrations. This simply magnifies the need for better communication between the design professional, roof manufacturer, general contractor, roofing contractor, and any of the various trades that might be working on the roof.

When everyone takes the time to plan up front and think through their own needs and the options to get there, everyone wins. The architect/owner representative can ensure that his or her clients get a roof that will perform long-term. The roof manufacturer is able to provide expertise that has been gained over a long period of time through working with similar details on roofs all over the country. The roofing contractor can leave the project knowing that the details are long-term and will mean little chance for leak callbacks. Plus, the general contractor and the building owner can quickly resolve any arguments over which trade is responsible for repairing a roof leak.

Selecting Metal Panels Based on Roof Slope

If you’re reading this article, then you are probably already aware that metal roofing can provide many benefits, including longevity, durability and water shedding—not to mention the aesthetic features of today’s metal roof products. When specifying a metal roof system, choosing the correct panel is a key factor. Roof slope is critical in determining that choice. Let’s take a look at some of the main things to consider when choosing a metal roof panel with regard to roof slope, including building codes, minimum slope requirements and typical applications.

Building Codes

Building codes are perhaps the most important driving force dictating the roof slope to choose. Different types of roofs have distinct specifications for installation. According to the 2012 International Building Code (1507.4.2 Deck slope), minimum slopes for roof panels need to comply with the following:

  1. The minimum slope for lapped, non-soldered seam metal roofs without applied lap sealant shall be three units vertical in 12 units horizontal (25-percent slope).
  2. The minimum slope for lapped, non-soldered seam metal roofs with applied lap sealant shall be one-half unit vertical in 12 units horizontal (4-percent slope). Lap sealants shall be applied in accordance with the approved manufacturer’s installation instructions.
  3. The minimum slope for standing seam of roof systems shall be one-quarter unit vertical in 12 units horizontal (2-percent slope).

Minimum Roof Slope Requirements

Depending on the roof profile, there are minimum roof slope requirements for each panel, which need to be considered. The profile refers to the shape the metal sheets take when they bend to form panels. Metal roof slope is expressed by a ratio indicating the roof pitch, which notes the vertical rise of the roof (in inches) for every 12 inches the roof runs horizontally—in other words, dividing the vertical rise and its horizontal span. The most common slopes are: 3:12, 1/2:12 and 1/4:12. When looking at metal roofing panel, you will need to consult with the manufacturer to ensure that the metal panel you selected will work for your application.

MBCI Roof Panels and Minimum Slopes

Applications: Low Slope or Steep Slope

Commercial Application– Low Slope Roofs

A low-slope roof is one whose slope is less than 3:12. Low slope roofs have several benefits. They have simpler geometry that is often much less expensive to construct and low slope metal roofs require fewer materials than a steep slope, which reduce material costs. Metal roofing panels are excellent solutions for roofs with low slopes. Commercial roofs are typically low slope (less than a 3:12 slope), and larger than residential roofs. This is due to low slope metal roofs being a bit easier to build on large structures.

1/2:12 Metal Roof Slope
Cecilia Junior High in Cecilia, Louisiana uses 7,180 sq. ft. of MBCI’s SuperLok®. This panel requires a minimum slope of 1/2:12.
Residential Application– Steep Slope Roofs

A steep slope roof is one whose slope is greater than 3:12. Steeper slopes are ideal for areas that have higher snow loads and will also prevent the possibility of ponding water on the roof. When it comes to residential construction, your roof is a visible part of the structure. Choosing a metal roof for residential construction involves choosing a panel profile that will be aesthetically pleasing.

Steel Slope Metal Roof
It is common to use steep slopes in residential applications, such as this home in Guntersville, Alabama that utilizes MBCI’s LokSeam® (requiring a minimum slope of 3:12).

Conclusion

Regardless of whether you’re choosing metal panels for a commercial or residential structure, slope matters. Following common standards, doing your research and paying attention to manufacturer guidelines regarding minimum slope will ensure you’re reaping the full benefit of your metal panel selection.

For More Information

To learn more about metal roof slopes, check out:

Fastener Compatibility with Metal Roof and Wall Panels

The installation of a new metal roof or wall panel on a residential home, business or commercial building takes care, precision and—of course—the right tools. Regardless of the structure, you’ll likely find that choosing the correct mechanical fastener plays a key role in the long-term performance, durability and efficacy of the project.

Many metal roof and wall panels, in fact, rely upon the use of quality mechanical fasteners to secure components to a structure. In order to guarantee a resilient and weather-tight attachment, it behooves the user to select an appropriately compatible fastener type for the specific metal construction, thereby ensuring expected benefits, such as energy efficiency, extended life cycle, and even lowering insurance bills for the owner. In other words, once the decision has been made to use metal building materials for your roof or wall project, the next step is figuring out how to hold it all together.

Know Your Fastener Options

Before selecting fasteners for the project, it is important for the designer or installer to understand the various materials and options available. Typically, this involves the following considerations:

  • What type of material and coating is appropriate?
  • What type of head do I need? Does it need to be painted?
  • Do I need a washer? If so, what material should I use?
  • Should I use self-tapping or self-drilling screws?
  • What thread count should I specify?
  • How long does the fastener need to be?
Many Types of Fasteners
The MCA provides a summary of the different types of fasteners in their technical bulletin, Fastener Compatibility with Profiled Metal Roof and Wall Panels.

Select a Fastener on the Basis of Material

Most fasteners are made from coated metal but both the type of metal and coating must be chosen on the basis of the materials the fastener is bringing together. Galvanic action between dissimilar metals can cause premature fastener failure and lead to leakage. Even stainless steel screws will corrode severely under the right (or actually wrong) conditions. In extreme exposure, sometimes the best option is to use galvanized screws and plan on replacing them at a later date with a larger screw once the zinc has been depleted.

Considerations for Self-Drilling Screws

Self-drilling screws have a drill bit built in and don’t require a pre-drilled hole. Although self-drillers save the installer the step of drilling a hole, they are not always a good idea. The available space between the back of the hole and the next physical restriction must be at least as big as the bit itself or the threads will not engage. Also, drilling a hole allows a quick inspection to ensure the hole is in the correct location and plies are aligned and parallel. Generally, self-drillers are used when going through thin gauge steel into thicker gauge steel and self-tappers are used when fastening two thin gauge plies.

Washers

Fasteners may be used with or without washers. While plastic washers help prevent leaks, they are not required on purely structural connections. When using washers, it is important to visually inspect the screw after installation to be sure they are properly compressed and not kinked. Exposed plastics generally degrade when exposed to ultraviolet light. Furthermore, use of neoprene washers may be prevented by restricted material lists, or “red lists.” Fastener heads themselves may be made of different materials than the rest of the screw, long-life ZAC heads being the most common example.

Fastener Profiles

Fasteners have different profiles. Flat or “pancake” screws are used when low profile installation is necessary and may have Philips, hex, or Torx sockets. Which socket to use is usually an installer’s preference based on accessibility restrictions. Another common feature is an over-sized dome beneath the head to encompass a larger washer. Also called shoulder screws, these screws are useful when thermal movement might distort the holes.

Colored Fasteners for Metal Roofs
Fasteners can also be colored to match the roof or wall panel.

Thread Count per Inch

Thread count per inch, or TPI, must also be considered. Most commonly, fasteners are installed through the thinner ply first and grip in the thicker ply, pulling the plies together. Therefore, TPI selection is usually driven by the thickness of the thicker ply. Generally, the TPI is close to the gauge of the metal for gauge steel and higher for plate and sheet.

Length

The fastener must also be long enough to fully engage all plies of material, plus the length of the drill bit in the case of self-drillers. Generally, this is rounded up to the next half or quarter inch. However, the longer the screw, the more torsional strain is produced during driving and in the case of very long fasteners, this can break the fastener or introduce wobble, leading to poor installation. Therefore, stainless steel with over-sized washers is often used for long screws for added strength and protection.

For More Information on Fastener Compatibility

To learn more about fasteners and their compatibility with different types of metal roof or wall panels, check out Metal Construction Association’s recently published technical bulletin, Fastener Compatibility with Profiled Metal Roof and Wall Panels.

Proper Care and Usage of Roof Seamers

As more standing seam metal roofs are being installed than ever before, it is imperative for roofing contractors to have the proper tools when quoting jobs. Remember, a properly formed seam is important for aesthetics, weathertightness and wind uplift. With the right tools in hand for these complex installations, you can get the job done faster, better and with greater cost efficiency than your competitors.

Know Your Type

Seamer use depends on the type of metal standing seam panels on the project: double lock seam, symmetrical seam, one-piece snap-lock interlock and two-piece snap-lock interlock. You will need to identify the type of panel in order to choose the right seamer and confirm that you are using the right seamer for the job. The double lock seam, also known as a Pittsburgh seam, is double-folded, meaning the finishing seam is 180 or 360 degrees. This applies to MBCI’s Double-Lok® and SuperLok® panels. A single-lock seam is 45 or 90 degrees, such as MBCI’s BattenLok® HS and Curved BattenLok®.

Follow Manufacturer Instructions Explicitly

Adherence to the field manual instructions is critical to ensure proper installation that will not result in damage to the seamer and/or panels. It is critical to carefully read the manufacturer’s manual thoroughly before beginning the seaming operation, whether renting or buying the equipment. Not only will this give you the best possible result, but it can also save you the headache of incurring costs of replacing or repairing the seamer due to misuse.

Step-by-Step Guide to Pre-Seaming

  1. Locate field manual in the seamer box and review operational procedures.
  2. Locate power source and check against power requirements in field manual.
  3. Check seams for proper engagement.
  4. Clean dirt, debris and excess sealant from seams and panel surfaces to avoid interfering with the seaming operation.
  5. Panels should be seamed with an electric seaming tool as panels are being installed.

Seamer Equipment Checklist

Keys to Seaming Success

  1. The seamer should be supplied or recommended by the manufacturer. Don’t assume another manufacturer’s seamer will work on the panels you are installing. For example, other manufacturers may have a panel similar to MBCI’s BattenLok® HS but that doesn’t mean that an MBCI seamer would work on any of those panels. It is important to use the seamer recommended for the specific product. It must be the proper seam for the engineering. That is if you don’t seam it properly, the manufacturer won’t know if its load charts and tables are accurate.As previously stated, carefully read and follow seamer instructions for proper results. You will need a properly formed seam to ensure you achieve the desired aesthetics and weathertightness as well as mitigating risk from wind uplift. The seamers are miniature roll formers and need to be installed in a very specific way.
  2. Take care of the seamer—don’t leave it out in the rain or in other weather conditions where it could suffer damage.
  3. If not forming seams properly, stop immediately and call the manufacturer or company providing the seamer
  4. If renting, when returning the seamer make sure all equipment is returned, i.e. hand crimpers or hand seamers.

For more information on MBCI seamers, please review the manuals for specific panel types.

Using Wind Clamps to Improve Wind Uplift on Standing Seam Metal Roofs

Among the most important factors to account for when specifying a standing seam metal roof are wind control and wind uplift. It is imperative to take the necessary measures to ensure the safety and efficacy of the metal roof. The wind clamp—an extruded piece of aluminum that is placed on the panel seams at clip locations—is one accessory that can be used to improve wind uplift characteristics on metal roofs, delivering substantial time and cost savings as these devices help mitigate risk of wind uplift and improve overall wind design.

Panel Deflection
Standing Seam Panel Deflection as a Result of Wind Uplift

Why Use a Wind Clamp

A typical failure mode of a standing seam metal roof panel is the clip top pulling out of the panel seam when the panels are subjected to high winds.  With a standard install of a standing seam panel, the seams just fold into each other. With enough pressure, wind will force seams to come apart—be it a vertical failure, horizontal movement of the seam or from clip disengagement. The clip top can then pull out of the panel seam.

The wind clamp resists the panel seam being opened, allowing for higher uplift loads. The purpose of wind clamps, in fact, is to prevent Windclamprszdfailures at the seam openings due to any deflection of the panel. The wind clamps provide more strength, thereby dramatically improving wind uplift performance.

The clamp is installed over the panel seam at clip locations, in the edge and corner zones of the roof.  This allows the roof to resist the higher wind pressures in these zones, usually eliminating the need for additional purlins or joists. On large roofs, the savings can be substantial.

Another benefit is shorter installation time. Since additional purlins or joists are typically not required at the edge or corner zones of the roof, the building can be erected faster.

Choosing Wind Clamps

When choosing the type of wind clamp, it is important to consider the type of panel and the special features of the clamps. MBCI, for example, uses S-5!’s patented wind clamps, which work for two panel types—Ultra-Dek® and Double-Lok®. The S-5! wind clamps do not penetrate the steel, thereby eliminating the risks of corrosion and water leakage that can be introduced by a hole in the steel. Since the screws are hidden from the weather elements, it helps to maintain waterproofing.

Quantitative Difference with Wind Clamps

One of the biggest benefits of using wind clamps in the edge and corner zones is that usage minimizes the quantity of purlins needed, resulting in substantial cost savings. For example, let’s look at a comparison using MBCI’s Double-Lok 24” – 24 ga. panels with and without wind clamps.Chart for blog image

In this example:

  1. The use of wind clamps in the edge and corner zones eliminated 3,800 linear feet of purlins.
  2. Assuming 8” x 2-1/2” Zee 14 ga. purlins were used, there would be a cost savings of $10,400.

Conclusion

Utilizing wind clamps to protect the investment of a standing seam metal roof can increase strength, make installation faster and lower overall cost.

Choosing the Right Type of Standing Seam Roof (SSR)

When it comes to specifying standing seam roofs, one type doesn’t fit all. While a standing seam metal roof system can be one of the most durable and weather-tight roof systems available in the industry, its benefits can be negated if you fail to understand the details in application parameters of the specific system. Do your research, though, and for your next design that requires an aesthetically pleasing and structurally sound metal roofing system, you can choose with confidence the standing seam metal roof system that suits your project to a tee.

How to identify a good standing seam roof system

A good standing seam roof system is one that can satisfy both the project’s specific design criteria and adhere to building code standards. Standing seam profiles can include those that are utilitarian or architectural in nature, are of numerous widths and profiles and have varying seam joinery (e.g., snap or field seamed).

Why specify a standing seam metal roof system

When properly installed, standing seam metal roof systems are an extremely effective and long-lasting material choice. Key advantages include:

  • Weather-tight roofing system
  • Can be engineered to withstand high winds (150 mph and higher)
  • Class A Fire-resistance rating from UL
  • Class 4 Impact-resistance rating from UL
  • Long service life—up to 60 years
  • Lightweight
  • Special clips designed to accommodate thermal roof expansion and contraction and various thicknesses of fiberglass insulation

Matching the roof system to the project

In basic terms, there are four unique styles of metal standing seam panels: Double lock seam, symmetrical seam, one-piece snap-lock interlock and two-piece snap-lock interlock. These styles can be further delineated by seam shape or profile, i.e. trapezoidal rib, vertical rib, square rib and tee rib. The choice of the rib profile, as well as the rib spacing is generally an aesthetic preference of the designer. Knowing which style will best suit a given situation will help ensure a successful installation.

Popular Standing Seam Metal Panels

Double Lock Standing Seam
Shown: MBCI Double-Lok®

One-Piece Snap Lock Interlock Standing Seam
Shown: MBCI LokSeam®

Two-piece Snap Lock Interlock Standing Seam
Shown: MBCI Craftsman™

Some criteria to consider are roof slope, roof run (distance from eave to ridge), weather conditions (such as ice or snow) and architectural features, i.e. hips, valleys, dormers, parapet walls, etc.

For instance, if your project has a roof slope of 1/2:12 you will need to ensure the product being installed is approved for this low pitch. In this case, you would likely use a “double lock” or mechanically “field-seamed” panel. You also want to ensure that all details are able to provide for a weather-tight seal even if temporarily submerged during a heavy rain. Field-seamed panels are also the best choice in areas that experience heavy ice and snow.

Additionally, it is imperative to recognize complicated design details that should be carefully specified and reviewed regardless of the roof slope. Design conditions that require special attention include: roof transitions, dead valleys, dormers, eave offsets, ridge offsets and offsets in parapet walls.

It cannot be overstated that you should always consult a metal roofing manufacturer about the capabilities of the standing seam metal roof system, including what warranties are available, prior to specifying it.

Browse the standing seam product manual for more information.

Design and testing

Familiarize yourself with wind uplift testing as prescribed by Underwriters Laboratories (UL-90 – 580 Test) and ASTM E-1592.

Metal Roofs and Solar Energy: An Ideal Match

Everyone is talking about—and doing something about—sustainability. Metal roofs fit nicely into the sustainable-material equation because of their myriad traits, such as recyclability, reflectivity, longevity and durability.  Another major component in the sustainability equation is renewable energy—the production of energy from renewable resources like sun and wind.  A metal roof is the ideal location for solar energy production on homes, commercial buildings and recreational applications.

Why Solar Panels and Metal Roofs?

metal roofing and solar panels
One of the key factors for long-term success of rooftop solar energy is the quality of roof under the solar panels.  Roofs under photovoltaic (PV) systems should be durable and have an equivalent service life to the solar panels.  However, too many traditional roof systems do not have a service life that matches, let alone exceeds, the service life of the PV panels.  This is where metal roofs excel.

Service Life of Metal Roofs

A study of roof system longevity presented at the Fourth International Symposium on Roofing Technology by Carl Cash, a principle at Simpson Gumpertz & Heger, showed that metal panel roofs have the longest service life when compared to asphalt-based roofs and single ply roofs.   The study showed that the average life of metal panels is 25 years.  BUR and EPDM were second and third, respectively, at 16.6 and 14.1 years of average service life.  Exceeding the Cash study, a more recent study conducted by the Metal Construction Association (MCA) and Zinc Aluminum Coaters (ZAC) Association showed the longevity of low-slope unpainted 55% Al-Zn alloy coated steel standing seam roofing (SSR) systems is 60 years.

Service Life of Solar Panels

Solar panels will last 25 to 30 years.  In fact, some of the very first PV panels from the 1960s and 1970s are still producing energy.  While their efficiency might decrease over time, solar panels will make electricity for many decades.  For the most cost-effective rooftop solar energy installation, the longevity of the roof should be equivalent, or greater, than the solar panels so that the roof doesn’t need replacement during the life of the solar energy system.  Metal panels are the most reliable, long-term roofing system for solar energy installation projects.

Built to Last

Solar Metal Roof Panels
Solar Roof Panels on Real Salt Lake City Stadium

Simply put, installing solar energy on rooftops that don’t have an equivalent service life is a mistake, especially for solar projects that cover a large portion of the rooftop.  The cost of decommissioning, removing, and replacing rooftop solar energy can cost 20% to 100% of the original installed cost.  The cost tends to align with the percentage of rooftop covered with solar panels.  Much of the cost to remove and reinstall is labor, but an older solar energy system will likely need some new components—most likely new wiring—when reinstalled, also adding to the cost.

Rooftop solar installations continue to grow year over year.  And with the extension of the federal investment tax credit for five years, expect more solar energy installations on roofs.  Pair solar energy with a metal roof, and you’ve hit a sustainable “home run.”

Learn other ways to implement Net-Zero Energy strategies into your building and learn how MBCI’s products contribute.

Find a sales representative