The Importance of Cleaning Metal Roof and Wall Panels

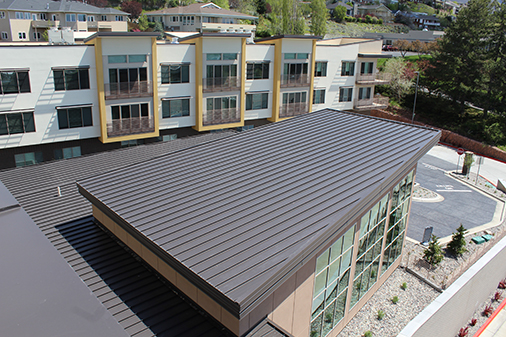
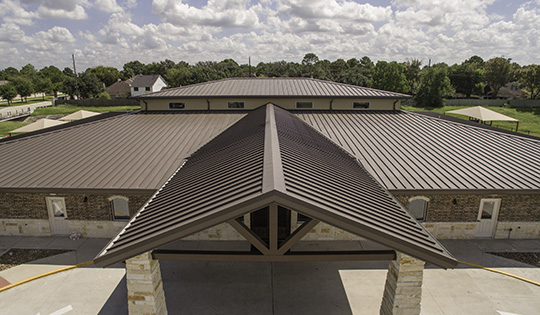
Metal panels need attention; they should not be taken for granted. True, they are a notably long-lasting and attractive choice, particularly with the myriad colors and protective finishes available, but once installed, proper care is imperative in order to maintain their durability, performance and good looks for decades.

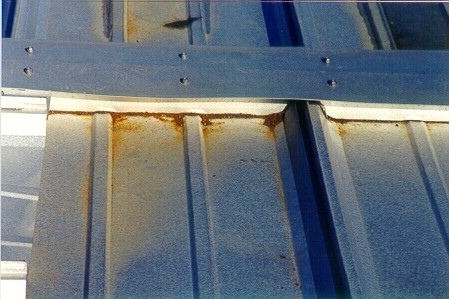
What are the main culprits of potential damage? Dirt and residue (such as from trees or animals) left to sit on metal panels, for instance, can cause the irreversible degradation of protective coatings, thereby compromising the longevity of roof and/or wall systems. Additionally, corrosive elements, including bacteria, mold, mildew or even acid rain can damage the structural integrity of the panels. Additionally, buildup of foreign elements, such as leaves, can hide potential leak areas or places that may be rotting away. Even in terms of energy efficiency, keeping the panels clean may help a roof reflect heat as they were originally intended.

To keep panel appearance in top shape, protecting the finishes must be a priority—otherwise, you may find yourself needing to re-coat the panels. Stains from leaves and moisture, algae and lime deposits that remain on panels for extended periods can do serious harm to the finish. It should be noted, however, that re-coating should only be considered if the panels remain structurally sound and if doing so wouldn’t void the manufacturer warranty.

How often should you clean metal panels? Most experts agree that at a minimum, an annual cleaning is advisable in order to keep the panels free of common elements that can jeopardize the integrity of the finishes. If you have heavy tree overhang, you may need to clean it or remove debris a little more frequently.

Deep cleaning to remove more stubborn substances (e.g., tree sap, oxidation) can be done every 3 to 5 years, depending on the building conditions, location and weather, etc. Interim, moderate cleanings can also be performed following substantial weather events and seasonal allergen build-up. It’s a good idea, in fact, to assess roof conditions before winter hits to identify any potential issues that need to be addressed.

No matter the frequency, perhaps the most important advisory when it comes to cleaning the panels is to follow the panel manufacturer’s recommendations regarding who should perform the work and with what solutions and tools so as not to void any warranties. In some instances, it may be beneficial (or perhaps even required) to have a professional building surface cleaning company with metal panel experience do the work.

2a

Tips on Proper Cleaning Techniques and Solutions

As for the maintenance and cleaning instructions, it’s always best to refer to the manufacturer’s guidelines in order to best protect specific products, for example, to determine which cleaning solutions and techniques work best for a given manufacturer’s panels. Neglect or improper care can degrade the finish, compromising not only the visual appearance and performance but, as noted, can also potentially void the panel warranty. But maintaining the panels doesn’t just entail washing them like you would a car; it also means keeping them free of harmful debris.

Here are a few general tips for the proper cleaning of metal panels (again, refer to the panel manufacturer’s specific directions):

Simple cleaning: generally, water and mild detergent will be sufficient. Do NOT use bleach, which can change the finish color or have a harmful interaction with certain finishes.

Water-soluble dirt or other deposits requiring more complete cleaning: you can use a solution of hot or cold water mixed with detergent. In a container of water, use a 5 percent solution of commonly used commercial (non-industrial, non-bleach) mild detergent. Use a cloth or a soft-bristle brush for application of the cleaning solution, followed by a clean water rinse. Alternatively, pressure-washing with a 40° tip is also an option.

Non-water-soluble deposits such as tar, grease, oil and adhesives: a solvent or alcohol-based cleaner may be required. In this case, since most organic solvents are flammable and/or toxic, they must be handled accordingly. Generally, keep them away from open flames, sparks and electrical motors; use adequate ventilation, protective clothing and goggles; and read the manufacturer’s Material Safety Data Sheet (MSDS) of any solvent used for any other specific safety details.

The following are among the cleaners widely recognized by manufacturers for this type of non-water-soluble cleaning: alcohols—denatured alcohol (ethanol) and isopropyl alcohol (rubbing alcohol); and solvents, including VM&P Naphtha, mineral spirits, kerosene, and turpentine (wood or gum spirits).

For any level of cleaning, do NOT use wire brushes, abrasives, or similar tools that will erode the surface coating and leave scratches or other finish damage that can lead to corrosion. Additionally, always test a small area before proceeding with any of the cleaning agents mentioned to ensure there is no adverse effect resulting from the product’s use.

Remember, the misuse or abuse of any of the acceptable cleaning agents will automatically void any manufacturer’s warranty for the affected surfaces, so be sure to check with the manufacturer and also follow directions on any cleaning products used.

By following the tips above, installers can keep metal panels looking great and performing well for years to come.

To learn more about the importance of cleaning metal panels, contact your MBCI representative or check out our blog post on metal panel maintenance.

Types of Standing Seam Metal Roof Clips & Why They’re Essential

A successful standing seam metal roof project goes beyond the obvious panels, substrate and frame. In order for the roof to look great and perform properly, don’t neglect the importance of selecting the proper roof clips for your given project. What may seem like a minor detail is, quite literally, what’s holding it all together. Here we’ll take a look at the key factors that go into selecting the correct clip type and see why this is so essential for the well-being of any standing seam metal roof.

BDC2_resized

When you are looking at the installation manual or if you’re ordering your materials directly—or even if you’re submitting the order to MBCI to do the engineering for you—you’re going to need to know and identify certain details. The roof clip selection criteria will be based predominantly on two main factors: 1. What is your insulation system and 2. What are the expansion and contraction requirements for your roof? You’ll also need to know your project’s roof geometry and how the panel you’ve selected is able to meet the roof clip range on a particular plane, because the distance the panel spans impacts what type of clip you would use. Additionally, the type of substrate you are attaching the clip to will dictate what type of clip you should use. Is it going over wood, metal decking, open framing?

With that information in hand, you’re ready to do your due diligence. MBCI classifies clips in two ways: high or low; fixed or floating.

The high and low clips are predominantly determined by insulation systems. For a low clip, for instance, MBCI will typically will go up to a maximum of four inches of insulation; a high clip will go up to six inches of insulation.

Here’s a bit of a caveat. What we’re referring to is how much insulation you’re trying to compress between the roof panel and the substrate—and particularly the purlins or the steel frame you’re attaching it to. The clips are designed with a “stand-off” that elevates the roof panel above the substrate to permit insulation to pass between the roof panel and the substrate at the structural attachment points. A low clip is typically a 3/8-inch stand-off; a high clip, depending on panel type, can be 1-inch, 1-3/8-inch or even possibly 2-inch.

Knowing this helps determine whether you’re choosing the right clip because, let’s say, you go with too tall of a clip or not tall enough to accommodate your insulation system, then the system’s going to be difficult to install and will not perform correctly. And watch out for roof systems that have roof clips with no stand-off that do not permit fiberglass insulation to be installed or is discouraged from being installed at the clip lines due to impact on the panel appearance.

Another factor here is if you are putting the roof over a solid substrate, such as wood or metal decking. In this case, we will typically default customers to a low clip system because they don’t need to accommodate for any sort of fiberglass insulation systems. We’re assuming the insulation is occurring elsewhere below the decking or incorporated with the decking, such as rigid board insulation. In the case of rigid board insulation over decking, a low clip is still utilized but with an added bearing plate. The clip is attached through the rigid board insulation into the decking or structure below.

The more particulars you know of your intended insulation system to determine the clip height needed, the better prepared you will be in determining the right clips. Will there be fiberglass insulation or rigid board insulation or no insulation? What is the insulation thickness? What type of insulation system? Share these details with your MBCI sales rep to help you get started selecting the right clip height.

You can also find much of this information on the MBCI website by searching the roof type and then reviewing the corresponding installation manual and details to determine what clip height to use based on your insulation and substrate.

Which brings us to the other main factor in selecting the right clip. A fixed or floating clip is dependent on the substrate and how much anticipated movement is needed for the roof size.

With fixed clip systems, there are no moving parts in the clip. The ability for that clip to expand and contract as the roof expands and contracts is dependent on the substrate. In layman’s terms, if you were to screw that clip to a purlin, as the purlin heats up and cools down, it’s going to allow for some of the movement of that roof. Generally, when a fixed clip is installed over a metal building purlin, the manufacturer advises a limit of 100-foot maximum on a single roof surface. This is an average and can be impacted also by roof color and geographic location of the roof install that control temperature swing ranges, i.e., 100-foot maximum is a guide.

It is advised that the fixed clip always be installed over open framing in order to permit the greatest ability to accommodate roof panel expansion/contraction. It is not advised to use fixed clips attached to a solid substructure because those don’t accommodate roof panel movement.

If the roof needs to be installed over a solid substrate OR if the roof plane is over a slope more than 100 feet, then the manufacturer would prescribe a floating clip system. [Note: A floating clip can also be used even if the slope is less than 100 feet.] The floating clip system permits the roof panel to move (expand/contract) independent of the substrate to which the clip is installed. The system either contains a clip with a tab seamed into the roof panel rib that is able to float/slide where it attaches to the clip, or the clip is such that when it engages the panel seam is doesn’t restrict the panel movement. The only thing controlling for floating clips is the maximum range of the clips that allows it to float. In other words, how far can the clip tab or panel slide at the clip attachment. The panel manufacturer again will have information as to this amount. You will need to make sure they’re aware of what the maximum single panel run distance is from low side to high side.

One more thing to note is that not every roof system is available with fixed clips and not all systems have high and low clips (although the majority do). That said, educating yourself and researching the panel you’re looking at will give you the information you need to make the determination as to which clip will not only work best, but potentially will work at all. Every panel has its own roof clips, so the roof clips are not interchangeable across all systems. An essential part of selecting a roof panel is verifying that its clip attachment is suitable for your project.

It might not be immediately obvious that you have the wrong clip. For instance, let’s say you ordered an Ultra-Dek®  roof and you ordered an Ultra-Dek®  clip. That sounds straightforward, but did you order the RIGHT Ultra-Dek®  clip for your particular project? The roof may even be able to be installed regardless, but, after installation you may discover it doesn’t perform properly or as intended due to the wrong combination of clips, insulation and substrate. That’s why it is so critical to check with the manufacturer that you have the right clip before you purchase or start putting down the roof.

For more information, reach out to your local sales rep or go to the MBCI Ask An Expert site to confirm the clip you need to make your project a success.

Measuring for a Metal Roof: Considerations and Tips

Getting an accurate measurement for your metal roofing panels may seem like a no-brainer, but it’s not quite as simple as length x width. The many complexities of a roof must be taken into consideration in order to ensure your numbers add up. For instance, anything that intrudes upon a roof plane needs to be included in drawings with labeled measurements as these conditions will all affect the measurement but are sometimes overlooked.

Let’s look at some specific conditions to consider before getting out the measuring tape as well as some handy tips for installers.

Building Conditions to Consider Before Measuring

The type of roof system

Is it going to be a standing seam roof system or an exposed fastener system? Once you’ve decided on your roof type, we recommend reviewing all of the conditions/details on the roof. If it’s a standing seam roof, will the roof system need to float? If so, where will it be pinned, and what direction will it float?

At MBCI, we have published installation technical manuals for installers and erectors to utilize in order to familiarize themselves with how to adjust for ridge conditions or end lap conditions, for instance.

Is it a new or existing metal building?

If it is an existing building, are there new or updated building codes to consider? This could possibly dictate panel type, gauge, or width, or require additional framing members that could impact the final measurements.

What is the purlin spacing?

The panel break at the purlin for an endlap condition will need to be considered.

Are there extensions, overhangs or penetrations?

Include any roof extensions or overhangs that may not be apparent at first glance. Any and all roof conditions should be considered when calculating panel and trim length, including any roof penetrations such as pipes, roof curbs, skylight hatches, etc.

The manufacturer’s details will aid in determining such things as panel hold back at the ridge, or panel overhang at the eave or gutter. Also, roof or slope transitions, and panel hems should be considered.

Insulation

The thickness of the insulation could determine or dictate the fastener type used.

DJI_0091_resized

Measuring Tips

  • Field verify the roof slope. The contractor should gather the field dimensions so measure when the framing is in place. While you can measure off of a set of plans, it’s not a definitive way to do things because things change in the field.
  • The structure should be square while you’re measuring. Scaling from plans may get you close, but measuring erected framing that is plumb and square is the most accurate.
  • You should measure multiple spots.
  • It’s a good idea to use a plan view of the roof or sketch a bird’s eye view to record your measurements.
  • Record your measurements in the units of measure that your manufacturer uses, typically feet and inches, to avoid errors.
  • The erector may elect to add a few inches to the length of the panels at a hip or valley to remedy any cutting mishaps since these panels will be field cut to the hip or valley angle.
  • Some contractors include one or two extra panels at the longest length for any errors or jobsite damage.

Ultimately, the takeaway is that any differential when measuring metal panels for installation could affect a building’s performance, so it’s important to keep all potential scenarios that could affect measurement accuracy in mind—throughout the entire process. To find out more about the proper way to measure a roof for metal buildings or to schedule training, contact your local MBCI representative.

Tips for Selecting and Field Applying Touch-Up Paint

Metal roofing and wall panels routinely come from the factory pre-finished a durable, baked-on paint finish that covers the Galvalume®-coated steel surface. This production occurs in a controlled environment, which helps create a consistent product, and allows metal panels to last decades with minimal maintenance. It turns out, however, that the biggest threat to a metal panel’s paint coating can happen during panel installation. Tools, fasteners and other installation-related items and activities can scratch or damage the finish, requiring touch-ups to the paint. If you experience this, here are some touch-up paint tips to keep in mind.

Assess the Damage

First, determine how noticeable the scratch is. Do you have to be close to see it, or can you see it easily from several feet away? Generally, if the scratch isn’t noticeable and has not penetrated the Galvalume coating, its best to refrain from doing a paint touch-up. This is because touch-up paint can’t match the fade resistance of the original baked-on pre-finish, and if the Galvalume is still intact, it will still protect the steel beneath the scratch.

On dark or bright colors in particular, the touch-up paint will fade much more quickly than the original paint. Often, the end result is that touch-up paint is more noticeable than if the scratch is left alone. On the other hand, if the scratch is noticeable and needs a touch-up, there are some best practices to follow. It’s important to note though, that if a large area of the panel is damaged (more than 10–15%), then it’s best to just replace the panel.

Getting the right touch-up paint

MBCI Metal Panel Touch-Up Paint

Metal panel manufacturers recognize that there may be a need for minor paint touch-ups in the field. So, most offer small containers of paint conducive to field work. These paints are specifically formulated to match standard color offerings, and have properties that make them compatible with the factory finish. Therefore, it’s important to always buy touch-up paint from the manufacturer that produced the original panels. Never ask a paint store to match colors based on a piece of panel or trim. Doing so may get a color match, but it won’t contain the other protective properties of the paint coating you receive from a manufacturer.

Choice of touch-up paint application

Touch-up paint for field application is often available in three types of containers: paint pens, small bottles and spray cans. Usually, the best choice for a scratch is a paint pen. Touch-up paint pens have small, precise tips that can fit into scratches, allowing it to only apply paint where needed. For larger scratches or scuffs, manufacturers offer bottles of paint (with a small brush) similar to those used for nail polish. Generally, these are best for dings on the panel.

Spray cans are also available, and are ideal for painting small accessories like plumbing vent pipes. Don’t use spray cans to conceal a scratch because they apply much more paint than necessary. This can cause unsatisfactory results as the paint weathers and fades differently than the original paint.

Using touch-up paint

When performing a paint touch-up, it’s important to make sure the area in and around the scratch is clean and dry. Wipe down the area as needed, then dry it completely before applying any paint. Afterward, paint the surface using the least amount of paint necessary. This eliminates excess paint on the pre-finished panel. Paint pens are ideal for this since they apply less paint than a nail polish-type bottle or spray can. Once the touch-up paint is on the panel, it will need time to dry. During drying, make sure that dust or other contaminants do not embed into the wet paint.

Consult the metal panel manufacturer

To ensure you or your maintenance professional properly select and apply touch-up paint, be sure to check all warranty and installation requirements and resources with the metal panel manufacturer. They can help ensure you get touch-up paint that matches the paint originally used on your panels and that you take the right steps to ensure warranties remain intact. MBCI offers metal panel touch-up paint for industries and applications including:

For more on metal roof and wall panel finishes, colors and touch-up paint techniques, contact your local MBCI representative.

Cutting Metal Panels Properly On Site

Cutting metal panels on site is an often-necessary part of installing metal roofing and wall panels. However, using the right tools and methods to ensure the panels remain damage-free is vital. Using the wrong tools can result in rust, rust stains, the voiding of warranties and diminished building service life. In this blog post, we’ll share several common field-cutting techniques and best practices that help ensure good results.


Maintaining Longevity When Cutting Metal Panels On Site

When metal panels are made in a manufacturing facility, the tools and methods used to cut the coated metal coil help protect the cut edge from deterioration like corrosion. When cutting metal panels on a jobsite or in the field, protecting any cut edges is just as important. To understand how to field-cut metal panels without sacrificing the quality and protection delivered from the manufacturing facility, you must first understand the what protects the panels. Most often, metal roof and wall panels are fabricated from Galvalume®-coated steel coil because of its proven longevity. Not only does the Galvalume coating protect the surface area of the metal panels, it has also been shown to be effective along the thin edges of the metal too, as long as those edges are cut properly.

During fabrication, the Galvalume metal panels are cut to length either by shearing while flat before entering the roll former, or by means of a profile shear as the panels exit the roll former. Either method tends to “wipe” the Galvalume coating across the cut edge of the metal panels. This provides superior cut-edge protection from corrosion.

Likewise, when panels arrive on site, any needed field cutting should address the same concerns of protecting the edge of the steel from corrosion. Of course, there are ways of doing the field cutting correctly. However, there are also poor strategies that can lead to real problems. The following are examples of common field cutting tools and the best practices for good results.


Common Tools and Methods for Cutting Metal Panels On Site:

Aviation Snips

Red and green aviation snips are a good choice for small cuts on metal panels, such as around pipe penetrations. These snips will wipe the Galvalume® coating in the same way as factory shears, making them a good choice.

Electric Shears

Electric shears are optimal when making lengthier cuts along the steel, such as cutting a wall panel at a corner or at a door opening. These shears take a ¼” strip of metal out of the panel during the cutting process, which tends to leave both sides of the panel smooth and flat along the cut. Like the aviation snips and factory shears, electric shears will wipe the Galvalume coating and protect the edges.

Mechanical Shears

Mechanical shears are an add-on tool that fit onto a battery-operated impact or screw gun. These shears do not take any metal out of the panel and will leave a slightly wavy edge. Mechanical shears are an excellent choice for bevel cutting standing-seam panels at hips and valleys, since they too wipe the Galvalume coating over the cut edges to offer protection.

Nibblers

A nibbler is a great tool for cutting across corrugations in wall panels to create openings for windows, doors and similar structural additions. A good nibbler typically costs $500-$700 (currently), but is well worth it if you often cut corrugated metal panels. The punch and die in the nibbler tends to wipe the Galvalume across the cut edge as it punches out small, half-moon shaped pieces of panel. However, because these little metal pieces will fall away from the cut, it’s important to contain them so no one walks on them. Otherwise, they can embed in the soles of installer’s shoes and create scratches in roof panels when they walk on the roof.

Skill Saw

Skill saws are an ideal tool for cutting metal panels because of their versatility. This tool can cut either across or parallel to corrugations, whether straight or at an angle. When using a skill saw, it is critical to use a saw blade that cuts cool. Otherwise, the Galvalume coating can melt along the cut edge and become ineffective. In particular, do not use an abrasive blade, which will generate heat and damage the coating.

MBCI Blog: Field Cutting Metal Panels On Site
Panels cut with abrasive blades corrode. A cool-cutting blade leaves a smooth edge.


Additionally, its vital to avoid cutting panels on the roof or above other panels. A skill saw blade will throw considerable amounts of steel debris into the air and down onto any panels below. This debris, called swarf, will quickly rust and ultimately cause rust spots in the panels. If enough swarf gathers in one spot, it can rust through the panel.

MBCI Blog: Field-Cutting Metal Panels On Site

Steel swarf, like this collected at the ridge will rust through the panel.


Which Tools Should To Avoid When Cutting Metal Panels On Site:

Tools that should never be used include:

  • Torches
  • Cut-off saws
  • Reciprocating saws
  • Hacksaws
  • Grinders

All of these tools will melt the Galvalume® coating, causing edge rust just like an abrasive blade would. These tools also throw a lot of steel debris (swarf) onto the panels they cut. This debris will be hot and will embed into the panel coating. This can cause rust spots and bigger problems down the road.

In conclusion, using the right tools and following metal panel manufacturer recommendations when cutting metal on site will help ensure that the panels remain damage-free and the final installation will be a fairly seamless process. Using the wrong tools can result in rust, rust stains, and the voiding of warranties. For more on best practices and recommendations for on-site cutting and installation of metal panels contact your local MBCI representative.

Are Metal Panels An Ideal Low-Slope Roofing Material?

Many large, commercial, low-rise buildings often don’t benefit from steeply-sloped roofs the way residences and small commercial buildings might. This is because a steep roof slope would add unwanted height and unnecessary construction cost. Buildings like warehouses, retail stores, etc. are more appropriately built with low-slope roofing, commonly known as “flat roofs”. The National Roofing Contractors Association (NRCA) defines low-slope roofs as those with “a slope at or less than 3:12″. Anything steeper qualifies as a “high-slope roof”. With this in mind, let’s look at some key points to consider when designing and constructing a low-slope roof.

MBCI Low-Slope Roofing

 Low-Slope Roofing Materials

When it comes to selecting low-slope roofing products, there are generally three fundamental choices:

  • Asphalt/ Bituminuous Products: The traditional commercial roofing norm for many years, the use of asphalt/bituminous products has dwindled as newer, more appealing options have emerged.
  • Flexible Membrane Roofing: This roofing material can be made from a variety of types of plastic/polymer-based materials (commonly known as EPDM, TPO, PVC, etc.). Rolls of the chosen membrane are laid out on the roof structure and secured in place either with mechanical fasteners (screws with large washers) or with a continuous layer of adhesive.
  • Metal Roofing: Sometimes overlooked, metal roofing is suitable for different roof slopes. Many metal roofs that use standing-seam systems are rated for use with a pitch as low as ½:12.

When considering which type of roofing material to use for a building project, there are a number of significant differences that illustrate why metal roofing is often the ideal choice.

Engineered For Superior Performance

Standing-seam metal roofing is made specifically for use on low-slope roofs as it meets a number of performance requirements:

  • Water resistance: Precipitation doesn’t penetrate through metal or through the standing seams where the metal panels join together. This is why they can tolerate such low slopes, allowing the water to drain away slowly and predictably without leakage.
  • Rigidity: The rigid nature of metal means that there is less opportunity for ponding (standing water). This is not always the case with asphalt/bituminous or membrane roofing systems.
  • Drainage: Metal roofs carry water to the building’s edge toward gutters and downspouts that carry it away from the building. Other roofing systems rely on drainage piped inside the building. This takes up space and has the potential to leak water inside the building and cause damage.
  • Wind Resistance: Standardized uplift testing shows that metal roofing performs as well or better in extreme weather than mechanically-fastened or fully-adhered membrane systems.
  • Durability: The most cited advantage of metal roofing is its long-term strength and durability. Engineered design and use of high-quality coatings ensures a longer lifespan—50 years or more. In contrast, other roofing types typically feature lifespan ratings of 20 or 30 years.
  • Puncture Resistance: Low-slope metal roofing is more puncture-resistant than asphalt/bituminous or membrane roofing. This makes it better able to tolerate foot traffic, hail and other puncture-inducing hazards.
  • Construction/ Installation Ease: Metal roofing panels are custom-made to suit specific building sizes and end uses. This customization typically means it takes less time to place and install metal roofing in the field. Further, metal panels can tolerate a wide range of temperatures and weather conditions and still install and perform as intended. Low-slope roofs are also safer to walk on with less risk of slips, falls and other hazards.

Cost-Effectiveness

Using metal roofing on low-slope roofing systems can be cost effective in a number of ways:

  • Fewer labor hours as a result of the ease of installation saves money during construction.
  • Competitive material costs, particularly if the metal roofing is part of a total metal building package from a single manufacturer.
  • Minimal maintenance requirements and aversion to rusting, mold growth and decay that save the building owner money over time.

This all adds up to a very favorable life-cycle cost.

The performance, cost-effectiveness and life-cycle benefits of metal roofing panels make them a viable option for low-slope roofing systems. Manufacturers like MBCI can help you select the right metal roofing products and provide information and resources to help ensure proper installation.

View examples of low-slope metal roofing projects and contact your local MBCI representative to start your project today.

Metal Roof Seaming: Best Practices for Ensuring Weathertight Seams

It would seem logical that the most important field installation process for a standing-seam metal roof is the actual process of creating the weathertight seams that connect the metal panels together and ensures the structural integrity of the roof. Perhaps for many different reasons, however, this critical seaming process is not always given the proper attention it deserves, nor are installers given the proper training required to ensure installation runs smoothly. This approach can cause some serious issues, not the least of which is the voiding of a manufacturers warranty or the discovery of roof leaks and the resulting damage.

To help, here are some best practices for readily and successfully carrying out the metal roofing seaming process:

MBCI Blog Image_Seaming_062019_00_in post_reduced

Personnel

Because of the critical nature of seaming metal roofs, the crew members doing this work should be properly trained. Team members who will be performing this work should not perform the seaming without having participated in the appropriate installation training required to ensure the seaming process is appropriately managed. Most roofing manufacturers offer installation training that many installers take advantage of—and this training opportunity should be taken advantage of by the staff who will be doing the seaming.

Seaming Equipment

It is very important that the seaming equipment being used is matched to the specific roof panel system being installed. Manufacturers routinely rent out this equipment in order to be sure that the metal panel profiles are installed properly and are not compromised through the use of generic equipment or that of another manufacturer. Using the wrong equipment can end up being costly for everyone if panels and seams are ruined in the process.

 Hand Crimper

As metal panels are set in place, they are often secured with metal clips, spaced according to engineering and construction needs. Hand crimpers are used to form the seams around the clips as well as any end laps. This process must not be overlooked as improper hand tooling is the number one cause of faulty seaming. To ensure costly mistakes aren’t made, follow the process described in the “Field Seaming Tool Manual”. This manual should be provided with the equipment and reviewed in training.

Electrical Sources

The next step will involve the use of an electric seamer which obviously needs a source of electricity to operate. However, not just any electrical power source will do. Almost all professional seamers have an AC/DC motor that will require 10 or 15 amps and 120 volts. A dedicated electrical circuit—preferably from a temporary electrical pole or an existing building electrical panel—is the best and most reliable way to go. A generator with 15 amp capacity dedicated to be used only for the seamer (in order to avoid power surging) may be acceptable as well. In either case, the power line to the seamer needs to be 10-gauge (minimum) cord. It should also be no more than 200 feet long (to avoid power drop).

Electrical power sources that are NOT acceptable include outlets from a powered man lift or a generator that is not dedicated to only the seamer. (This includes a generator that is part of a welding machine.) Check the manufacturer’s requirements for any other restrictions that can damage the seamer. Skipping this step can place the responsibility for repair or replacement onto the installer.

Electric Seamer

Once all panels are in place, the hand crimping is done and the power source is set. Then, electric seaming takes care of finishing the roofing system. Again, consult the seamer manual for proper procedures, including which direction the seaming should be done. (Seaming can either be done up or down the roof depending on direction of roof installation.) The electric seamer includes a switch for the operator to control the starting and stopping of the process.

On low-slope roofs, the operator should walk alongside the seamer to be sure nothing is in its path and that the seam is done properly. While stopping and re-starting is fine, the seamer should never be removed in the middle of a seam. Doing this makes it very difficult to set it back in exactly the same spot again. If something appears to be wrong with the seamer or the seams being produced, then don’t keep using it. There is no point in damaging multiple roof panels if any one panel indicates that things aren’t going right. In this case, contact the manufacturer right away for assistance or replacement of the seamer.

Safety

Electrical seamers are heavy and—if not used and secured properly—can cause harm or injury. Therefore, they should always be tied off with a safety line—the same type used for workers—not a common rope and definitely not the electrical cord. The safety line should be properly secured to the seamer and then attached to something rigid on the building. Never attach this to a person who could be pulled off of a roof by it.

Cleaning

Before use each day, check the electric seamer and remove any oils, debris or dirt. Make sure the seamer is unplugged from the electrical power source before you begin cleaning. Also, check the grease level in the machine daily and only add a little bit  (2-3 pumps from a grease gun) as needed. Too much will cause the grease to leak out onto the roofing.

Following these pointers should help assure the safe and efficient use of the right seaming equipment when installing roofing panels. To find out more about proper seaming or to schedule training, contact your local MBCI representative.

Choosing Metal Roofing Types

All metal roofing is not the same. There are different profiles in different shapes for different reasons and to suit different performance needs. How to choose? Here’s the process that metal building engineers go through at MBCI to zero in on the most economical selection that will still meet the performance requirements of a particular metal roof project.

Snap Together Trapezoidal Panels

Offered by MBCI under the name Ultra-Dek®, the trapezoidal shape is among the best for channeling water off of the roof. However, because of this shape, it is most appropriate for typical sloped roofs with single plane roofs areas free of valleys or hips. It’s snap together installation makes it quick and easy to install economically with wind resistance capabilities adequate for many situations. It also carries basic air leakage and water penetration testing approvals.

Mechanically Seamed Trapezoidal Panels

For roofs that require a higher degree of performance than snap together systems can provide, MBCI Double-Lok® panels can be considered. The mechanically field-seamed, trapezoidal legs provide higher wind and water resistance with test results to satisfy UL-90, FM ratings, and Miami Dade County approvals. This makes them ideal for many industrial, commercial, and architectural roofs without hips and valleys that are subject to higher wind and rain demands. While the material cost for the panel is the same as for the Ultra-Dek®, there is more labor cost due to the mechanical field-seaming compared to the snap together installation. The Double-Lok® panel is also used often for retrofit installations over pre-existing metal roofs either to update the roof or to provide additional insulation. In either case, there is no need to disrupt the existing roofing or structure below allowing for a very cost-effective solution. Check with MBCI on the details of how to properly do a retrofit with these panels though to be sure things work out as intended.

Vertical Legs with Mechanical Seams

BattenLok
Regardless of which metal roofing type you choose, they all use high grade steel in standard gauge thicknesses and can be specified in many colors.

In cases where the trapezoidal legs aren’t appropriate or desired, then vertical leg, standing seam metal panels are the next logical choice. The MBCI BattenLok® HS system uses 2” tall legs that are mechanically field-seamed once along each panel joint to create a high strength, structural standing seam roof system that can be installed directly over purlins or bar joists – no additional solid substrate is required. It is also capable of transitioning from roof to fascia with the use of accessory seam covers.

Double Seamed Vertical Legs

In cases where very rigorous weather conditions may be encountered, the MBCI SuperLok® roof panels provide the highest degree of roof performance. While the manufactured SuperLok® roof panel is essentially the same as the single seamed BattenLok® panel, the profile is modified slightly to allow for standing seams to be rolled over twice, thus creating a stronger, thicker seal between adjacent panels. Once again, there is no difference in the material cost between the two, but the added field-seaming step will obviously add to the labor cost of this roof choice. Nonetheless, that can be a small price to pay for the higher performance and added peace of mind that the system offers.

While we have pointed out the differences between these four different metal roofing choices, note that there are some basic similarities too. They all use high grade steel in standard gauge thicknesses and they can all be specified in the same wide choice of colors. They are all offered in multiple panel widths, although check with the manufacturer to be sure the width you prefer is available for the specific panel selected. They all can be used for low slope applications down to ¼” per foot except for the retrofit solution which requires a 3:12 pitch. Finally, they all do have some minor variations in the profile which can help with the final desired appearance of the finished roof on the building.

To find out more about the differences in roof deck types and how to choose the best ones for on a metal roof that you are involved with, contact your local MBCI representative, and sign up for our newsletter to subscribe to our blog.


Appropriate Standing Seam Clips for Roof Panels

Part of the beauty and appeal of standing seam metal roofs is that the fasteners holding the metal panels in place are concealed. That gives the roof its clean, continuous appearance that is often desirable, but it also avoids the issue of potential roof leaks around exposed through-fasteners. Concealed fastening doesn’t mean that there aren’t any fasteners, though, it just means they are installed out of sight – underneath the panels. The industry standard approach is to use a metal clip that fits over the edge of a panel and that is secured with a screw type fastener to the structure or substrate below. Then it is covered by an adjacent panel or trim. The important thing to know is that not all panel clips are made the same – for good reasons.

What determines the type of panel clip to use? Here are the most common things to keep in mind:

The Manufacturer

Each manufacturer of metal roofing typically has a range of metal panel types, profiles, and brands that have their own traits and characteristics. As such, they need clips to match and fit with the manufactured panels. Hence, the first place to start with panel clip selection, is for the roofing manufacturer to be clear on the options and choices available that are compatible with their roofing products.

Building Size and Type

Fixed clips (left) and floating clips (right) are two of the most commonly used types of clips.
Fixed clips (left) and floating clips (right) are two commonly used types of clips.

Manufactured metal buildings that include metal roofing commonly use very predictable, coordinated systems. Accordingly, a standard, one piece, “utility clip” is commonly used, primarily for snap together roof panels, on metal buildings that do not exceed certain widths causing undue expansion and contraction. One piece clips allow the roofing panels to expand and contract within the clip profile, but there are limits based on the amount of movement tolerated. Alternatively, in projects where the roofing is attached to something other than a metal building frame or where standing seams are used to secure the panels together, it is advisable to use a two-piece or “floating” clip. In these cases, a base piece is secured to the structure or substrate and the clip fits both into the base and over the roofing panel where it is seamed or folded into the vertical leg of the panel. Using this approach, the clip expands and contracts directly with the metal panel thus moving across the base and keeping the roofing attached.

Insulation

Roof insulation comes in different thicknesses, appropriately so for different climate zones and different roof designs. Since energy codes require at least some of the insulation to fit between the underside of the metal roofing panel and the structure (i.e. above the metal roofing purlins), the metal panel clip needs to be the right height to reach the full height of the insulation up to the top of the roof panel. Hence, manufacturers offer different sizes and heights of panel clips designed to work with different heights of insulation. In many cases, they also recommend the use of a thermal spacer underneath the clip to separate it thermally from the steel structure below. Note that the thermal spacer thickness is dependent on the insulation thickness over the steel purlin only, not the thickness of any insulation under the purlin.

A certified installer should install your standing seam roof to ensure proper installation of clips.

Other Factors

The panel clips connect the roof panels to the roof structure, so they need to be installed in a manner that allows them to do that job under normal and demanding circumstances. The driving issue in this case is not keeping the panel down, but preventing it from blowing off in a strong wind. Therefore, a structural engineer or other design professional may need to determine the proper spacing of the clips, the type and size of fasteners (i.e. screws) to use, or similar important details. Similarly, the proper installation of clips so that they seat and nest the way they are intended, means that qualified and certified installers / erectors should be used. In this way, roofing crews with the needed experience and training can help assure that the whole roofing system, including the panel clips, are installed properly.

To find out more about the most appropriate panel clips to use on a metal roof that you are involved with, contact your local MBCI representative.

Built to Move: Building for Expansion and Contraction with Standing Seam Roofs

Standing seam roof (SSR) systems are built to move, designed to account for necessary—and often substantial—expansion and contraction due to thermal conditions. In fact, for many builders, this fact is one of the main reasons SSRs are such an attractive option.

Even with this expectation baked into the mix, many contractors and installers may still make a wrong turn when tying the SSR into adjacent structures and other building edge conditions. By not allowing for that same expansion and contraction on trims and transitions, problems can ensue.

Fixed and Floating Clips

One main consideration in planning for this movement is the clip type used. Standing seam metal panel clips are designed specifically to interact with their corresponding roof panels in order to allow movement (both interior and exterior) caused by thermal changes. The clips, which are part of the concealed fastening system used with SSRs, provide improved aesthetics in addition to durability and protection from the elements.

Fixed Clip (left) Floating / Sliding Clip (right)

The two main options are fixed clips (one-piece) and floating/sliding clips (two-piece). Fixed clips are limited by and dependent on the substrate’s ability to expand and contract with the roof system, whereas floating/sliding clips permit the panels to expand and contract within the clip itself. These clips will allow for greater thermal movement of the panel, which is independent of the substrate while still ensuring the panel remains secured. Regardless of which clip is utilized, you are not going to stop the expansion and contraction. You can, however, have some control of the direction of movement, and, therefore, can address or compensate for the degree of this movement when tied into adjacent structures.

While standing seam roofs are designed for movement, correctly tying it to the rest of the structure is crucial.

Standing seam roofs with floating/sliding clips require one end of the panel run to be “pinned” and the other end to be “moveable” in order to permit expansion and contraction. The “pinned” point of the system is typically the low eave, although it doesn’t have to be. There will be instances when it becomes beneficial to “pin” the roof at the complicated transition or tie-in point and design the roof system to expand/contract outward from this location. This can eliminate potentially “troublesome” areas from the equation on having to deal with the roof movement, and in turn can make them easier to install and have greater weathertightness success.

With all this in mind, it is important to always check with the manufacturer to determine the best clip and design layout to use with any given SSR system and be aware of how much and in what direction the expansion and contraction is going to occur.

Tying In

Not only does the building move, but anything it ties into has to be able to permit that movement, e.g., the edges or perimeter of the buildings. Manufacturers can provide both longitudinal and transverse transitions that allow for thermal movement so that when they tie into an adjacent structure it doesn’t restrict the panel from moving. Not adequately compensating for or preventing that movement entirely can lead to potential pitfalls, such as oil canning. It could also lead to fasteners backing out and slotting of holes. Bottom line, any time that we try to confine or restrict the roof from doing what it was meant to do (move!), we inevitably run the risk of damaging the panel not just aesthetically but more importantly, from a weathertightness standpoint.

Slip joint being used for transverse tie-in between adjacent roof surfaces.

The Role of Expansion

Issues can arise not just when tying panels into adjacent structures. Because of the roof’s size and magnitude of potential movement,  you may/will have to implement expansion/contraction capability of various degrees into the perimeter of the roofing system itself. In these cases, this is why manufacturers offer roof accessories as ridge expansions, edge trim expansions, panel expansions, gutter expansions and other details to account for not only the roof movement but the perimeter trims that are secured from the roof system to the wall system.

Parallel Roof Transition (left) and Perpendicular Roof Transition (right)

Know Your Details

The key takeaway here is to remember that if you’re considering a standing seam roof for a project, then you need to make sure that the designer looks at every detail from the manufacturer and accounts for movement of the roof panel, such as how it ties into adjacent structures or simply how the edge or perimeter of the building is terminating to make sure they permit that expansion and contraction. Know what you’re buying and understand that if the roof you’re purchasing is meant to expand and contract, everything that ties into it has to be able to expand and contract as well.

To find out more about how to correctly install your standing seam roof, contact your local MBCI representative.

Find a sales representative