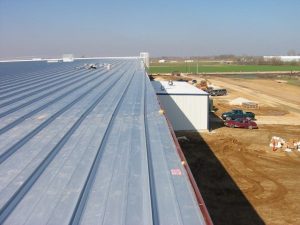
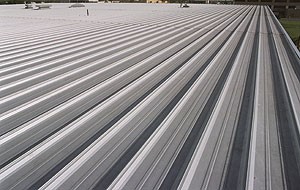
When installing metal roof panels, the sign of a successful installation can be seen in the way the spacing and alignment of the panels are held across the entire roof. Improperly done, the appearance suffers from standing seam lines that are wavy or non-parallel to roof edges. Even worse, the panels can be unduly stressed, causing the potential for failure of water protection. Installed properly, by being diligent about spacing and holding the modular layout to be square to the building, the results are clean, straight lines that allow proper performance of the roofing system.
Here are some basic tips for installing metal roofing panels that help ensure that the module is used as an advantage for first-class work.
Check the Building
Before starting the roofing installation, examine the steel structure and anything else that the roofing panels attach to or are impacted by. Is the steel out of square? Are the purlins properly aligned or are they bowed? Is the plane of the substructure within the tolerance of the manufacturer’s requirements? Discovering any irregular conditions in the building will require some adjustment to determine how to assure that the roofing can be installed properly and then remedy prior to starting.
Establish a Reference Line
The best way to ensure that the panels stay aligned as they are installed is to establish a fixed reference line along the rake edge of the building that is square to the building eave. Then, all measurements for spacing should be made from this reference edge line. A string line can be installed from the eave to ridge running parallel to the rake. The string line should stay ahead of the work and measure from the string back to each panel run. The string line is moved ahead as the roof installation progresses.
Improperly installed roof panels that do not maintain proper module alignment not only look bad but will result in a roof system not being able to function as intended for expansion and contraction as well as weathertightness.
Checking Panel Alignment
The alignment of the roof panels can be checked every run, but at a minimum, it must be checked every three or four runs. Measure from the rake support to the seam of the last completed panel run at the eave, endlap and ridge.
Holding Panel Modularity
Here are a few basic techniques as the work progresses:
For better clip alignment, the installer can pre-drill purlins at endlaps and ridge locations. The hole should be located at the leading edge of the clip so that an awl or punch can be inserted into the hole to align the clip and adjust accordingly.
In order to be sure the panel shape is held, use wood or other substrate to create blocking that can be inserted between the panel ribs and used in conjunction with checking the module and alignment of the panels as they are installed.
Keep as much weight as possible off of the panel while installing clips. Not only is it unsafe, but it can shrink width of the panel.
Use the correct combination of clips, insulation thickness and thermal spacers to maintain a level panel installation and prevent gaining or losing module size. See the manufacturers recommendations for each of these components based on the roof insulation system being utilized.
Use alignment straps purchased from the roofing manufacturer and install them on top of the purlins before insulation. These are factory stamped to receive the roof system clips based on their panel module.
A properly installed system is apparent in the consistent alignment of the roof panels with the building and will perform as designed more many years of weathertightness.
Adjusting Panel Width
In order to maintain the modularity of a well-installed roof, the width of the panels may need some slight adjustments. Some roof systems can be adjusted by bending the sides of the backup plates slightly to make the panel connection at then endlaps and ridges either wider or narrower, but no more than ¼” per side. Other roof systems may be adjusted with the panel clips themselves. To stretch the panel width, install the clip at the endlap or ridge with the base angled away from the panel. To shrink panel coverage, install the clip at the endlap or ridge with the base angled toward the panel.
By following some of these simple techniques and paying attention to the reference lines for the roof, any deviations and corrections can be identified right away rather than discovering the problem later and requiring rework. Overall, these tips should result in a roof that is better-looking, faster to install, and more weathertight.